9. Lighting Part 2: Specular Highlights and Point Lights
In chapter 4 we lit a flat triangle with ambient light and a directional light.
A flat triangle has one normal, so the whole thing got one brightness, and you could hardly tell that any lighting was going on.
Lighting only becomes interesting on a curved surface, where every pixel faces a slightly different way.
So in this chapter we go back to the playground from chapter 5 and draw a sphere without a single triangle: the fragment shader works out, for every pixel, where on the sphere it is and which way the surface faces there.
Then we add the two things that make a lit object look like an object and not a cut-out:
- Specular highlights: the small bright spot on shiny things, first with the Phong model and then with Blinn-Phong, the version almost everyone uses.
- Point lights: a light with a position, like a light bulb, whose direction changes from pixel to pixel and whose brightness falls off with distance.
At the end the light circles around the sphere or follows the mouse.
We only change shader/playground.glsl.
Keep the tester running and press R after every edit.
9.1 A sphere without triangles
9.1.1 Finding the surface
We start with the centred coordinate from chapter 5, where y goes from −1 to 1 and one unit is the same length in x and y:
vec2 p = (2.0 * gl_FragCoord.xy - uResolution) / uResolution.y;
Now imagine a sphere with radius around the origin, and imagine that we look at it straight along the −z axis, from very far away.
Every pixel inside the circle sees exactly one point of the front half of the sphere.
Its x and y are the pixel's x and y, and we only have to find z.
Every point on a sphere around the origin has distance from the centre (linear algebra chapter 3):
We take the positive root because that is the half facing us (+z points towards the viewer).
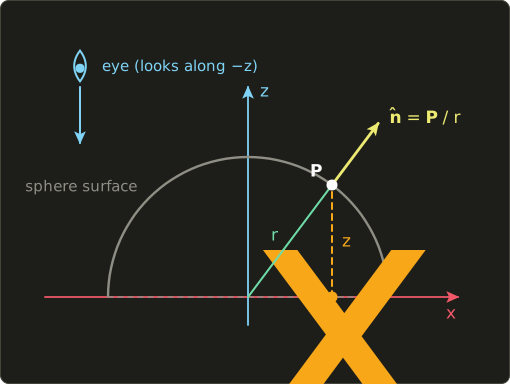
The normal of a sphere is the easiest normal there is: it points straight away from the centre.
The vector from the centre to the point is , and its length is , so dividing by normalizes it:
A quick check with numbers: and the pixel .
, so .
The normal is , and indeed .
We will use this pixel again for the worked examples below.
This trick, drawing something flat that pretends to be a 3D object by computing its surface per pixel, is called an impostor.
Games use it for distant trees, particles and molecule viewers, where thousands of perfect spheres are drawn as flat squares.
9.1.2 Showing the normals
Replace main in playground.glsl with this (the uniforms at the top stay as they are):
const float RADIUS = 0.8; // sphere radius

void main() {
  // origin in the center, y from -1 to 1 (chapter 5)
  vec2 p = (2.0 * gl_FragCoord.xy - uResolution) / uResolution.y;
  float px = 2.0 / uResolution.y; // size of one pixel

  // point on the sphere and its normal (z = 0 outside the sphere)
  float z = sqrt(max(RADIUS * RADIUS - dot(p, p), 0.0));
  vec3 pos = vec3(p, z);
  vec3 n = pos / RADIUS;

  vec3 sphere = n * 0.5 + 0.5; // normal (-1..1) to color (0..1)
  vec3 background = vec3(0.1);

  // smooth the edge of the sphere over one pixel (chapter 6)
  float mask = 1.0 - smoothstep(RADIUS - px, RADIUS, length(p));
  out_color = vec4(mix(background, sphere, mask), 1.0);
}
dot(p, p) is , the squared length, without the square root that length would compute.
Outside the circle is negative, and sqrt of a negative number is undefined in GLSL (it may give NaN, 0 or anything else, depending on the GPU).
The max(..., 0.0) keeps the value valid everywhere; those pixels are thrown away by the mask anyway.
We compute the sphere for every pixel and then blend it in with the anti-aliased mask from chapter 6, instead of using an if, so the edge is smooth.
The colour is the debugging trick from chapter 5: a normal has components from −1 to 1, so n * 0.5 + 0.5 maps it to 0 to 1 and we can see it.
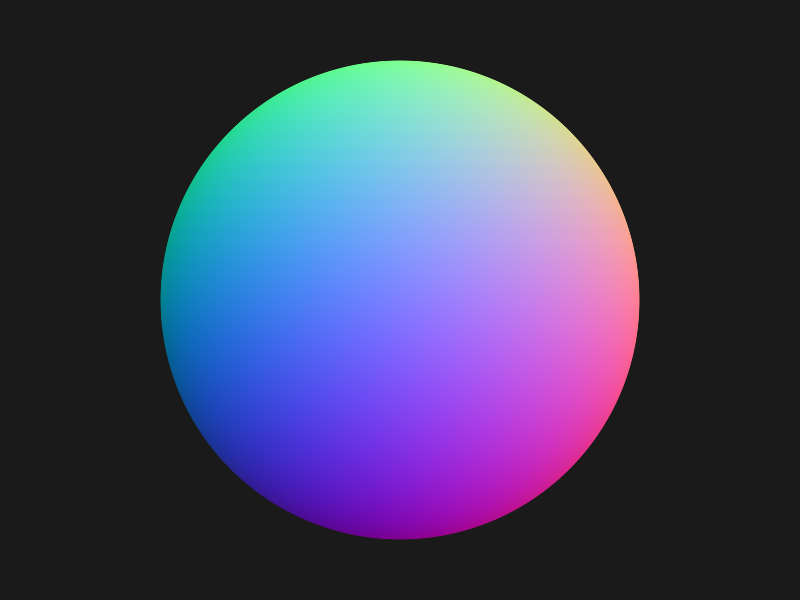
The right edge is reddish (x = 1), the top is greenish (y = 1), the middle is blue-violet because the normal there is (0, 0, 1), which becomes (0.5, 0.5, 1).
This is exactly how normal maps look, and we will meet them again in chapter 12.
9.1.3 One space for everything
Lighting needs several vectors: the normal, the direction to the light, the direction to the eye.
The one rule that is never allowed to break is that all of them must be in the same coordinate space.
In a full 3D program they are usually in world space or view space (linear algebra chapter 11), and chapter 13 sets that up properly.
Here everything lives in one simple space that is really the view space of a camera: x to the right, y up, z towards the viewer, the screen centre at the origin, and the camera looking down −z.
Because we look along parallel lines (an orthographic view), the direction from any surface point to the eye is the same everywhere:
With a perspective camera would be normalize(cameraPos - pos) and change from pixel to pixel; we will do that in chapters 13 and 14.
9.2 Diffuse light: the Lambert recap
In chapter 4 and in linear algebra chapter 4 we saw that a matte surface receives light in proportion to the cosine of the angle between its normal and the direction towards the light.
For unit vectors that cosine is a dot product:
Remember the direction convention: in this series always points from the surface towards the light.
If you store "the direction in which the light travels" instead, you need a minus sign, exactly as in chapter 4.
Now we have a real normal per pixel, so let's use it:
const float RADIUS = 0.8;                 // sphere radius
const vec3 ALBEDO = vec3(0.8, 0.2, 0.3);  // surface color (same as chapter 4)
const vec3 LIGHT_COLOR = vec3(1.0);       // light color
const float AMBIENT = 0.1;                // ambient strength

void main() {
  vec2 p = (2.0 * gl_FragCoord.xy - uResolution) / uResolution.y;
  float px = 2.0 / uResolution.y;

  float z = sqrt(max(RADIUS * RADIUS - dot(p, p), 0.0));
  vec3 pos = vec3(p, z);
  vec3 n = pos / RADIUS;

  // directional light: from the surface towards the light (top left, front)
  vec3 l = normalize(vec3(-0.5, 0.6, 0.6));
  float diffuse = max(dot(n, l), 0.0);

  vec3 sphere = ALBEDO * AMBIENT + ALBEDO * LIGHT_COLOR * diffuse;
  vec3 background = vec3(0.1);

  float mask = 1.0 - smoothstep(RADIUS - px, RADIUS, length(p));
  out_color = vec4(mix(background, sphere, mask), 1.0);
}
Albedo is the word for the colour of the surface itself, how much of each colour channel it reflects.
Multiplying two colours component by component (ALBEDO * LIGHT_COLOR) is how light and surface interact: a red surface under white light reflects red; under pure blue light it would be black.
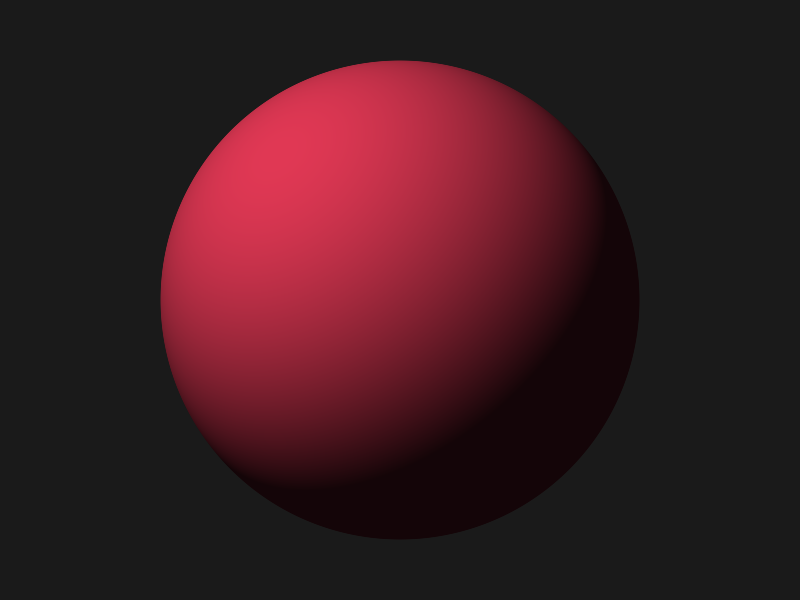
It already looks round.
But it looks like a ball of clay or chalk: nothing on it shines.
9.3 Specular highlights: the Phong model
9.3.1 The idea
A shiny surface acts a little bit like a mirror.
A perfect mirror reflects the light into exactly one direction, and you only see the light if your eye is exactly in that direction.
A shiny but not perfectly smooth surface (plastic, a polished apple, wet skin) spreads the reflection into a small cone around that direction.
The result is a bright spot, a highlight, where the mirror direction points close to the eye.
In 1975 Bui Tuong Phong described a simple model for this.
Mirror the direction towards the light about the normal to get the reflected direction , then measure how close is to the direction to the eye with a dot product, and make the spot small by raising it to a power:
The exponent is the shininess.
A number between 0 and 1 raised to a big power falls off very quickly: , but .
So a big means only directions very close to the mirror direction are bright: a small, sharp highlight.
9.3.2 The reflected vector
Reflection is the formula from linear algebra chapter 4: for an incoming direction and a unit normal ,
GLSL has it built in as reflect(I, N).
Its first argument is the incident direction, the direction the light travels: towards the surface.
Our points away from the surface, so we have to flip it: reflect(-l, n).
Forgetting that minus sign is the classic bug here; the highlight then appears on the wrong side of the sphere (or not at all).
Written out, .
9.3.3 A worked example
Take the pixel from 9.1.1 with , a light from (up and in front), and the eye .
(Check: , a mirror doesn't change lengths.)
With the highlight is , with it is .
The diffuse term of the same pixel is 0.928, almost full brightness, but at shininess 32 this pixel is already outside the highlight.
9.3.4 In the shader
Add two constants and the specular term:
const float SHININESS = 32.0;             // shininess (bigger = smaller, sharper highlight)
const float SPECULAR = 0.5;               // specular strength
  vec3 l = normalize(vec3(-0.5, 0.6, 0.6));
  float diffuse = max(dot(n, l), 0.0);

  // Phong specular
  vec3 v = vec3(0.0, 0.0, 1.0); // direction from the surface to the eye
  vec3 r = reflect(-l, n);      // direction the reflected light travels
  float specular = pow(max(dot(r, v), 0.0), SHININESS);

  vec3 sphere = ALBEDO * AMBIENT
              + ALBEDO * LIGHT_COLOR * diffuse
              + LIGHT_COLOR * SPECULAR * specular;
pow(x, y) computes .
The GLSL specification leaves it undefined for , and for with , so the max(..., 0.0) in front of it is not optional.
Notice that the specular term is not multiplied by the albedo.
For non-metals (plastic, paint, skin, wood) the highlight is a reflection of the light itself, so it has the colour of the light, not of the surface.
Metals are different: their reflection is tinted (gold reflects yellow), and they have almost no diffuse light at all (challenge 3).
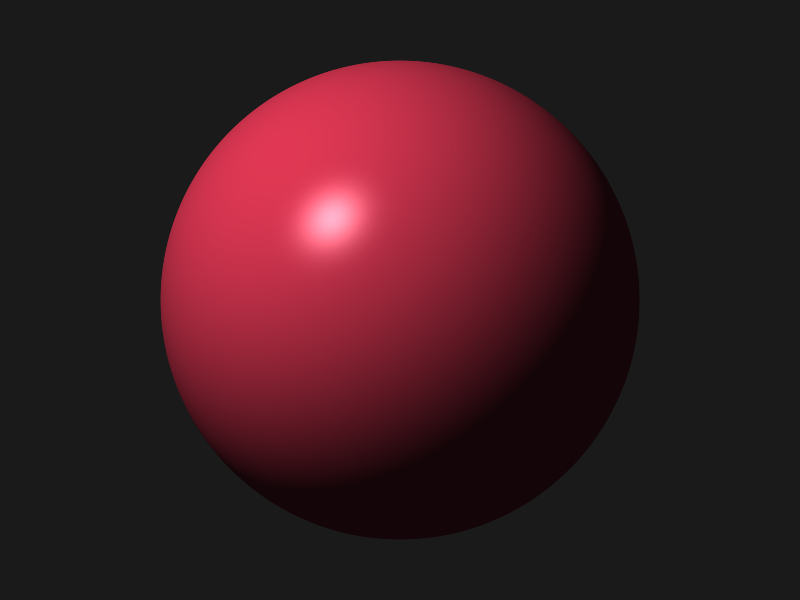
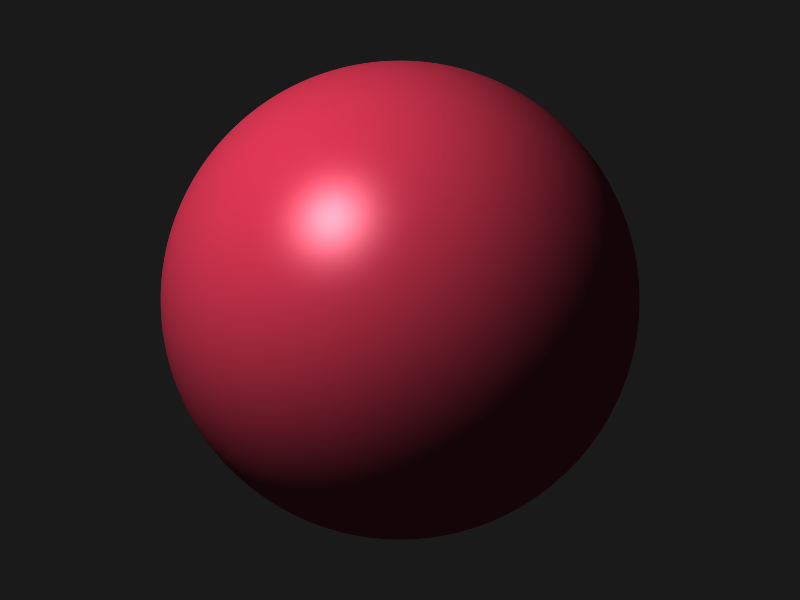
Suddenly it is a shiny ball.
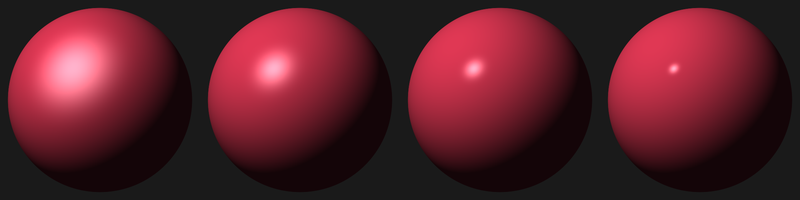
Here is the same sphere with shininess 4, 16, 64 and 256:
9.4 Blinn-Phong: the half vector
9.4.1 The idea
In 1977 Jim Blinn proposed a small change that turned out to be better in almost every way.
Instead of reflecting the light and comparing with the eye, he asked: which normal would reflect the light exactly into the eye?
That normal points exactly halfway between and , and we call it the half vector:
Adding two unit vectors gives a vector along the diagonal of the rhombus they span, so it points exactly in the middle; normalizing makes it a unit vector again.
If the real normal is close to , the surface is "almost a mirror between light and eye" and the highlight is bright.
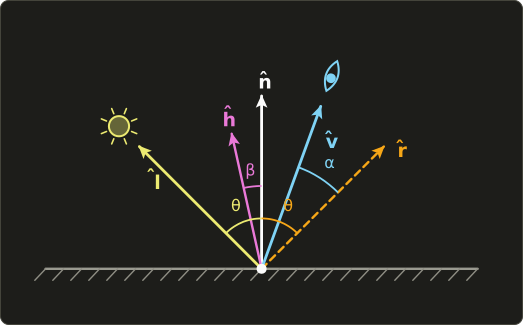
When all four vectors lie in one plane, as in the picture, the angle between and is exactly twice the angle between and .
(In the picture is at 135°, at 70°, so is at 45°, at 102.5°: and .)
Because the angle is smaller, the same shininess gives a bigger highlight with Blinn-Phong.
As a rule of thumb, Blinn-Phong with shininess looks about like Phong with shininess : at , and .
9.4.2 The same worked example
Same pixel, same light, same eye:
With : , with : .
Phong gave 0.048 at ; Blinn-Phong needs about four times the exponent for the same value.
(The angles here are 46.8° for Phong and 24.4° for Blinn-Phong; not exactly 2 to 1, because the four vectors are not in one plane.)
9.4.3 In the shader
Two lines change:
  // Blinn-Phong specular
  vec3 v = vec3(0.0, 0.0, 1.0); // direction from the surface to the eye
  vec3 h = normalize(l + v);    // half vector
  float specular = pow(max(dot(n, h), 0.0), SHININESS);
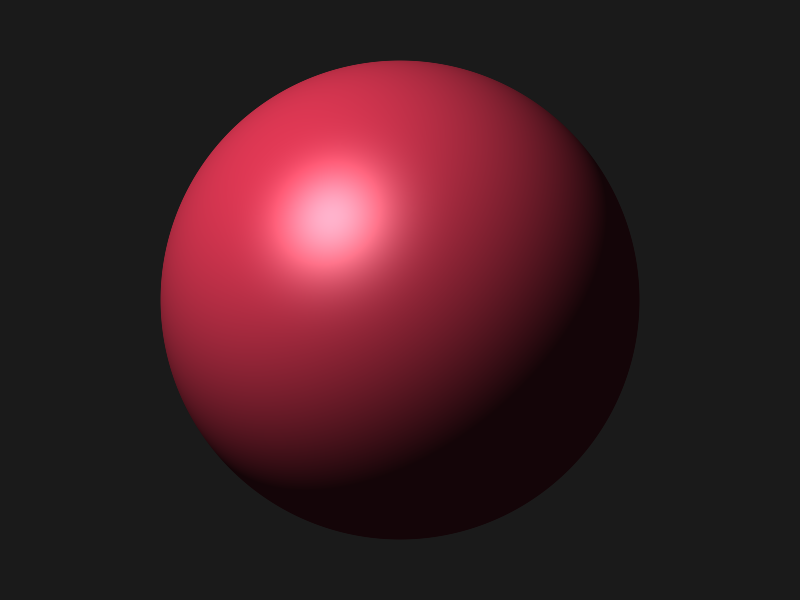
To see the difference directly, here is one sphere where the left half uses Phong and the right half Blinn-Phong, both with shininess 32 and the light at from the worked example (p.x < 0.0 ? phong : blinn picks one per pixel):
9.4.4 Why Blinn-Phong won
- Cheaper with directional lights. With a directional light and our constant view direction, is the same for every pixel and could even be computed once on the CPU.
reflecthas to run for every pixel. - No cut-off. When the angle between and goes beyond 90°, becomes negative and Phong's highlight is clamped to zero, with a visible edge at low shininess. stays positive in much more of that range.
- Closer to reality. Measured highlights on real surfaces get stretched when you look at them at a flat angle (think of the long streak of the sun on a wet road). Blinn-Phong produces that stretching, Phong keeps the highlight round.
- It survives into modern rendering. The physically based models that engines use today describe a surface as many tiny mirrors, and ask how many of them face along . The half vector is at the heart of all of them.
OpenGL's old fixed-function pipeline (before shaders) used Blinn-Phong too, and by default it even assumed the same eye direction that we use.
9.4.5 Light from behind
Blinn-Phong has one trap.
When the light is behind the surface, and the diffuse light is zero, but can still be positive, especially when the light grazes the surface.
Then a highlight appears on the dark side, which no real object does.
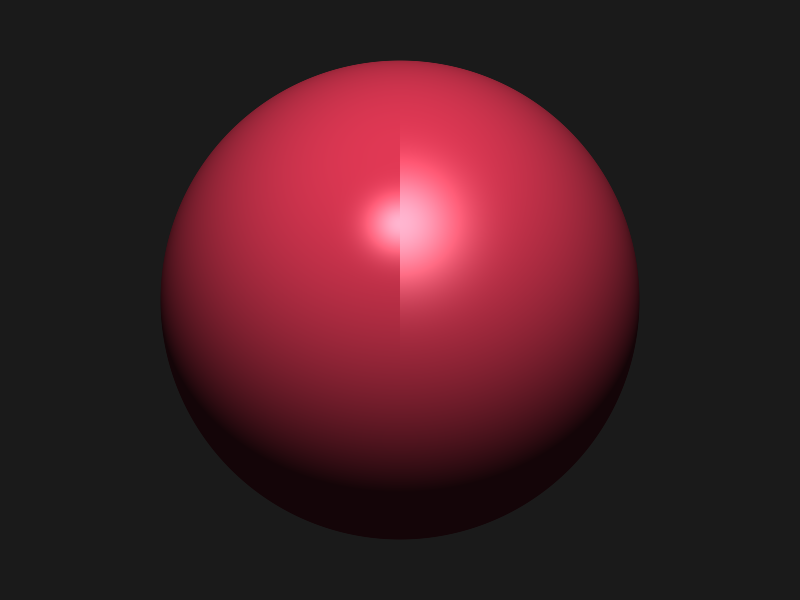
Here the light comes from above and behind, , with a low shininess of 2 so the problem is easy to see (left half Phong, right half Blinn-Phong):
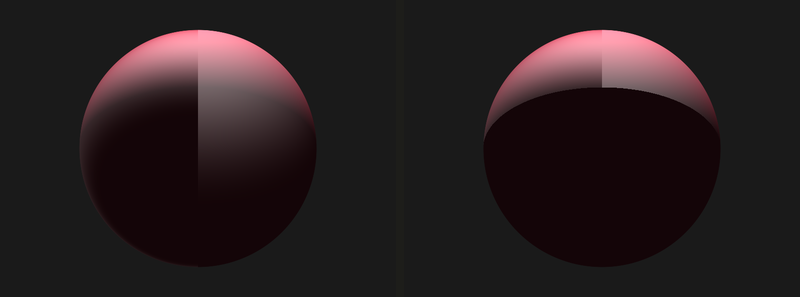
The fix is to compute the highlight only when the surface faces the light at all, if (diffuse > 0.0).
At such a low shininess you can now see a hard edge where the highlight is cut; with realistic shininess values that edge falls where the highlight is already very weak.
9.5 Ambient, diffuse and specular together
Time to tidy up.
We put the per-light work into a function, because in a moment the light will move, and in chapter 10 there will be several of them:
const float RADIUS = 0.8;                 // sphere radius
const vec3 ALBEDO = vec3(0.8, 0.2, 0.3);  // surface color (same as chapter 4)
const vec3 LIGHT_COLOR = vec3(1.0);       // light color
const float AMBIENT = 0.1;                // ambient strength
const float SHININESS = 64.0;             // shininess (bigger = smaller, sharper highlight)
const float SPECULAR = 0.5;               // specular strength

// diffuse and specular light from one light (Blinn-Phong)
//   n: normal, v: towards the eye, l: towards the light (all unit vectors)
vec3 blinnPhong(vec3 n, vec3 v, vec3 l, vec3 lightColor) {
  float diffuse = max(dot(n, l), 0.0);
  float specular = 0.0;
  if (diffuse > 0.0) {
    vec3 h = normalize(l + v);
    specular = pow(max(dot(n, h), 0.0), SHININESS);
  }
  return (ALBEDO * diffuse + SPECULAR * specular) * lightColor;
}

void main() {
  vec2 p = (2.0 * gl_FragCoord.xy - uResolution) / uResolution.y;
  float px = 2.0 / uResolution.y;

  float z = sqrt(max(RADIUS * RADIUS - dot(p, p), 0.0));
  vec3 pos = vec3(p, z);
  vec3 n = pos / RADIUS;
  vec3 v = vec3(0.0, 0.0, 1.0);
  vec3 l = normalize(vec3(-0.5, 0.6, 0.6));

  vec3 ambient = ALBEDO * AMBIENT;
  vec3 sphere = ambient + blinnPhong(n, v, l, LIGHT_COLOR);
  vec3 background = vec3(0.1);

  float mask = 1.0 - smoothstep(RADIUS - px, RADIUS, length(p));
  out_color = vec4(mix(background, sphere, mask), 1.0);
}
The whole model in one formula, with albedo , light colour , ambient strength and specular strength (all colour products are component-wise):
These three parts are what people mean by the "ADS" model (ambient, diffuse, specular).
Here are the three terms on their own, and their sum:
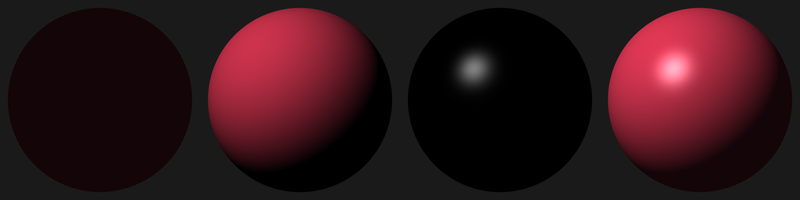
Each term fixes a weakness of the others.
Ambient alone has no shape, diffuse alone makes the far side pitch black (in reality light bounces around the room and lights it a little), and specular alone is just a dot.
Writing the shader so that each term can be shown alone, as above, is also the best way to debug lighting.
9.6 Point lights
9.6.1 A direction for every pixel
A directional light is infinitely far away, like the sun: every pixel gets the same .
A point light has a position , like a light bulb, and sends light into all directions.
Now the direction towards the light depends on where the surface point is:
"Target minus start" is the direction from A to B from linear algebra chapter 3.
We need the distance anyway (below), so instead of calling normalize and length (which would compute the same square root twice), we compute the length once and divide by it.
9.6.2 Attenuation
A light bulb lights your desk much more than the wall across the room.
The physical reason is simple: the light that leaves the bulb spreads over the surface of a sphere, and a sphere of radius has the area .
Twice as far away, the same light is spread over four times the area, so each point gets a quarter.
That is the inverse-square law:
Used directly in a shader it has two problems.
At it is infinite, and very close to the light it is far brighter than anything a monitor can show.
And it never reaches zero, so every light affects every pixel in the whole world.
The classic solution, which also comes from fixed-function OpenGL (GL_CONSTANT_ATTENUATION, GL_LINEAR_ATTENUATION, GL_QUADRATIC_ATTENUATION), is a polynomial with three constants:
- (constant) is usually 1, so the attenuation is 1 at the light and never goes above 1.
- (linear) makes the light fall off soon.
- (quadratic) is the physical part and dominates far from the light.
Nobody picks these by hand.
This table of constants for different light ranges comes from the Ogre3D engine wiki and is used all over the internet (LearnOpenGL popularised it).
"Range" is roughly the distance in world units at which the light has become negligible:
| Range | |||
|---|---|---|---|
| 7 | 1.0 | 0.7 | 1.8 |
| 13 | 1.0 | 0.35 | 0.44 |
| 20 | 1.0 | 0.22 | 0.20 |
| 32 | 1.0 | 0.14 | 0.07 |
| 50 | 1.0 | 0.09 | 0.032 |
| 100 | 1.0 | 0.045 | 0.0075 |
| 200 | 1.0 | 0.022 | 0.0019 |
| 600 | 1.0 | 0.007 | 0.0002 |
Our whole scene is about 2 units across, so we use the smallest one, .
Worked example:
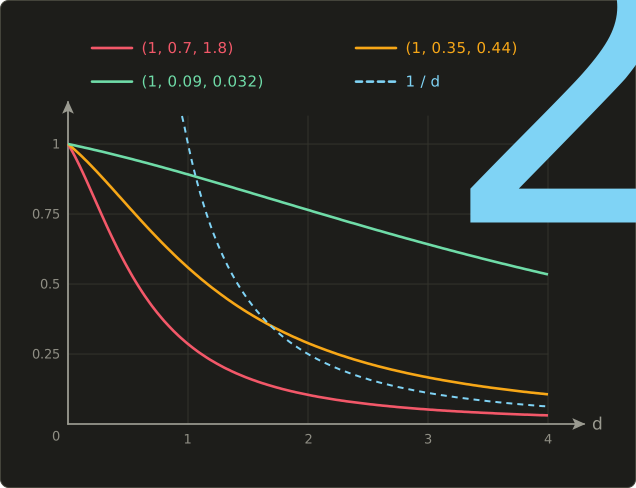
All three curves start at exactly 1 at the light, and far away they behave like , the physical law.
The pure (dashed) shows why we need the constant term.
9.6.3 Material, wall and point light
To see a point light properly, we need something for it to light besides the sphere.
We put a wall right behind the sphere: the plane , with the normal facing us.
Every pixel outside the sphere sees the wall at the point .
The wall should be grey and matte, the sphere red and shiny, so the material values go into a struct:
// surface material
struct Material {
  vec3 albedo;      // surface color
  float specular;   // specular strength
  float shininess;  // shininess (bigger = smaller, sharper highlight)
};

const float RADIUS = 0.6;        // sphere radius
const float WALL_Z = -RADIUS;    // wall position (right behind the sphere)
const float AMBIENT = 0.1;       // ambient strength
const vec3 LIGHT_COLOR = vec3(1.0, 0.95, 0.85) * 3.0; // light color and brightness
const vec3 ATTENUATION = vec3(1.0, 0.7, 1.8);         // attenuation (constant, linear, quadratic)

const Material SPHERE = Material(vec3(0.8, 0.2, 0.3), 0.5, 64.0);
const Material WALL = Material(vec3(0.7, 0.7, 0.75), 0.1, 8.0);

// diffuse and specular light from one light (Blinn-Phong)
//   n: normal, v: towards the eye, l: towards the light (all unit vectors)
vec3 blinnPhong(vec3 n, vec3 v, vec3 l, Material m, vec3 lightColor) {
  float diffuse = max(dot(n, l), 0.0);
  float specular = 0.0;
  if (diffuse > 0.0) {
    vec3 h = normalize(l + v);
    specular = pow(max(dot(n, h), 0.0), m.shininess);
  }
  return (m.albedo * diffuse + m.specular * specular) * lightColor;
}

// point light: direction and attenuation from the light position
vec3 pointLight(vec3 pos, vec3 n, vec3 v, Material m, vec3 lightPos, vec3 lightColor) {
  vec3 toLight = lightPos - pos;
  float d = length(toLight);   // distance to the light
  vec3 l = toLight / d;        // same as normalize(toLight)
  float attenuation = 1.0 / (ATTENUATION.x + ATTENUATION.y * d + ATTENUATION.z * d * d);
  return blinnPhong(n, v, l, m, lightColor) * attenuation;
}

// color of one point on a surface
vec3 shade(vec3 pos, vec3 n, Material m, vec3 lightPos) {
  vec3 v = vec3(0.0, 0.0, 1.0); // towards the eye
  vec3 color = m.albedo * AMBIENT;
  color += pointLight(pos, n, v, m, lightPos, LIGHT_COLOR);
  return color;
}

void main() {
  vec2 p = (2.0 * gl_FragCoord.xy - uResolution) / uResolution.y;
  float px = 2.0 / uResolution.y;

  vec3 lightPos = vec3(-0.7, 0.5, 0.7); // light position (top left, in front of the sphere)

  // sphere
  float z = sqrt(max(RADIUS * RADIUS - dot(p, p), 0.0));
  vec3 spherePos = vec3(p, z);
  vec3 sphere = shade(spherePos, spherePos / RADIUS, SPHERE, lightPos);

  // wall (the plane z = WALL_Z, normal points towards us)
  vec3 wall = shade(vec3(p, WALL_Z), vec3(0.0, 0.0, 1.0), WALL, lightPos);

  float mask = 1.0 - smoothstep(RADIUS - px, RADIUS, length(p));
  out_color = vec4(mix(wall, sphere, mask), 1.0);
}
A few things to notice:
- The sphere got smaller (0.6) so there is more wall to see.
- The light colour is
* 3.0: attenuation makes everything darker, so a point light needs more than 1.0 to look bright. At the sphere's nearest point the light is about 0.51 units away, where the attenuation is about 0.55. pointLightandshadetake the positionposof the surface point, which is the new ingredient: up to now our lighting only needed the normal.- The constant vector
ATTENUATIONholds the three constants;.x,.yand.zare just a compact way to store three numbers.
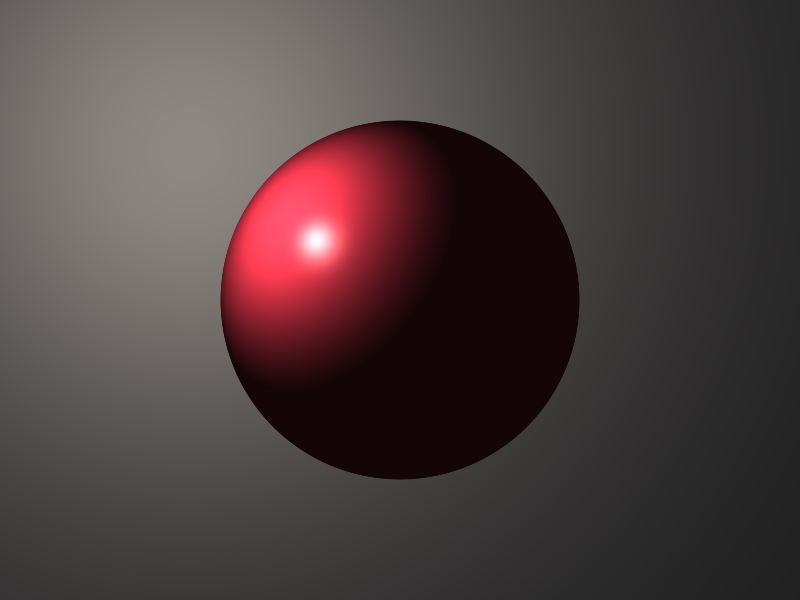
Compare this with the directional light.
The lit part of the sphere is smaller, because a light that is close only reaches the side of the sphere facing it.
And the wall is a soft pool of light that fades with distance: that circle is the attenuation you are looking at.
9.7 Moving the light
A light that moves shows the shape much better than any still image.
Let it circle around the sphere with uTime, or follow the mouse with uMouse.
We choose between the two with the preprocessor (chapter 2): #define FOLLOW_MOUSE 0 near the top, then in main:
// 1: the mouse moves the light, 0: the light circles over time
#define FOLLOW_MOUSE 0
  // light position (z is in front of the sphere)
#if FOLLOW_MOUSE
  vec2 mouse = (2.0 * uMouse - uResolution) / uResolution.y; // same coordinates as p
  vec3 lightPos = vec3(mouse, 0.7);
#else
  vec3 lightPos = vec3(0.9 * cos(uTime * 1.25), 0.6 * sin(uTime * 1.25), 0.7);
#endif
uMouse is in pixels with the origin at the bottom left (chapter 5), so we convert it with exactly the formula we use for p.
The orbit is an ellipse, , wider than it is tall because the window is wider than it is tall, and uTime * 1.25 makes one round take seconds.
The z of 0.7 keeps the light in front of the sphere: a light at would be inside the sphere for some positions, and then the whole visible surface would face away from it.
Finally, a small white dot shows where the light is, so we can see what the lighting is doing.
Replace the last two lines of main:
  float mask = 1.0 - smoothstep(RADIUS - px, RADIUS, length(p));
  vec3 color = mix(wall, sphere, mask);

  // draw a small white dot at the light position
  float marker = 1.0 - smoothstep(0.03 - px, 0.03, length(p - lightPos.xy));
  color = mix(color, vec3(1.0), marker);

  out_color = vec4(color, 1.0);
(Don't name the variable dot: GLSL lets a local variable hide the built-in function, and the next dot(...) call in the same block would fail to compile.)
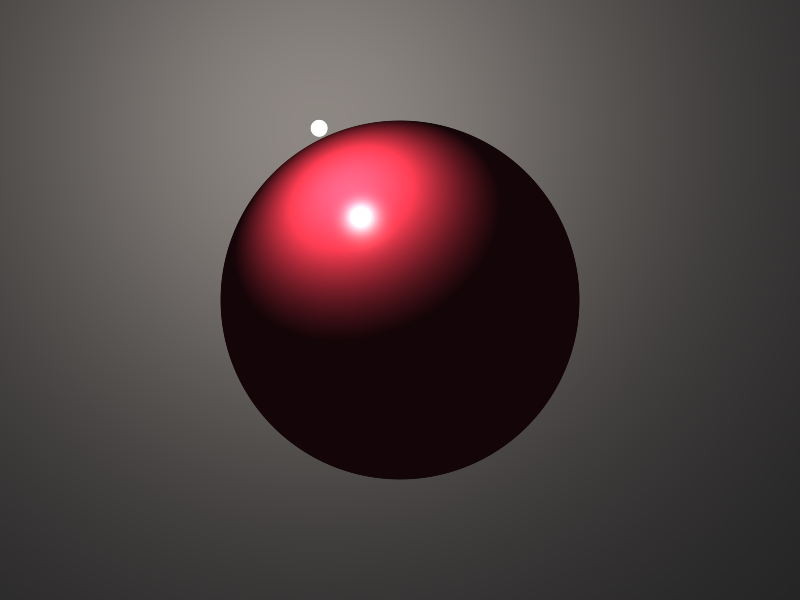
With #define FOLLOW_MOUSE 1 and R, the light follows the cursor:
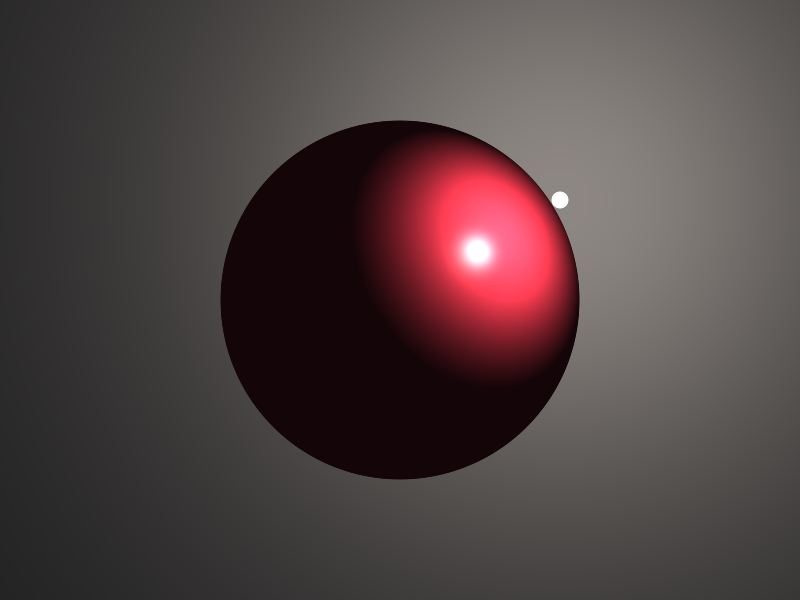
Notice that the highlight is never exactly under the light dot.
It sits where the sphere's normal points halfway between the light and the eye, and the eye is straight in front, so the highlight lies between the dot and the centre of the sphere.
9.8 New GLSL features in this chapter
| Feature | What it does |
|---|---|
reflect(I, N) |
; I is the incoming direction, N must be normalized |
pow(x, y) |
; undefined for x less than 0, and for x = 0 with y at most 0 |
sqrt(x) |
; undefined for x less than 0 |
normalize(v) |
; undefined for the zero vector |
struct Name { ... }; |
a type that groups several values, read with .name |
Material(a, b, c) |
the constructor every struct gets: values in declaration order |
const Material X = ... |
a constant struct, allowed because the constructor arguments are constant |
#define, #if |
the preprocessor (chapter 2): switch code on and off before compiling |
reflectis often misread as "the vector towards the light, reflected". It is the direction of travel: give it-l.- GLSL structs can't have functions (methods) or default values, but they can be passed to functions, returned, compared with
==and nested. - A function parameter is a copy (an
inparameter, chapter 2), so a function can change itsMaterial mwithout affecting the caller. We use that in chapter 10. - Everything here works unchanged on macOS's OpenGL 4.1.
9.9 How this is used in real games and engines
- The workhorse of 1990–2010. Blinn-Phong was the lighting of fixed-function OpenGL (where
GL_SHININESSwas limited to 0–128) and Direct3D, and of most games of the PS2, Xbox 360 and PS3 era, usually per vertex at first and per pixel later. Many indie and stylised games still use it because it is cheap and easy to control. - Physically based rendering. Modern engines (Unreal, Unity, Godot, Frostbite) use "PBR" models like GGX. They look different from Blinn-Phong, but the inputs are exactly the ones from this chapter: , , , and the half vector with . Shininess becomes "roughness", and a specular colour becomes "metalness". Learning Blinn-Phong first is the normal path.
- Many point lights. A game level may have hundreds of point lights (lamps, muzzle flashes, glowing magic). Engines therefore give each light a radius beyond which it is ignored, and draw it only on the pixels it can reach (deferred or clustered shading, which the OpenGL series will touch on). The polynomial attenuation never reaches zero, so engines use attenuation curves that are forced to exactly zero at the radius (challenge 7).
- Impostors. Molecule viewers, particle systems and distant trees draw spheres and other shapes as flat quads with a per-pixel surface, just like our sphere. Chapter 14 (raymarching) takes this idea all the way to complete 3D scenes.
9.10 Summary
- For a sphere seen along −z, the surface point under pixel has , and the normal is the point divided by .
- All lighting vectors must be in one space. Here that is a view space with an orthographic camera, so .
- Diffuse: , with pointing towards the light.
- Phong: with
r = reflect(-l, n). Blinn-Phong: withh = normalize(l + v); it needs about 4 times the exponent for the same highlight size. - Only add specular light where . Highlights of non-metals have the colour of the light, not of the surface.
- Point light: and attenuation , with constants from the range table.
- Write lighting as small functions (
blinnPhong,pointLight,shade) that can be tested and shown one term at a time.
9.11 Challenges
- ★ A floor point with , the light direction and the eye . Compute , the Phong specular for and , then and the Blinn-Phong specular for and . (Phong should give 0.64 and 0.4096, Blinn-Phong 0.9 and 0.81.)
- ★ With the constants , compute the attenuation at and . Then solve to find the distance where the light has fallen to exactly one half (about 0.58).
- ★★ Turn the sphere into gold: albedo close to black for the diffuse part, and a specular colour of
vec3(1.0, 0.77, 0.34)multiplied into the highlight instead of the plainm.specular(add avec3 specularColortoMaterial). The sphere should look like a dark ball with a golden highlight and a golden glow where the light is close. - ★★ Add a second point light: a blue one,
vec3(0.3, 0.5, 1.0) * 3.0, that circles in the opposite direction (-uTime), while the first one follows the mouse.shadesimply adds a secondpointLightcall. You should see two highlights and two pools of light on the wall, purple where they overlap. - ★★ Make a perspective eye: put the camera at and use
v = normalize(C - pos)inshade. Give the wall a specular strength of 0.5 and shininess 32 so its highlight is easy to see. With the orthographic eye the wall's highlight sits right under the light dot; with the perspective eye it moves to a point between the light dot and the centre of the window (about 0.74 of the way out), where the wall mirrors the light into the camera. - ★★ Write a debug view that shows only the specular term, Phong on the left half, Blinn-Phong on the right, with
SHININESSfor Phong and4.0 * SHININESSfor Blinn-Phong. Move the light with the mouse: the two halves should match almost perfectly, except near the edge of the sphere. - ★★★ Unreal Engine 4 uses the attenuation for a light with radius . Implement it with and compare it with the polynomial. Show that it is exactly 0 for and explain why that matters for an engine with hundreds of lights. Why is used instead of ?
ファイル: a/shader/playground.glsl | b/shader/playground.glsl
| 前 | 新 | ||
|---|---|---|---|
| @@ -7,16 +7,80 @@ uniform float uTime; // 起動してからの秒数 | |||
| 7 | uniform vec2 uResolution; // 画面の大きさ(ピクセル) | 7 | uniform vec2 uResolution; // 画面の大きさ(ピクセル) |
| 8 | uniform vec2 uMouse; // マウスの位置(ピクセル、左下が原点) | 8 | uniform vec2 uMouse; // マウスの位置(ピクセル、左下が原点) |
| 9 | 9 | ||
| 10 | // 1にするとマウスで光を動かす、0にすると時間で光が回る | ||
| 11 | #define FOLLOW_MOUSE 0 | ||
| 12 | |||
| 13 | // 表面の材質 | ||
| 14 | struct Material { | ||
| 15 | vec3 albedo; // 表面の色 | ||
| 16 | float specular; // 鏡面反射の強さ | ||
| 17 | float shininess; // 光沢度(大きい程ハイライトが小さく鋭い) | ||
| 18 | }; | ||
| 19 | |||
| 20 | const float RADIUS = 0.6; // 球の半径 | ||
| 21 | const float WALL_Z = -RADIUS; // 壁の位置(球の真後ろ) | ||
| 22 | const float AMBIENT = 0.1; // アンビエントの強さ | ||
| 23 | const vec3 LIGHT_COLOR = vec3(1.0, 0.95, 0.85) * 3.0; // 光の色と明るさ | ||
| 24 | const vec3 ATTENUATION = vec3(1.0, 0.7, 1.8); // 減衰の定数(定数項、1次、2次) | ||
| 25 | |||
| 26 | const Material SPHERE = Material(vec3(0.8, 0.2, 0.3), 0.5, 64.0); | ||
| 27 | const Material WALL = Material(vec3(0.7, 0.7, 0.75), 0.1, 8.0); | ||
| 28 | |||
| 29 | // 1つの光からの拡散反射と鏡面反射(ブリン・フォン) | ||
| 30 | // n:法線、v:目への向き、l:光への向き(全て単位ベクトル) | ||
| 31 | vec3 blinnPhong(vec3 n, vec3 v, vec3 l, Material m, vec3 lightColor) { | ||
| 32 | float diffuse = max(dot(n, l), 0.0); | ||
| 33 | float specular = 0.0; | ||
| 34 | if (diffuse > 0.0) { | ||
| 35 | vec3 h = normalize(l + v); | ||
| 36 | specular = pow(max(dot(n, h), 0.0), m.shininess); | ||
| 37 | } | ||
| 38 | return (m.albedo * diffuse + m.specular * specular) * lightColor; | ||
| 39 | } | ||
| 40 | |||
| 41 | // ポイントライト:光の位置から向きと減衰を求める | ||
| 42 | vec3 pointLight(vec3 pos, vec3 n, vec3 v, Material m, vec3 lightPos, vec3 lightColor) { | ||
| 43 | vec3 toLight = lightPos - pos; | ||
| 44 | float d = length(toLight); // 光までの距離 | ||
| 45 | vec3 l = toLight / d; // normalize(toLight)と同じ | ||
| 46 | float attenuation = 1.0 / (ATTENUATION.x + ATTENUATION.y * d + ATTENUATION.z * d * d); | ||
| 47 | return blinnPhong(n, v, l, m, lightColor) * attenuation; | ||
| 48 | } | ||
| 49 | |||
| 50 | // 表面の1点の色 | ||
| 51 | vec3 shade(vec3 pos, vec3 n, Material m, vec3 lightPos) { | ||
| 52 | vec3 v = vec3(0.0, 0.0, 1.0); // 目への向き | ||
| 53 | vec3 color = m.albedo * AMBIENT; | ||
| 54 | color += pointLight(pos, n, v, m, lightPos, LIGHT_COLOR); | ||
| 55 | return color; | ||
| 56 | } | ||
| 57 | |||
| 10 | void main() { | 58 | void main() { |
| 11 | // ピクセル座標を0〜1に正規化 | 59 | vec2 p = (2.0 * gl_FragCoord.xy - uResolution) / uResolution.y; |
| 12 | vec2 uv = gl_FragCoord.xy / uResolution; | 60 | float px = 2.0 / uResolution.y; |
| 61 | |||
| 62 | // 光の位置(zは球より手前) | ||
| 63 | #if FOLLOW_MOUSE | ||
| 64 | vec2 mouse = (2.0 * uMouse - uResolution) / uResolution.y; // pと同じ座標にする | ||
| 65 | vec3 lightPos = vec3(mouse, 0.7); | ||
| 66 | #else | ||
| 67 | vec3 lightPos = vec3(0.9 * cos(uTime * 1.25), 0.6 * sin(uTime * 1.25), 0.7); | ||
| 68 | #endif | ||
| 69 | |||
| 70 | // 球 | ||
| 71 | float z = sqrt(max(RADIUS * RADIUS - dot(p, p), 0.0)); | ||
| 72 | vec3 spherePos = vec3(p, z); | ||
| 73 | vec3 sphere = shade(spherePos, spherePos / RADIUS, SPHERE, lightPos); | ||
| 74 | |||
| 75 | // 壁(z = WALL_Zの平面、法線は手前を向く) | ||
| 76 | vec3 wall = shade(vec3(p, WALL_Z), vec3(0.0, 0.0, 1.0), WALL, lightPos); | ||
| 13 | 77 | ||
| 14 | // 時間で動くグラデーション | 78 | float mask = 1.0 - smoothstep(RADIUS - px, RADIUS, length(p)); |
| 15 | vec3 color = 0.5 + 0.5 * cos(uTime + uv.xyx + vec3(0.0, 2.0, 4.0)); | 79 | vec3 color = mix(wall, sphere, mask); |
| 16 | 80 | ||
| 17 | // マウスの周りに白い円 | 81 | // 光の位置に小さな白い点を描く |
| 18 | float d = length(gl_FragCoord.xy - uMouse); | 82 | float marker = 1.0 - smoothstep(0.03 - px, 0.03, length(p - lightPos.xy)); |
| 19 | color = mix(color, vec3(1.0), 1.0 - smoothstep(18.0, 20.0, d)); | 83 | color = mix(color, vec3(1.0), marker); |
| 20 | 84 | ||
| 21 | out_color = vec4(color, 1.0); | 85 | out_color = vec4(color, 1.0); |
| 22 | } | 86 | } |
コメント(0)
まだコメントはありません。
ログインするとコメント出来ます。