11. Textures and Sampling
Up to now every colour on the screen was calculated by a formula: gradients, shapes, noise, lighting.
Real games also need colours that nobody can write as a formula: a wooden floor, a face, the letters on a sign.
Those come from textures, images that live in GPU memory and that a shader can read at any position.
In this chapter I'll make a texture in C, hand it to the playground shader, and then look closely at what really happens when a shader reads it: UV coordinates, wrap modes, filtering, mipmaps, and a few effects that move or change the image.
Loading image files from disk comes in the OpenGL series, so here we generate the image ourselves.
11.1 What is a texture?
A texture is a grid of colour values stored on the GPU.
One element of that grid is called a texel (texture element), so we don't confuse it with the pixels on the screen.
Our test texture has 256 × 256 texels, each with red, green, blue and alpha stored as 8-bit numbers.
A shader never asks for "texel number 37".
Instead it gives a position in UV coordinates: goes from 0 at the left edge to 1 at the right edge, from 0 at the bottom to 1 at the top.
The size of the texture doesn't matter, which is very handy: the same shader works with a 64 × 64 texture and a 4096 × 4096 one.
Here is a tiny 4 × 4 texture in UV space:
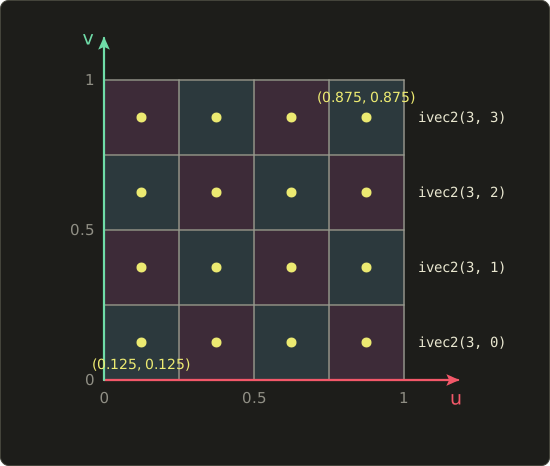
Each texel covers a small square, and its center sits half a texel in from its edges.
For a texture texels wide, texel number (counting from 0) covers from to , and its center is at
So in the picture (), texel 0 has its center at , and texel 3 at .
Note that is not the center of the first texel, it is its left edge.
That half-texel offset will show up again when we write our own filtering in 11.6.
When the shader asks for the colour at some UV, the GPU does three things for us:
- Wrap: if the UV is outside 0 to 1, decide what that means (repeat, mirror, clamp…).
- Filter: the UV almost never lands exactly on a texel center, so decide how to combine the nearby texels.
- Return the result as a
vec4.
The hardware block that does this is called a sampler, and reading a texture is called sampling.
Both steps are configured from C, which is what we'll do first.
Note: In OpenGL the first row of texels you upload is the bottom row (). Image files and Vulkan/Direct3D put the top row first. I explained this in chapter 1 of the linear algebra series, and it's the reason many OpenGL programs flip images when loading them.
11.2 Making a texture in C
Let's start again from the playground of chapter 5, not from the lighting code of chapters 9 and 10: this chapter's diff is against chapter 5, and chapter 12 continues from here.
We need a picture that makes every sampling effect easy to see:
- a 32 × 32 texel checkerboard, so we can see the texels and any stretching,
- a colour gradient (red grows to the right, green grows upwards), so we can see where and point,
- a big white letter F, because an F looks different when it's flipped in any direction,
- a thin white ring at the top right, because curves show the difference between filtering modes.
Add this function to main.c, above main():
// texture size in texels
#define TEX_SIZE 256

// Make a test texture in C (256x256, RGBA, 8 bits per channel)
// Row y = 0 becomes the bottom of the texture (v = 0)
GLuint createTestTexture(void) {
  unsigned char *pixels = (unsigned char *)malloc(TEX_SIZE * TEX_SIZE * 4);
  if (!pixels) {
    puts("Failed to allocate the texture memory");
    return 0;
  }

  for (int y = 0; y < TEX_SIZE; y++) {
    for (int x = 0; x < TEX_SIZE; x++) {
      // gradient: redder to the right, greener towards the top
      float r = (float)x / (TEX_SIZE - 1);
      float g = (float)y / (TEX_SIZE - 1);
      float b = 0.6f;

      // 32x32 checkerboard (the dark cells are darkened)
      if ((x / 32 + y / 32) % 2 == 1) {
        r *= 0.35f;
        g *= 0.35f;
        b *= 0.35f;
      }

      // the letter F (so we see at once when it gets flipped)
      int fx = x - 80, fy = y - 64;
      int inF = (fx >= 0 && fx < 24 && fy >= 0 && fy < 128)     // vertical bar
             || (fx >= 0 && fx < 96 && fy >= 104 && fy < 128)   // top bar
             || (fx >= 0 && fx < 72 && fy >= 56 && fy < 80);    // middle bar

      // a white ring at the top right (shows the filtering differences)
      float dx = x + 0.5f - 216.0f, dy = y + 0.5f - 216.0f;
      float d = sqrtf(dx * dx + dy * dy);
      int inRing = d > 20.0f && d < 24.0f;

      if (inF || inRing) r = g = b = 1.0f;

      unsigned char *p = &pixels[(y * TEX_SIZE + x) * 4];
      p[0] = (unsigned char)(r * 255.0f + 0.5f);
      p[1] = (unsigned char)(g * 255.0f + 0.5f);
      p[2] = (unsigned char)(b * 255.0f + 0.5f);
      p[3] = 255;
    }
  }

  // create a texture object and send the pixels to the GPU
  GLuint texture;
  glGenTextures(1, &texture);
  glBindTexture(GL_TEXTURE_2D, texture);
  glTexImage2D(GL_TEXTURE_2D, 0, GL_RGBA8, TEX_SIZE, TEX_SIZE, 0,
               GL_RGBA, GL_UNSIGNED_BYTE, pixels);
  free(pixels);

  // build the mipmaps (the chain of smaller versions) automatically
  glGenerateMipmap(GL_TEXTURE_2D);

  // colour used outside the texture with GL_CLAMP_TO_BORDER
  float border[] = { 1.0f, 0.0f, 1.0f, 1.0f };
  glTexParameterfv(GL_TEXTURE_2D, GL_TEXTURE_BORDER_COLOR, border);
  return texture;
}
The loop is plain C: for every texel we compute a colour from 0 to 1, then store it as a byte from 0 to 255 (the + 0.5f rounds instead of cutting off).
Texel lives at byte (y * TEX_SIZE + x) * 4, four bytes per texel, one row after the other.
The + 0.5f in dx and dy measures from the texel center, exactly as in 11.1.
The OpenGL part is short, but every call matters:
glGenTextures(1, &texture)creates a name (a number) for a new texture object. Nothing is allocated yet.glBindTexture(GL_TEXTURE_2D, texture)makes it the "current" 2D texture. Every followingglTex…call changes the bound texture, not one you pass in.glTexImage2Dallocates the memory and copies our pixels into it. After this call we canfreeour copy.glGenerateMipmapcreates the smaller versions of the image that we'll need in 11.7.glTexParameterfv(…, GL_TEXTURE_BORDER_COLOR, …)sets one of the sampling settings. We'll set the others withglTexParameteribelow.
glTexImage2D has a lot of arguments:
| Argument | Our value | Meaning |
|---|---|---|
| target | GL_TEXTURE_2D |
the kind of texture that is bound |
| level | 0 |
which mipmap level we upload (0 = the full-size image) |
| internal format | GL_RGBA8 |
how the GPU stores it: 4 channels, 8 bits each |
| width, height | 256, 256 |
size in texels |
| border | 0 |
must always be 0 in modern OpenGL |
| format | GL_RGBA |
the channel order of our data |
| type | GL_UNSIGNED_BYTE |
the type of each channel in our data |
| data | pixels |
pointer to our data (NULL just allocates) |
The internal format describes the GPU side, format and type describe the array we pass in.
OpenGL converts between them if they differ.
Note: OpenGL expects each row of our data to start at a multiple of 4 bytes by default (GL_UNPACK_ALIGNMENTis 4). Our rows are 256 × 4 bytes, so that's fine. With RGB data and an odd width you'd needglPixelStorei(GL_UNPACK_ALIGNMENT, 1)first, otherwise the image comes out slanted.
Filtering and wrap modes on the keyboard
I want to switch the sampling settings while the program runs, so the next part is two small tables and two helper functions.
The names don't mean anything yet: 11.5 explains wrap modes and 11.6 and 11.7 explain filtering.
// filtering modes (switched with the F key)
typedef struct {
  GLint minFilter;
  GLint magFilter;
  const char *name;
} FilterMode;

static const FilterMode filterModes[] = {
  { GL_NEAREST, GL_NEAREST, "GL_NEAREST" },
  { GL_LINEAR, GL_LINEAR, "GL_LINEAR" },
  { GL_LINEAR_MIPMAP_LINEAR, GL_LINEAR, "GL_LINEAR_MIPMAP_LINEAR (mipmaps)" },
};

// wrap modes (switched with the W key)
typedef struct {
  GLint mode;
  const char *name;
} WrapMode;

static const WrapMode wrapModes[] = {
  { GL_REPEAT, "GL_REPEAT" },
  { GL_MIRRORED_REPEAT, "GL_MIRRORED_REPEAT" },
  { GL_CLAMP_TO_EDGE, "GL_CLAMP_TO_EDGE" },
  { GL_CLAMP_TO_BORDER, "GL_CLAMP_TO_BORDER" },
};

// set the filtering of the currently bound texture
void setFilter(int mode) {
  glTexParameteri(GL_TEXTURE_2D, GL_TEXTURE_MIN_FILTER, filterModes[mode].minFilter);
  glTexParameteri(GL_TEXTURE_2D, GL_TEXTURE_MAG_FILTER, filterModes[mode].magFilter);
  printf("Filtering: %s\n", filterModes[mode].name);
}

// set the wrap mode of the currently bound texture (S = u direction, T = v direction)
void setWrap(int mode) {
  glTexParameteri(GL_TEXTURE_2D, GL_TEXTURE_WRAP_S, wrapModes[mode].mode);
  glTexParameteri(GL_TEXTURE_2D, GL_TEXTURE_WRAP_T, wrapModes[mode].mode);
  printf("Wrap mode: %s\n", wrapModes[mode].name);
}

// returns 1 only at the moment the key goes down (not while it's held)
int keyPressed(GLFWwindow *window, int key, int *wasDown) {
  int down = glfwGetKey(window, key) == GLFW_PRESS;
  int pressed = down && !*wasDown;
  *wasDown = down;
  return pressed;
}
OpenGL calls the texture axes S and T instead of U and V, so GL_TEXTURE_WRAP_S is the wrap mode along .
keyPressed is the same "was it up last frame?" trick that chapter 5 used for the R key, moved into a function so three keys can share it.
Binding the texture for the shader
In main(), after the vertex attributes, create the texture and pick the starting settings:
  // create the test texture (start with mipmapped GL_LINEAR and GL_REPEAT)
  GLuint texture = createTestTexture();
  int filterMode = 2;
  int wrapMode = 0;
  setFilter(filterMode);
  setWrap(wrapMode);

  int reloadWasDown = 0;
  int filterWasDown = 0;
  int wrapWasDown = 0;
At the top of the render loop, the F and W keys cycle through the tables, and the R key now uses keyPressed too:
    // F switches the filtering, W the wrap mode
    glBindTexture(GL_TEXTURE_2D, texture);
    if (keyPressed(window, GLFW_KEY_F, &filterWasDown)) {
      filterMode = (filterMode + 1) % 3;
      setFilter(filterMode);
    }
    if (keyPressed(window, GLFW_KEY_W, &wrapWasDown)) {
      wrapMode = (wrapMode + 1) % 4;
      setWrap(wrapMode);
    }

    // R reloads the shaders (keeps the old ones if that fails)
    if (keyPressed(window, GLFW_KEY_R, &reloadWasDown)) {
And after the other uniforms, give the texture to the shader:
    // bind the texture to unit 0 and tell the sampler which unit to read
    glActiveTexture(GL_TEXTURE0);
    glBindTexture(GL_TEXTURE_2D, texture);
    glUniform1i(glGetUniformLocation(shaderProgram, "uTexture"), 0);
Finally, delete it with the other objects at the end: glDeleteTextures(1, &texture);.
Why a number instead of the texture itself?
The shader doesn't see texture objects directly.
The GPU has a row of texture units (at least 16 for fragment shaders in OpenGL 4.x), and each unit holds one bound texture.
A sampler uniform in the shader stores the number of a unit:
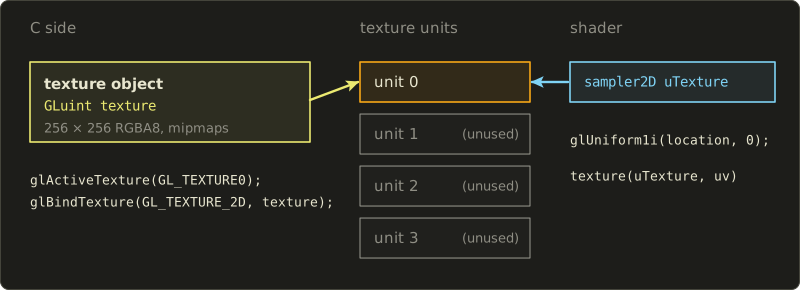
glActiveTexture(GL_TEXTURE0) chooses unit 0, glBindTexture puts our texture into it, and glUniform1i(…, 0) tells uTexture to read unit 0.
With one texture this looks like a lot of ceremony, but in chapter 12 we'll use three textures at once, each in its own unit.
We set the uniform every frame because pressing R creates a new program, and a new program starts with all uniforms at 0 again.
Note: Since GLSL 4.20 you can writelayout(binding = 0) uniform sampler2D uTexture;and skipglUniform1i. macOS stops at OpenGL 4.1 (GLSL 4.10), so our shaders don't use it and set the unit from C instead.
11.3 The first sample
Now the shader side.
Replace shader/playground.glsl with:
#version 450 core

in vec2 vUv;
out vec4 out_color;

uniform sampler2D uTexture; // the texture in texture unit 0

void main() {
  vec3 color = texture(uTexture, vUv).rgb;
  out_color = vec4(color, 1.0);
}
Build, run, and the whole window shows the texture:
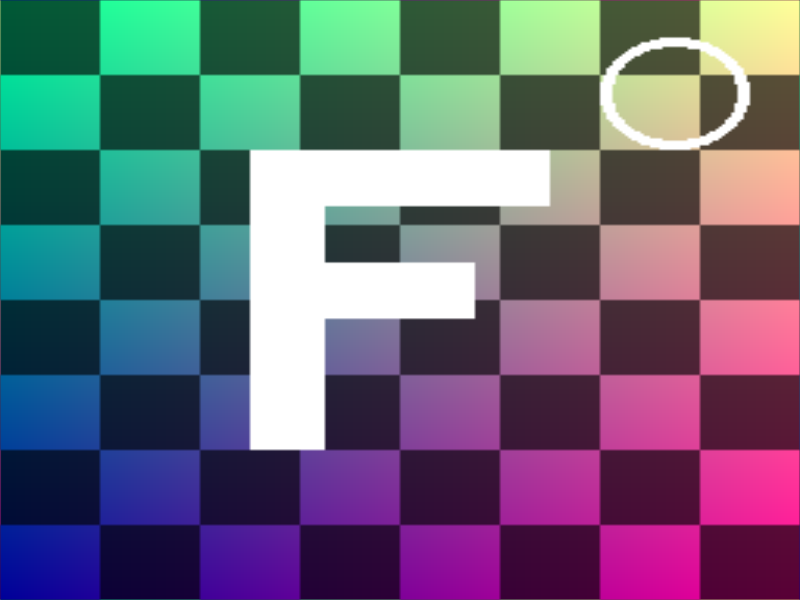
Two new things:
sampler2Dis the type for "a 2D texture together with its sampler settings". It's an opaque type: you can't do maths with it, assign it or store it in a normal variable. It can only be auniformor a function parameter.texture(sampler, uv)samples the texture atuvand returns avec4(red, green, blue, alpha). It applies the wrap mode and the filter we set in C. We only need the colour, so.rgbswizzles out the first three components.
vUv is the 0 to 1 UV from the fullscreen quad (the vertex data from chapter 3), so the texture covers the window exactly.
But the window is 800 × 600 and the texture is square, so everything is stretched sideways: the checker cells are wider than tall.
Let's use the aspect-correct coordinates from chapter 5 instead:
#version 450 core

in vec2 vUv;
out vec4 out_color;

uniform vec2 uResolution;
uniform sampler2D uTexture;

void main() {
  // -1 to 1 vertically, the aspect ratio horizontally (chapter 5)
  vec2 p = (2.0 * gl_FragCoord.xy - uResolution) / uResolution.y;

  // turn the -1..1 square into 0..1 UVs
  vec2 uv = p * 0.5 + 0.5;

  vec3 color = texture(uTexture, uv).rgb;

  // darken everything outside the square
  if (abs(p.x) > 1.0) color *= 0.25;

  out_color = vec4(color, 1.0);
}
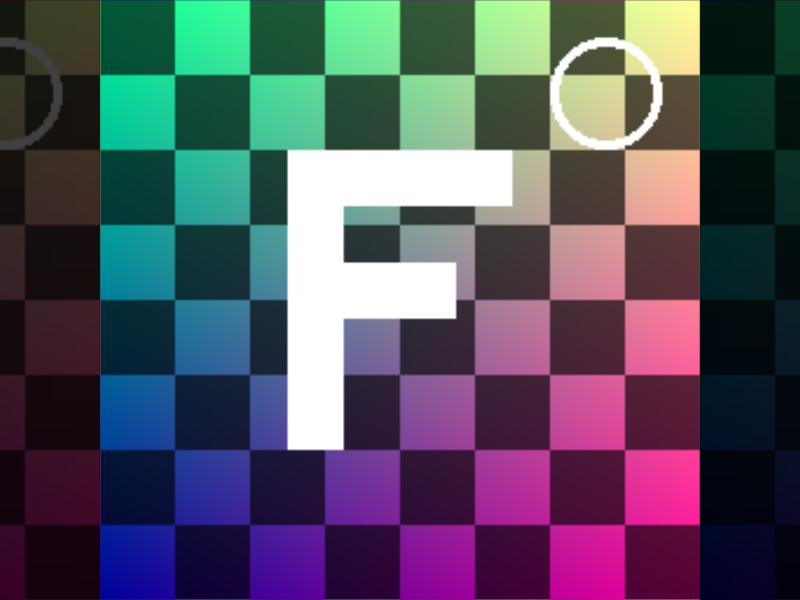
p runs from −1 to 1 vertically, so p * 0.5 + 0.5 runs from 0 to 1: a square.
Left and right of the square, goes below 0 and above 1, and the texture simply repeats (darkened by the if).
That's the GL_REPEAT wrap mode we chose in C. We'll come back to it in 11.5.
Look at the colours: red grows to the right, green grows upwards, so points right and points up, as promised.
11.4 UV coordinates: flipping and mirroring
Because UVs are just numbers, we can change them before sampling and the picture changes with them.
The simplest changes are flips:
- mirrors left and right,
- turns it upside down,
- both together turn the picture by 180°.
This shader splits the window into four areas and does one flip in each:
#version 450 core

in vec2 vUv;
out vec4 out_color;

uniform vec2 uResolution;
uniform sampler2D uTexture;

void main() {
  // split the screen into 2x2 areas
  vec2 cell = floor(gl_FragCoord.xy / uResolution * 2.0);  // area number (0 or 1)
  vec2 local = fract(gl_FragCoord.xy / uResolution * 2.0); // 0..1 inside the area

  // fix the aspect ratio inside the area and put a square in the middle
  vec2 p = (local - 0.5) * vec2(uResolution.x / uResolution.y, 1.0) * 2.0;
  vec2 uv = p * 0.6 + 0.5;

  if (cell.x == 1.0) uv.x = 1.0 - uv.x; // right column: mirror left/right
  if (cell.y == 0.0) uv.y = 1.0 - uv.y; // bottom row: upside down

  vec3 color = texture(uTexture, uv).rgb;

  // dark grey outside 0..1
  if (uv.x < 0.0 || uv.x > 1.0 || uv.y < 0.0 || uv.y > 1.0) color = vec3(0.08);

  out_color = vec4(color, 1.0);
}
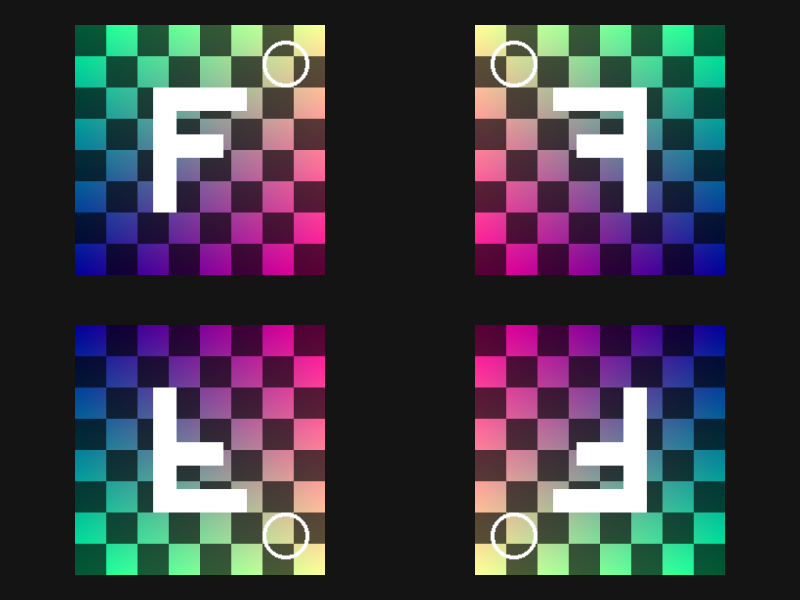
Top left is the original, top right is mirrored, bottom left is upside down, and bottom right is both.
floor and fract were introduced in chapter 7: is the largest whole number not above , and is what's left over.
Multiplying the screen position by 2 and splitting it into those two parts gives "which area" and "where inside the area".
The bottom-left picture is exactly what you get when you load a normal image file (top row first) into OpenGL without flipping it.
If your textures ever show up upside down, either flip the rows when loading or use in the shader, but not both!
Note: The rule from chapter 7 applies here as well: changing the coordinates moves the picture the opposite way.uv * 2.0makes the picture smaller (it repeats twice), anduv + 0.1moves it to the left, because we change where we read, not where we draw.
11.5 Wrap modes
What should texture() return when is −0.3 or 1.7?
That's the wrap mode, set per axis with GL_TEXTURE_WRAP_S and GL_TEXTURE_WRAP_T.
For a texture texels wide, the four common modes are:
| Mode | What happens to u | Formula |
|---|---|---|
GL_REPEAT |
the texture tiles forever | |
GL_MIRRORED_REPEAT |
tiles, every second copy mirrored | |
GL_CLAMP_TO_EDGE |
the edge texels are stretched outwards | |
GL_CLAMP_TO_BORDER |
outside 0 to 1 you get a fixed border colour | (no formula, just the border colour) |
Let's check the mirrored formula with : , its fract is , , and .
So 1.25 reads the same place as 0.75: a quarter of the way back from the right edge, mirrored.
For (inside the texture): , , and , unchanged, as it should be.
The clamp limits for GL_CLAMP_TO_EDGE are the centers of the first and last texel (11.1), so the outermost texels are never mixed with anything outside.
To see all four, we zoom out so the UVs go from −1 to 2 vertically, and draw a yellow frame where the real 0 to 1 texture is:
#version 450 core

in vec2 vUv;
out vec4 out_color;

uniform vec2 uResolution;
uniform sampler2D uTexture;

void main() {
  vec2 p = (2.0 * gl_FragCoord.xy - uResolution) / uResolution.y;

  // UVs wider than 0..1 (-1 to 2 vertically)
  vec2 uv = p * 1.5 + 0.5;

  vec3 color = texture(uTexture, uv).rgb;

  // yellow frame around the original 0..1 square
  float d = max(abs(uv.x - 0.5), abs(uv.y - 0.5)) - 0.5;
  if (abs(d) < 0.008) color = vec3(1.0, 0.9, 0.2);

  out_color = vec4(color, 1.0);
}
The frame uses the box distance from chapter 6: d is 0 exactly on the border of the 0 to 1 square, so abs(d) < 0.008 is a thin outline.
Run it and press W three times:
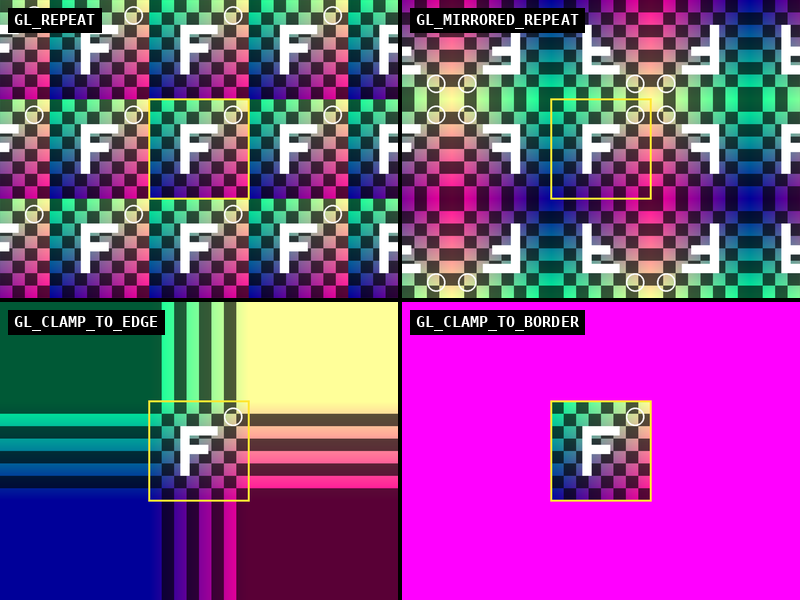
GL_REPEAT (top left) is what you want for anything that tiles: floors, walls, grass, water.
GL_MIRRORED_REPEAT (top right) hides the seams of a texture that doesn't tile perfectly, because neighbouring copies always match at their shared edge.
GL_CLAMP_TO_EDGE (bottom left) turns the outermost row and column into long stripes. That looks silly here, but it's the correct mode for UI images, sprites, text and fullscreen effects, where nothing should "leak in" from the opposite edge.
GL_CLAMP_TO_BORDER (bottom right) shows the magenta border colour we set in createTestTexture. It's useful for shadow maps, where "outside the map" should mean "not in shadow".
Note: Even inside 0 to 1 the wrap mode matters. With linear filtering, a sample near the right edge mixes in texels from the left edge when the mode isGL_REPEAT. That's exactly right for a tiling texture and exactly wrong for a sprite, which then gets a thin line of colour from its other side. That's why sprites useGL_CLAMP_TO_EDGE.
11.6 Filtering when magnifying: nearest and bilinear
The screen and the texture almost never line up one pixel to one texel.
Either a pixel is smaller than a texel (the texture is shown bigger than it is, magnification), or one pixel covers many texels (the texture is shown smaller, minification):
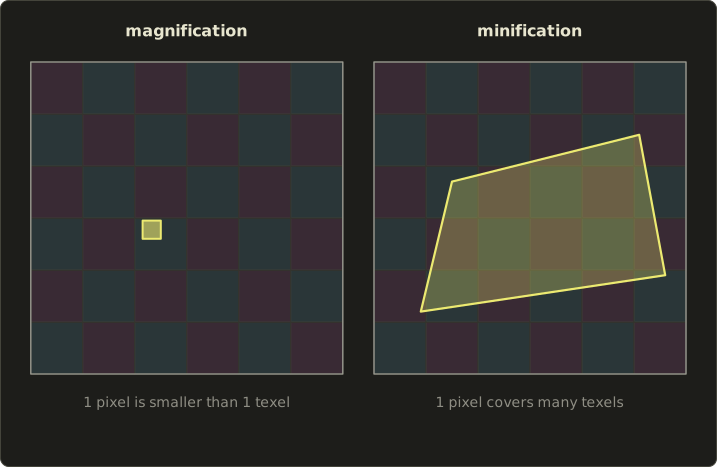
OpenGL has a separate filter setting for each case: GL_TEXTURE_MAG_FILTER and GL_TEXTURE_MIN_FILTER.
Let's start with magnification, by zooming into the ring at the top right of the texture:
#version 450 core

in vec2 vUv;
out vec4 out_color;

uniform vec2 uResolution;
uniform sampler2D uTexture;

void main() {
  vec2 p = (2.0 * gl_FragCoord.xy - uResolution) / uResolution.y;

  // zoom far into the ring at the top right (only 0.2 of v on the screen)
  vec2 uv = p * 0.1 + vec2(0.82, 0.82);

  vec3 color = texture(uTexture, uv).rgb;
  out_color = vec4(color, 1.0);
}
600 pixels of screen now show 0.2 of the texture, which is about 51 texels, so each texel is about 12 pixels tall.
Press F once to switch to GL_NEAREST and once more for GL_LINEAR. Here they are side by side:
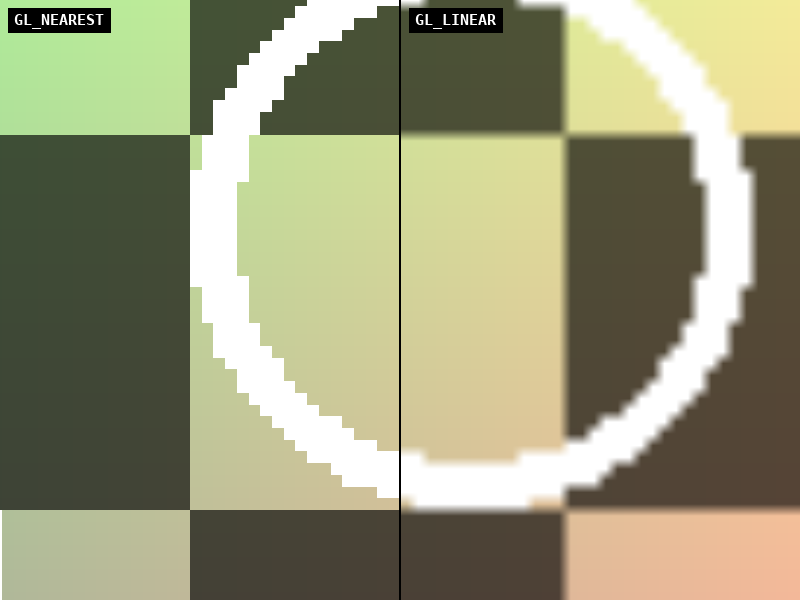
GL_NEARESTreturns the one texel whose square contains the UV. You see every texel as a hard-edged block. That's the right choice for pixel art and for data textures where mixing values would be meaningless (IDs, lookup tables).GL_LINEARmixes the four nearest texel centers. Edges become soft and the ring looks round, but also blurry. This is what most textures in a 3D game use.
The bilinear formula
"Mixes the four nearest texels" is called bilinear interpolation: linear interpolation (the mix from chapter 2 of the linear algebra series) done twice horizontally and once vertically.
Recall .
First we turn the UV into texel coordinates where the texel centers are whole numbers.
Since center sits at , we solve for :
The texel to the lower left is , and the leftover parts , say how far we are towards the next texel.
Call the four texel colours (lower left), (lower right), (upper left) and (upper right). Then:
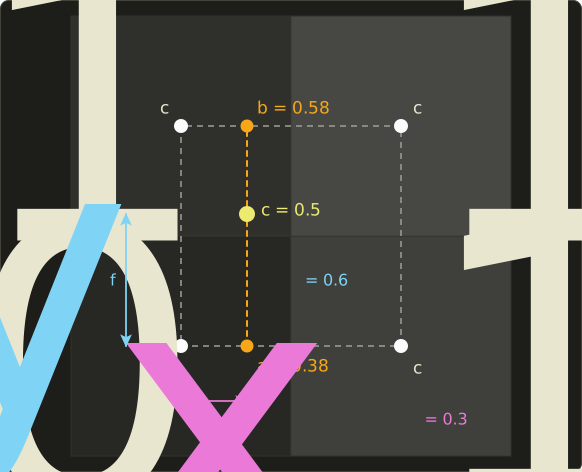
Here's the example from the picture with grey values , , , and :
And one example for the half-texel offset: in our 256 texel wide texture, gives .
So and : exactly halfway between texels 127 and 128.
That makes sense, because is precisely the edge between the left and the right half of the texture.
Doing it ourselves with texelFetch
To be sure we understood, let's rebuild both filters by hand.
For that we need two more built-ins:
textureSize(sampler, lod)returns the size of mipmap levellodin texels, as anivec2. Level 0 is the full image, sotextureSize(uTexture, 0)isivec2(256, 256).texelFetch(sampler, ivec2 texel, int lod)reads exactly one texel by its integer index, with no filtering and no wrapping. An index outside the texture gives an undefined result, so we must wrap it ourselves.
#version 450 core

in vec2 vUv;
out vec4 out_color;

uniform vec2 uResolution;
uniform sampler2D uTexture;

// bring a texel index back into 0..size-1, like GL_REPEAT
ivec2 wrapTexel(ivec2 i, ivec2 size) {
  return ivec2(mod(vec2(i), vec2(size)));
}

// nearest (the same as GL_NEAREST, by hand)
vec3 nearest(sampler2D tex, vec2 uv) {
  ivec2 size = textureSize(tex, 0);
  ivec2 i = ivec2(floor(uv * vec2(size)));
  return texelFetch(tex, wrapTexel(i, size), 0).rgb;
}

// bilinear interpolation (the same as GL_LINEAR, by hand)
vec3 bilinear(sampler2D tex, vec2 uv) {
  ivec2 size = textureSize(tex, 0);
  vec2 st = uv * vec2(size) - 0.5; // texel centers are whole numbers here
  ivec2 i = ivec2(floor(st));      // the lower-left texel
  vec2 f = fract(st);              // position between the four texels (0..1)

  vec3 c00 = texelFetch(tex, wrapTexel(i + ivec2(0, 0), size), 0).rgb;
  vec3 c10 = texelFetch(tex, wrapTexel(i + ivec2(1, 0), size), 0).rgb;
  vec3 c01 = texelFetch(tex, wrapTexel(i + ivec2(0, 1), size), 0).rgb;
  vec3 c11 = texelFetch(tex, wrapTexel(i + ivec2(1, 1), size), 0).rgb;

  // twice along x, then once along y
  return mix(mix(c00, c10, f.x), mix(c01, c11, f.x), f.y);
}

void main() {
  vec2 p = (2.0 * gl_FragCoord.xy - uResolution) / uResolution.y;
  vec2 uv = p * 0.1 + vec2(0.82, 0.82);

  // left half: our nearest, right half: our bilinear
  vec3 color = p.x < 0.0 ? nearest(uTexture, uv) : bilinear(uTexture, uv);

  // a dividing line in the middle
  if (abs(gl_FragCoord.x - uResolution.x * 0.5) < 1.0) color = vec3(0.0);

  out_color = vec4(color, 1.0);
}
The result looks exactly like the screenshot above.
I compared the two images pixel by pixel: the biggest difference is 1 out of 255, because GPUs usually compute with only 8 bits of precision.
mod(x, y) is , which (unlike the % operator on negative integers) always gives a result between 0 and , so −1 wraps to 255 as GL_REPEAT would.
You normally let the hardware filter, since it's much faster.
But texelFetch is the right tool whenever a texture holds data rather than a picture: lookup tables, particle positions, the cells of a game board, or a G-buffer in deferred rendering.
11.7 Shrinking: aliasing and mipmaps
Magnification only makes things blurry.
Minification is worse: it makes them wrong.
To show it, let's turn the texture into an endless floor.
Imagine the eye 1 unit above the floor, looking straight ahead at a screen 1 unit away.
A pixel with screen height looks down along a ray, and by similar triangles that ray hits the floor at a distance of :
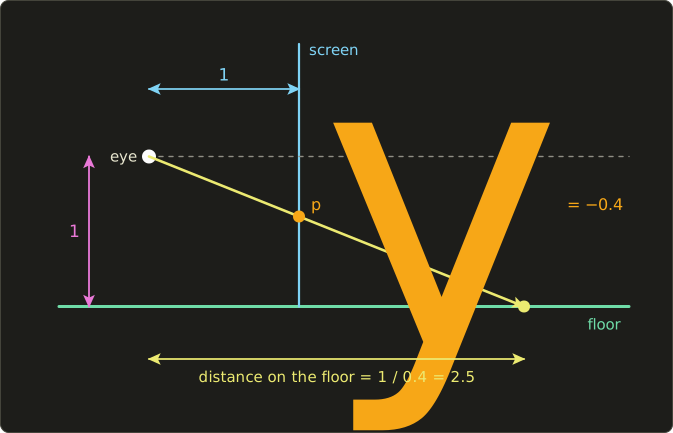
Sideways it works the same way, so the floor position is with .
Pixels near the horizon ( close to 0) are very far away, and neighbouring pixels there are many texels apart.
#version 450 core

in vec2 vUv;
out vec4 out_color;

uniform float uTime;
uniform vec2 uResolution;
uniform sampler2D uTexture;

void main() {
  vec2 p = (2.0 * gl_FragCoord.xy - uResolution) / uResolution.y;

  // a point on the floor: the closer to the horizon (p.y = 0), the farther (1 / -p.y)
  float depth = 1.0 / max(-p.y, 0.001);
  vec2 uv = vec2(p.x * depth, depth) * 0.5;
  uv.y += uTime * 0.25; // move forward

  // call texture() outside the if (see below why)
  vec3 floorColor = texture(uTexture, uv).rgb;
  vec3 skyColor = vec3(0.45, 0.6, 0.85);
  vec3 color = p.y < 0.0 ? floorColor : skyColor;

  out_color = vec4(color, 1.0);
}
The max(-p.y, 0.001) avoids dividing by zero (or by a negative number) in the sky, whose colour we throw away anyway.
Here is the area just below the horizon with the three filter settings (press F to cycle):
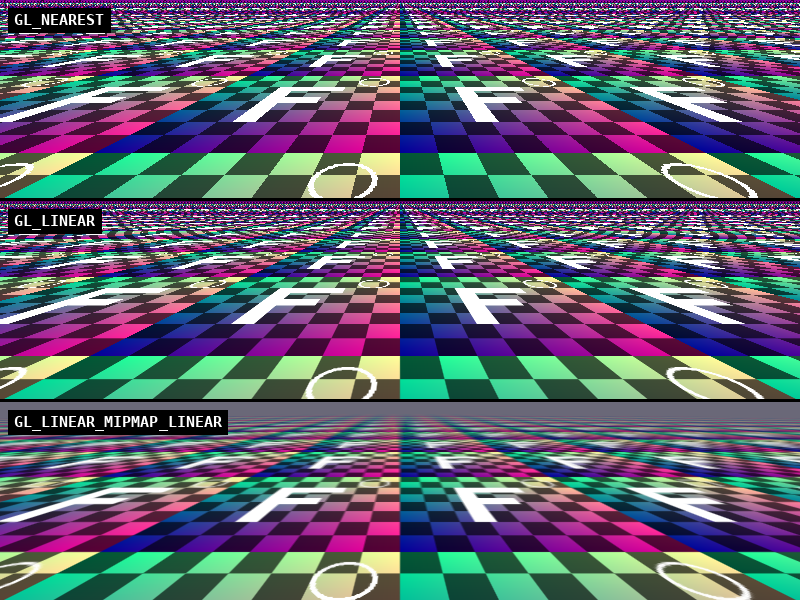
With GL_NEAREST and GL_LINEAR the far part of the floor is a mess of random colours, with curved stripes (moiré) where the checkerboard should be.
Each pixel there covers dozens of texels, but the sampler only looks at one (or four) of them, picked more or less by chance.
As the floor moves, that chance changes every frame and the noise flickers.
This is called aliasing, the same problem that makes thin lines look jagged.
GL_LINEAR doesn't help, because averaging four neighbours out of fifty is still a random pick.
Mipmaps
The fix is to prepare smaller versions of the texture in advance, each one averaged from the one before.
That's what glGenerateMipmap did in createTestTexture: level 1 is 128 × 128 (each texel the average of 2 × 2 texels of level 0), level 2 is 64 × 64, and so on down to 1 × 1.
256 halves 8 times before it reaches 1, so our texture has 9 levels.
This shader shows levels 0 to 5, each stretched to the same size, using texelFetch with a level number:
#version 450 core

in vec2 vUv;
out vec4 out_color;

uniform vec2 uResolution;
uniform sampler2D uTexture;

void main() {
  vec3 color = vec3(0.08);

  // 240x240 pixel squares in 3 columns and 2 rows (level 0 at the top left)
  vec2 pos = gl_FragCoord.xy - vec2(20.0, 40.0);
  vec2 cell = floor(pos / vec2(260.0, 280.0));
  vec2 local = (pos - cell * vec2(260.0, 280.0)) / 240.0; // 0..1 inside the square

  if (all(greaterThanEqual(local, vec2(0.0))) && all(lessThan(local, vec2(1.0)))
      && cell.x >= 0.0 && cell.x < 3.0 && cell.y >= 0.0 && cell.y < 2.0) {
    int level = int(cell.x) + 3 * (1 - int(cell.y));  // top row 0..2, bottom row 3..5
    ivec2 levelSize = textureSize(uTexture, level);   // 256, 128, 64, ...
    ivec2 texel = ivec2(local * vec2(levelSize));
    color = texelFetch(uTexture, texel, level).rgb;
  }

  out_color = vec4(color, 1.0);
}
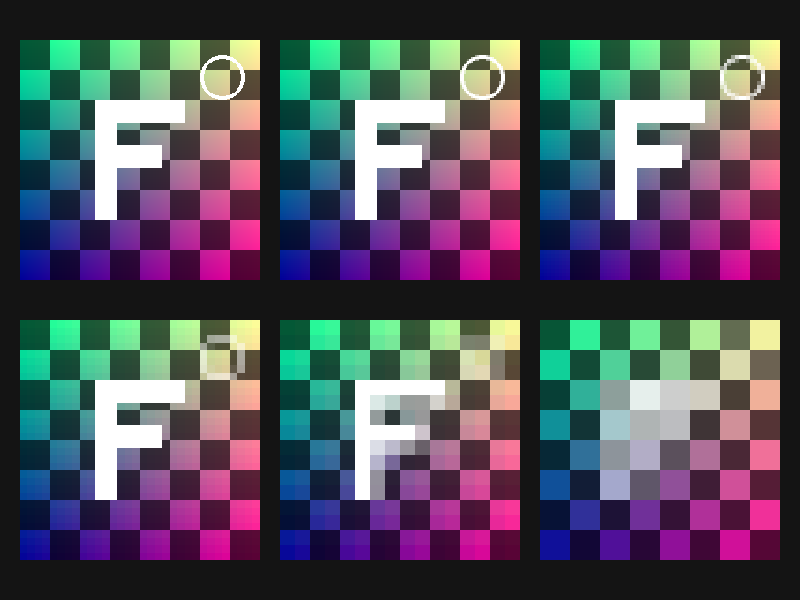
lessThan and greaterThanEqual compare vectors component by component and return a bvec2, and all is true when every component is true.
At level 3 (32 × 32, bottom left) the ring is already a blur, and at level 5 (8 × 8) the F has become a grey smudge, because 32 × 32 texels of the original were averaged into each texel.
That smudge is the correct answer for a pixel that covers that many texels.
All the levels together use of the memory of level 0, so mipmaps cost only a third more memory.
Choosing the level
The GPU picks a level for every pixel by asking: "if I move one pixel to the right or one pixel up, how many texels does the UV move?"
It can answer that because fragments are always shaded in 2 × 2 blocks, so it can subtract a value from its neighbour.
GLSL gives us the same subtraction:
dFdx(v)is how muchvchanges from this pixel to its horizontal neighbour,dFdy(v)is the same vertically.
With (the UV in texels), the GPU computes roughly
where is just dFdx(s).
(lambda) is the level of detail, LOD.
If one pixel step moves 1 texel, and we use level 0.
If it moves 4 texels, and level 2 has exactly one texel per pixel.
Values below 0 mean magnification and use the MAG filter instead.
For example, if a step moves 1.5 texels sideways and 6 texels upwards, and : between level 2 and level 3.
Let's colour the floor by our own :
#version 450 core

in vec2 vUv;
out vec4 out_color;

uniform float uTime;
uniform vec2 uResolution;
uniform sampler2D uTexture;

void main() {
  vec2 p = (2.0 * gl_FragCoord.xy - uResolution) / uResolution.y;
  float depth = 1.0 / max(-p.y, 0.001);
  vec2 uv = vec2(p.x * depth, depth) * 0.5;
  uv.y += uTime * 0.25;

  // how many texels does one step to the neighbouring pixel move?
  vec2 st = uv * vec2(textureSize(uTexture, 0));
  float rho = max(length(dFdx(st)), length(dFdy(st)));
  float lod = max(log2(rho), 0.0); // mipmap level (0 = the original image)

  // a colour per level: 0 blue, 1 cyan, 2 green, 3 yellow, 4 orange, 5+ red
  vec3 levels[6] = vec3[](
    vec3(0.2, 0.2, 0.9), vec3(0.2, 0.8, 0.9), vec3(0.2, 0.8, 0.2),
    vec3(0.9, 0.9, 0.2), vec3(0.9, 0.5, 0.1), vec3(0.9, 0.1, 0.1));
  int level = min(int(lod), 5);
  vec3 tint = mix(levels[level], levels[min(level + 1, 5)], fract(lod));

  vec3 color = mix(texture(uTexture, uv).rgb, tint, 0.7);
  if (p.y >= 0.0) color = vec3(0.45, 0.6, 0.85);

  out_color = vec4(color, 1.0);
}
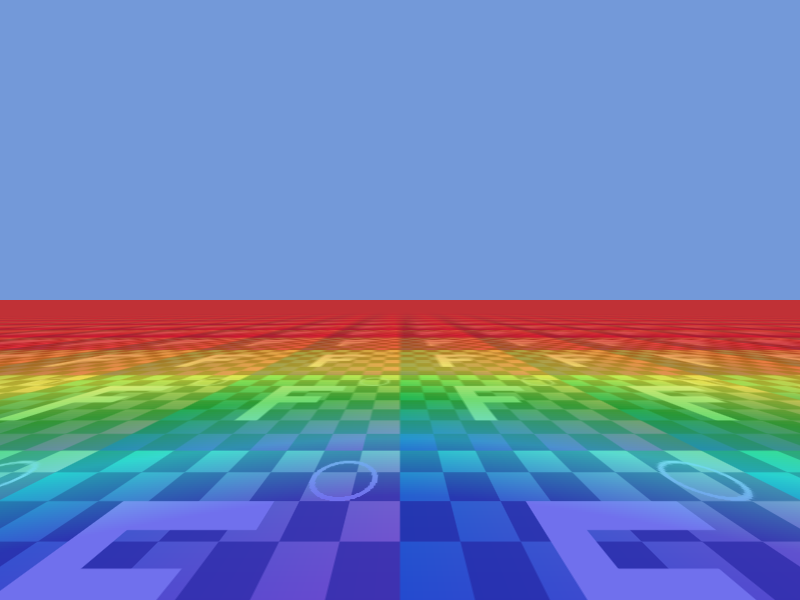
Near the camera (blue) the floor uses level 0, and the level climbs as the floor gets farther away.
log2(x) is the base-2 logarithm (), and vec3[](…) is an array constructor: six vec3 values in one constant array.
Notice the bands are wider at the bottom: each level covers twice the distance of the one before.
The minification filters
GL_TEXTURE_MIN_FILTER has six possible values.
The first word says how to filter inside a level, the second how to choose between levels:
| Min filter | Inside a level | Between levels |
|---|---|---|
GL_NEAREST |
nearest | no mipmaps, always level 0 |
GL_LINEAR |
bilinear | no mipmaps, always level 0 |
GL_NEAREST_MIPMAP_NEAREST |
nearest | the single closest level |
GL_LINEAR_MIPMAP_NEAREST |
bilinear | the single closest level |
GL_NEAREST_MIPMAP_LINEAR |
nearest | mix the two closest levels |
GL_LINEAR_MIPMAP_LINEAR |
bilinear | mix the two closest levels ("trilinear") |
With GL_LINEAR_MIPMAP_LINEAR and , the GPU filters level 2 and level 3 bilinearly and then mixes them with weight 0.585, so there's no visible jump where one level changes to the next.
That's 8 texel reads per sample, and GPUs are built to do it quickly, so trilinear filtering is the normal choice for 3D scenes.
Note: The default min filter in OpenGL isGL_NEAREST_MIPMAP_LINEAR, which needs mipmaps. If you create a texture, upload only level 0 and forget bothglGenerateMipmapand setting the min filter, the texture is "incomplete" and every sample returns black. This is probably the most common "my texture is black" bug.
Motion shows the difference best.
In this video the left half forces level 0 with textureLod, the right half uses normal texture (which chooses the level by itself):
  // left half: level 0 only (no mipmaps), right half: the GPU chooses the level
  vec3 level0 = textureLod(uTexture, uv, 0.0).rgb;
  vec3 automatic = texture(uTexture, uv).rgb;
  vec3 color = p.x < 0.0 ? level0 : automatic;
textureLod(sampler, uv, lod) works like texture but uses the level you give it instead of computing .
With the trilinear min filter, lod = 0.0 means plain bilinear filtering of level 0, the same as GL_LINEAR.
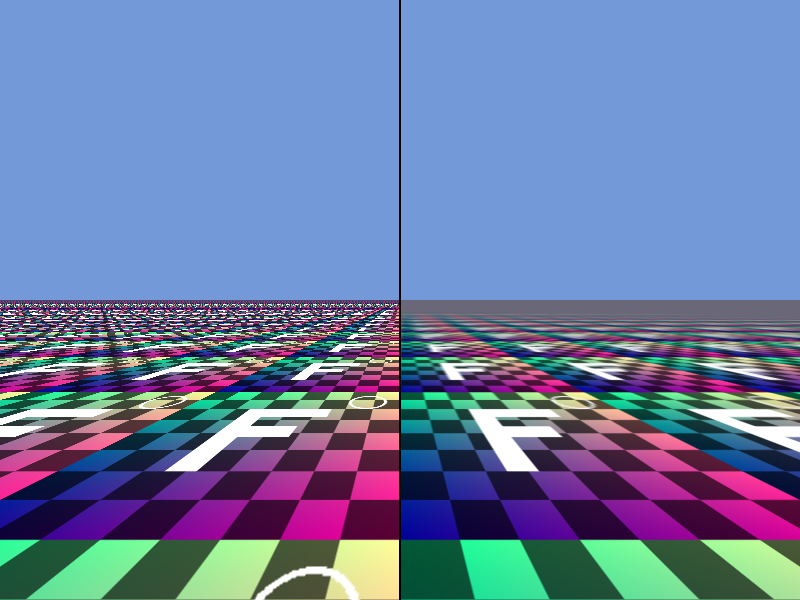
The left side shimmers, the right side is calm.
But the right side also turns into a flat grey-violet near the horizon, blurrier than it needs to be.
That's because takes the larger of the two directions: the floor is squashed much more vertically than sideways, so the level is chosen for the worst direction.
Anisotropic filtering fixes this by taking several samples along the squashed direction.
It's core in OpenGL 4.6 and available almost everywhere (macOS included) as the extension GL_EXT_texture_filter_anisotropic, set with glTexParameterf(GL_TEXTURE_2D, GL_TEXTURE_MAX_ANISOTROPY_EXT, 8.0f).
We'll use it in the OpenGL series.
Derivatives need uniform control flow
In the floor shader I called texture() before the if, not inside it.
Here's why: dFdx, dFdy and texture() (which uses derivatives to pick its level) need the neighbouring pixels of the 2 × 2 block to run the same code.
If some pixels of a block take an if and others don't, the neighbours have no value to subtract, and GLSL says the result is undefined.
textureLod and texelFetch don't need derivatives, so they're safe anywhere.
The rule of thumb: sample with texture() at the top level of main, keep the results in variables, and choose between them afterwards.
11.8 Moving UVs: scrolling and water
Since the UV is just a vec2, everything from the earlier chapters can change it: time, sines, noise.
Adding time scrolls the texture (conveyor belts, clouds, waterfalls), and adding a small wave makes it wobble:
#version 450 core

in vec2 vUv;
out vec4 out_color;

uniform float uTime;
uniform vec2 uResolution;
uniform sampler2D uTexture;

void main() {
  vec2 p = (2.0 * gl_FragCoord.xy - uResolution) / uResolution.y;
  vec2 uv = p * 0.5 + 0.5;

  // 1. drift slowly towards the top right
  uv += uTime * vec2(0.03, 0.02);

  // 2. shift the UV a little, like waves
  vec2 offset;
  offset.x = sin(uv.y * 20.0 + uTime * 2.0);
  offset.y = cos(uv.x * 16.0 + uTime * 1.6);
  uv += 0.012 * offset;

  // 3. mix in a watery blue
  vec3 color = texture(uTexture, uv).rgb;
  color = mix(color, vec3(0.1, 0.35, 0.6), 0.35);

  out_color = vec4(color, 1.0);
}
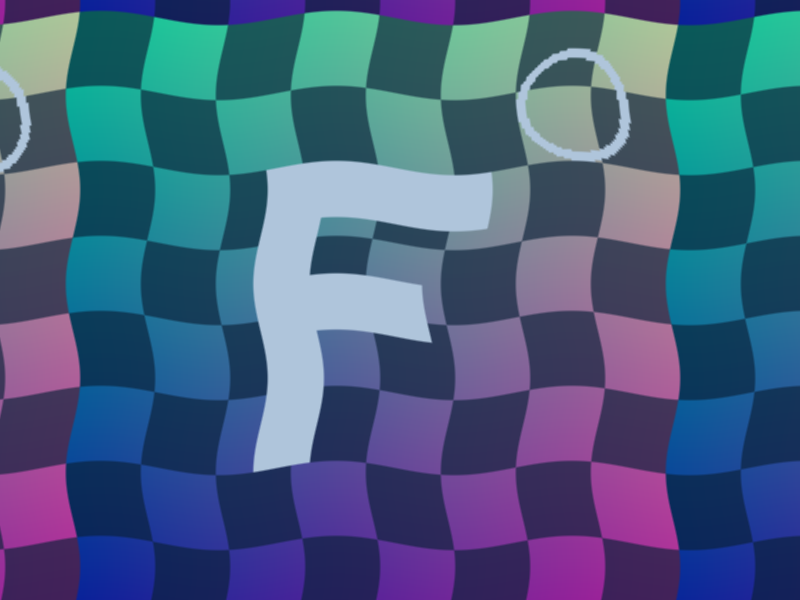
The horizontal offset depends on and the vertical one on , so straight lines of the checkerboard become waves.
The amplitude 0.012 is about 3 texels: small numbers are enough, because the eye is very sensitive to distorted straight lines.
Replace the sines with the noise from chapter 8 and you get the heat haze or underwater effects of many games.
11.9 Simple image effects
Post-processing effects in games are fragment shaders that sample a texture holding the rendered frame.
Our test texture can stand in for that frame.
Here are three classic effects, each one a small function:
#version 450 core

in vec2 vUv;
out vec4 out_color;

uniform vec2 uResolution;
uniform sampler2D uTexture;

// greyscale: an average weighted by how sensitive the eye is (a dot product)
vec3 grayscale(vec3 c) {
  float y = dot(c, vec3(0.2126, 0.7152, 0.0722));
  return vec3(y);
}

// sepia: multiply by a 3x3 matrix (GLSL's mat3 is written column by column)
vec3 sepia(vec3 c) {
  mat3 m = mat3(0.393, 0.349, 0.272,  // column 1: what R adds
                0.769, 0.686, 0.534,  // column 2: what G adds
                0.189, 0.168, 0.131); // column 3: what B adds
  return min(m * c, vec3(1.0));
}

// blur: weighted average of the 7x7 texels around us (Gaussian weights)
vec3 blur(sampler2D tex, vec2 uv) {
  vec2 texel = 1.0 / vec2(textureSize(tex, 0)); // size of one texel in UV
  vec3 sum = vec3(0.0);
  float total = 0.0;
  for (int y = -3; y <= 3; y++) {
    for (int x = -3; x <= 3; x++) {
      float w = exp(-float(x * x + y * y) / 4.5); // sigma = 1.5 texels
      sum += w * texture(tex, uv + vec2(x, y) * texel).rgb;
      total += w;
    }
  }
  return sum / total;
}

void main() {
  vec2 p = (2.0 * gl_FragCoord.xy - uResolution) / uResolution.y;
  vec2 uv = p * 0.5 + 0.5;
  vec3 color = texture(uTexture, uv).rgb;

  // split the square into 4 vertical bands, each with a different effect
  float band = floor((p.x + 1.0) * 2.0); // 0, 1, 2, 3
  vec3 blurred = blur(uTexture, uv); // uses texture(), so outside the ifs
  if (band == 1.0) color = grayscale(color);
  if (band == 2.0) color = sepia(color);
  if (band == 3.0) color = blurred;

  // dark grey outside the square
  if (abs(p.x) > 1.0) color = vec3(0.08);

  out_color = vec4(color, 1.0);
}
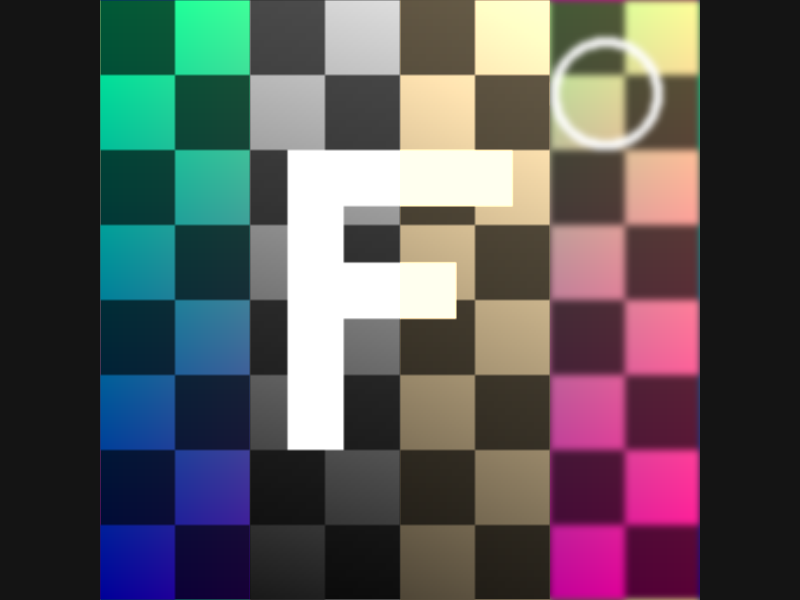
Greyscale.
A plain average looks wrong, because our eyes are far more sensitive to green than to blue.
The standard (Rec. 709) weights give the luminance:
That's a dot product with a weight vector (linear algebra chapter 4), and dot does exactly .
The weights add up to 1, so white stays white. Pure green becomes 0.7152 (light grey) and pure blue only 0.0722 (almost black).
Strictly, these weights are meant for linear colour values, not the sRGB values in our texture (chapter 10 explained the difference), but for an effect like this nobody will notice.
Sepia.
Each output channel is a different mix of all three input channels, which is exactly a matrix times a vector (linear algebra chapter 6):
GLSL's mat3(…) constructor takes the numbers column by column, so in the code the first three numbers are the first column (0.393, 0.349, 0.272), not the first row.
Swap them and you get a very different colour, a classic bug.
For white each channel is the sum of a row: , , .
min(…, vec3(1.0)) cuts that to , a warm cream, which is why the white F looks yellowish.
Blur.
Every output pixel is a weighted average of the texels around it.
The weights follow a bell curve (a Gaussian), so near texels count more than far ones:
exp(x) is , and with texels, .
Dividing by the sum of the weights keeps the brightness the same.
1.0 / vec2(textureSize(tex, 0)) is the size of one texel in UV units, so vec2(x, y) * texel steps exactly one texel at a time.
49 samples per pixel is slow for a real game. Real blurs split it into a horizontal pass and a vertical pass (7 + 7 samples), and use the bilinear filter to read two texels with one sample.
11.10 How textures are used in real games and engines
- Material maps. A modern material has several textures: base colour (albedo), normal map (next chapter), roughness, metalness, ambient occlusion. Engines often pack several grey maps into the R, G, B and A channels of one texture to save samples.
- Atlases and sprite sheets. 2D games put many sprites, glyphs or UI pieces into one big texture and select one with a UV offset and scale, so the whole scene can be drawn with one texture bound. Bitmap fonts work the same way.
- Texture arrays and 3D textures.
sampler2DArrayholds many same-size layers (terrain materials, animation frames) andsampler3Dholds a volume (fog, colour grading tables). - Compressed formats. Games almost never ship
GL_RGBA8. Block compression (BC1 to BC7 on PC and consoles, ASTC and ETC2 on mobile) stores textures at a quarter of the size or less, and the GPU decodes them while sampling. - sRGB textures. Colour textures are usually stored in sRGB and created as
GL_SRGB8_ALPHA8, so the sampler converts them to linear values for lighting (chapter 10). Data textures such as normal maps must not be sRGB. - Render targets. The rendered frame itself is a texture, which is how bloom, blur, colour grading, depth of field and screen-space reflections work: they are fragment shaders sampling the previous pass, like 11.9.
- Sampler objects. Since OpenGL 3.3, filter and wrap settings can live in separate sampler objects (
glGenSamplers), so one texture can be read with different settings. Vulkan and Direct3D always keep textures and samplers separate. - Streaming and mipmaps. Big open worlds load only the small mip levels of far-away textures and stream in the large ones as the camera approaches.
11.11 Summary
- A texture is a grid of texels on the GPU. Shaders read it with UV coordinates from 0 to 1, and texel has its center at .
- In C:
glGenTextures,glBindTexture,glTexImage2DandglGenerateMipmapcreate it,glTexParameterisets filtering and wrapping, andglActiveTextureplusglUniform1iconnect it to asampler2Dthrough a texture unit. texture(sampler, uv)wraps, filters and returns avec4. Changing the UV first lets us flip, tile, scroll and distort the image.- Wrap modes:
GL_REPEAT,GL_MIRRORED_REPEAT,GL_CLAMP_TO_EDGE,GL_CLAMP_TO_BORDER. - Magnification:
GL_NEARESTgives blocks,GL_LINEARgives bilinear interpolation, twomixalong x and one along y. - Minification without mipmaps causes aliasing. Mipmaps cost a third more memory, and the GPU picks the level from the UV derivatives with .
texelFetch,textureSizeandtextureLodread exact texels, sizes and levels.dFdx/dFdygive the change to the neighbouring pixel, and need uniform control flow (so doestexture).- Image effects are just maths on sampled colours: a dot product for greyscale, a matrix for sepia, a weighted sum of neighbours for blur.
11.12 Challenges
- ★ Our texture is 256 texels wide. At which is the center of texel 10? Which texel does
GL_NEARESTreturn for ? For bilinear filtering at , compute , the two texel indices and . - ★ Using the formula in 11.5, compute the that
GL_MIRRORED_REPEATreads for , and . Then check your answers on the wrap screenshot. - ★ On the floor, a pixel moves 3 texels to its right neighbour and 12 texels to its upper neighbour. What are and ? Which two levels does trilinear filtering mix, and with which weight?
- ★★ Make a tile floor that rotates slowly: rotate the UV around with the
mat2rotation from chapter 7 before sampling, and repeat the texture 4 times. The F should spin while the picture tiles without seams. - ★★ Write a "pixelate" effect: snap the UV to a coarse grid with
floor(uv * n) / n(and add half a cell so you sample the middle of each block). With you should see 16 × 16 big blocks, each a single colour. Then animate withuTimefrom 4 to 64. - ★★ Add a fourth filter mode to the C tables,
GL_NEAREST_MIPMAP_NEAREST, and look at the floor with it. You should see sharp lines across the floor where the level jumps from one to the next. Explain whyGL_LINEAR_MIPMAP_LINEARdoesn't have them. - ★★★ Show that the Gaussian weight is separable: with . Then rewrite
blurso that the inner loop blurs one row horizontally with and the outer loop combines the 7 row results with . The picture must look exactly like the blur band in 11.9. Explain why, with a second texture to store the horizontal pass in, this idea needs only 14 samples per pixel instead of 49.
ファイル: a/main.c | b/main.c
| 前 | 新 | ||
|---|---|---|---|
| @@ -176,6 +176,118 @@ GLuint buildProgram(const char *vertexPath, const char *fragmentPath) { | |||
| 176 | return program; | 176 | return program; |
| 177 | } | 177 | } |
| 178 | 178 | ||
| 179 | // テクスチャの大きさ(テクセル) | ||
| 180 | #define TEX_SIZE 256 | ||
| 181 | |||
| 182 | // テスト用のテクスチャをCで作る(256×256、RGBA、1チャンネル8ビット) | ||
| 183 | // 1行目(y = 0)がテクスチャの一番下(v = 0)になる | ||
| 184 | GLuint createTestTexture(void) { | ||
| 185 | unsigned char *pixels = (unsigned char *)malloc(TEX_SIZE * TEX_SIZE * 4); | ||
| 186 | if (!pixels) { | ||
| 187 | puts("テクスチャのメモリ確保に失敗しました"); | ||
| 188 | return 0; | ||
| 189 | } | ||
| 190 | |||
| 191 | for (int y = 0; y < TEX_SIZE; y++) { | ||
| 192 | for (int x = 0; x < TEX_SIZE; x++) { | ||
| 193 | // グラデーション:右に行く程赤く、上に行く程緑になる | ||
| 194 | float r = (float)x / (TEX_SIZE - 1); | ||
| 195 | float g = (float)y / (TEX_SIZE - 1); | ||
| 196 | float b = 0.6f; | ||
| 197 | |||
| 198 | // 32×32テクセルのチェッカーボード(暗いマスは暗くする) | ||
| 199 | if ((x / 32 + y / 32) % 2 == 1) { | ||
| 200 | r *= 0.35f; | ||
| 201 | g *= 0.35f; | ||
| 202 | b *= 0.35f; | ||
| 203 | } | ||
| 204 | |||
| 205 | // 「F」の文字(上下左右が反転したらすぐ分かる様に) | ||
| 206 | int fx = x - 80, fy = y - 64; | ||
| 207 | int inF = (fx >= 0 && fx < 24 && fy >= 0 && fy < 128) // 縦棒 | ||
| 208 | || (fx >= 0 && fx < 96 && fy >= 104 && fy < 128) // 上の横棒 | ||
| 209 | || (fx >= 0 && fx < 72 && fy >= 56 && fy < 80); // 真ん中の横棒 | ||
| 210 | |||
| 211 | // 右上の白い輪(フィルタリングの違いが見える様に) | ||
| 212 | float dx = x + 0.5f - 216.0f, dy = y + 0.5f - 216.0f; | ||
| 213 | float d = sqrtf(dx * dx + dy * dy); | ||
| 214 | int inRing = d > 20.0f && d < 24.0f; | ||
| 215 | |||
| 216 | if (inF || inRing) r = g = b = 1.0f; | ||
| 217 | |||
| 218 | unsigned char *p = &pixels[(y * TEX_SIZE + x) * 4]; | ||
| 219 | p[0] = (unsigned char)(r * 255.0f + 0.5f); | ||
| 220 | p[1] = (unsigned char)(g * 255.0f + 0.5f); | ||
| 221 | p[2] = (unsigned char)(b * 255.0f + 0.5f); | ||
| 222 | p[3] = 255; | ||
| 223 | } | ||
| 224 | } | ||
| 225 | |||
| 226 | // テクスチャオブジェクトを作り、ピクセルをGPUに送る | ||
| 227 | GLuint texture; | ||
| 228 | glGenTextures(1, &texture); | ||
| 229 | glBindTexture(GL_TEXTURE_2D, texture); | ||
| 230 | glTexImage2D(GL_TEXTURE_2D, 0, GL_RGBA8, TEX_SIZE, TEX_SIZE, 0, | ||
| 231 | GL_RGBA, GL_UNSIGNED_BYTE, pixels); | ||
| 232 | free(pixels); | ||
| 233 | |||
| 234 | // ミップマップ(縮小版の画像の列)を自動で作る | ||
| 235 | glGenerateMipmap(GL_TEXTURE_2D); | ||
| 236 | |||
| 237 | // 範囲外の色(GL_CLAMP_TO_BORDERの時に使う) | ||
| 238 | float border[] = { 1.0f, 0.0f, 1.0f, 1.0f }; | ||
| 239 | glTexParameterfv(GL_TEXTURE_2D, GL_TEXTURE_BORDER_COLOR, border); | ||
| 240 | return texture; | ||
| 241 | } | ||
| 242 | |||
| 243 | // フィルタリングの種類(Fキーで切り替え) | ||
| 244 | typedef struct { | ||
| 245 | GLint minFilter; | ||
| 246 | GLint magFilter; | ||
| 247 | const char *name; | ||
| 248 | } FilterMode; | ||
| 249 | |||
| 250 | static const FilterMode filterModes[] = { | ||
| 251 | { GL_NEAREST, GL_NEAREST, "GL_NEAREST" }, | ||
| 252 | { GL_LINEAR, GL_LINEAR, "GL_LINEAR" }, | ||
| 253 | { GL_LINEAR_MIPMAP_LINEAR, GL_LINEAR, "GL_LINEAR_MIPMAP_LINEAR(ミップマップ)" }, | ||
| 254 | }; | ||
| 255 | |||
| 256 | // ラップモードの種類(Wキーで切り替え) | ||
| 257 | typedef struct { | ||
| 258 | GLint mode; | ||
| 259 | const char *name; | ||
| 260 | } WrapMode; | ||
| 261 | |||
| 262 | static const WrapMode wrapModes[] = { | ||
| 263 | { GL_REPEAT, "GL_REPEAT" }, | ||
| 264 | { GL_MIRRORED_REPEAT, "GL_MIRRORED_REPEAT" }, | ||
| 265 | { GL_CLAMP_TO_EDGE, "GL_CLAMP_TO_EDGE" }, | ||
| 266 | { GL_CLAMP_TO_BORDER, "GL_CLAMP_TO_BORDER" }, | ||
| 267 | }; | ||
| 268 | |||
| 269 | // 今バインドされているテクスチャにフィルタリングを設定 | ||
| 270 | void setFilter(int mode) { | ||
| 271 | glTexParameteri(GL_TEXTURE_2D, GL_TEXTURE_MIN_FILTER, filterModes[mode].minFilter); | ||
| 272 | glTexParameteri(GL_TEXTURE_2D, GL_TEXTURE_MAG_FILTER, filterModes[mode].magFilter); | ||
| 273 | printf("フィルタリング: %s\n", filterModes[mode].name); | ||
| 274 | } | ||
| 275 | |||
| 276 | // 今バインドされているテクスチャにラップモードを設定(S = u方向、T = v方向) | ||
| 277 | void setWrap(int mode) { | ||
| 278 | glTexParameteri(GL_TEXTURE_2D, GL_TEXTURE_WRAP_S, wrapModes[mode].mode); | ||
| 279 | glTexParameteri(GL_TEXTURE_2D, GL_TEXTURE_WRAP_T, wrapModes[mode].mode); | ||
| 280 | printf("ラップモード: %s\n", wrapModes[mode].name); | ||
| 281 | } | ||
| 282 | |||
| 283 | // キーが押された瞬間だけ1を返す(押しっぱなしでは繰り返さない) | ||
| 284 | int keyPressed(GLFWwindow *window, int key, int *wasDown) { | ||
| 285 | int down = glfwGetKey(window, key) == GLFW_PRESS; | ||
| 286 | int pressed = down && !*wasDown; | ||
| 287 | *wasDown = down; | ||
| 288 | return pressed; | ||
| 289 | } | ||
| 290 | |||
| 179 | int main(int argc, char **argv) { | 291 | int main(int argc, char **argv) { |
| 180 | (void)argc; | 292 | (void)argc; |
| 181 | (void)argv; | 293 | (void)argv; |
| @@ -261,16 +373,35 @@ int main(int argc, char **argv) { | |||
| 261 | glVertexAttribPointer(1, 2, GL_FLOAT, GL_FALSE, 4 * sizeof(float), (void *)offset); | 373 | glVertexAttribPointer(1, 2, GL_FLOAT, GL_FALSE, 4 * sizeof(float), (void *)offset); |
| 262 | glEnableVertexAttribArray(1); | 374 | glEnableVertexAttribArray(1); |
| 263 | 375 | ||
| 376 | // テスト用のテクスチャを作る(最初はミップマップ付きのGL_LINEARとGL_REPEAT) | ||
| 377 | GLuint texture = createTestTexture(); | ||
| 378 | int filterMode = 2; | ||
| 379 | int wrapMode = 0; | ||
| 380 | setFilter(filterMode); | ||
| 381 | setWrap(wrapMode); | ||
| 382 | |||
| 264 | int reloadWasDown = 0; | 383 | int reloadWasDown = 0; |
| 384 | int filterWasDown = 0; | ||
| 385 | int wrapWasDown = 0; | ||
| 265 | 386 | ||
| 266 | // メインレンダリングループ | 387 | // メインレンダリングループ |
| 267 | while (!glfwWindowShouldClose(window)) { | 388 | while (!glfwWindowShouldClose(window)) { |
| 268 | // ESCキーで終了 | 389 | // ESCキーで終了 |
| 269 | if (glfwGetKey(window, GLFW_KEY_ESCAPE) == GLFW_PRESS) glfwSetWindowShouldClose(window, 1); | 390 | if (glfwGetKey(window, GLFW_KEY_ESCAPE) == GLFW_PRESS) glfwSetWindowShouldClose(window, 1); |
| 270 | 391 | ||
| 392 | // Fキーでフィルタリング、Wキーでラップモードを切り替える | ||
| 393 | glBindTexture(GL_TEXTURE_2D, texture); | ||
| 394 | if (keyPressed(window, GLFW_KEY_F, &filterWasDown)) { | ||
| 395 | filterMode = (filterMode + 1) % 3; | ||
| 396 | setFilter(filterMode); | ||
| 397 | } | ||
| 398 | if (keyPressed(window, GLFW_KEY_W, &wrapWasDown)) { | ||
| 399 | wrapMode = (wrapMode + 1) % 4; | ||
| 400 | setWrap(wrapMode); | ||
| 401 | } | ||
| 402 | |||
| 271 | // Rキーでシェーダーを再読み込み(失敗したら古いシェーダーのまま) | 403 | // Rキーでシェーダーを再読み込み(失敗したら古いシェーダーのまま) |
| 272 | int reloadDown = glfwGetKey(window, GLFW_KEY_R) == GLFW_PRESS; | 404 | if (keyPressed(window, GLFW_KEY_R, &reloadWasDown)) { |
| 273 | if (reloadDown && !reloadWasDown) { | ||
| 274 | GLuint newProgram = buildProgram(vertexPath, fragmentPath); | 405 | GLuint newProgram = buildProgram(vertexPath, fragmentPath); |
| 275 | if (newProgram) { | 406 | if (newProgram) { |
| 276 | glDeleteProgram(shaderProgram); | 407 | glDeleteProgram(shaderProgram); |
| @@ -280,7 +411,6 @@ int main(int argc, char **argv) { | |||
| 280 | puts("再読み込みに失敗しました。前のシェーダーを使い続けます"); | 411 | puts("再読み込みに失敗しました。前のシェーダーを使い続けます"); |
| 281 | } | 412 | } |
| 282 | } | 413 | } |
| 283 | reloadWasDown = reloadDown; | ||
| 284 | 414 | ||
| 285 | // 画面をクリア | 415 | // 画面をクリア |
| 286 | glClearColor(0.0f, 0.0f, 0.0f, 1.0f); | 416 | glClearColor(0.0f, 0.0f, 0.0f, 1.0f); |
| @@ -302,6 +432,11 @@ int main(int argc, char **argv) { | |||
| 302 | glUniform2f(glGetUniformLocation(shaderProgram, "uMouse"), | 432 | glUniform2f(glGetUniformLocation(shaderProgram, "uMouse"), |
| 303 | (float)mouseX * scale, (float)(windowH - mouseY) * scale); | 433 | (float)mouseX * scale, (float)(windowH - mouseY) * scale); |
| 304 | 434 | ||
| 435 | // テクスチャをユニット0にバインドし、サンプラーにユニットの番号を教える | ||
| 436 | glActiveTexture(GL_TEXTURE0); | ||
| 437 | glBindTexture(GL_TEXTURE_2D, texture); | ||
| 438 | glUniform1i(glGetUniformLocation(shaderProgram, "uTexture"), 0); | ||
| 439 | |||
| 305 | // クアッドを描画 | 440 | // クアッドを描画 |
| 306 | glBindVertexArray(VAO); | 441 | glBindVertexArray(VAO); |
| 307 | glDrawElements(GL_TRIANGLES, 6, GL_UNSIGNED_INT, 0); | 442 | glDrawElements(GL_TRIANGLES, 6, GL_UNSIGNED_INT, 0); |
| @@ -315,6 +450,7 @@ int main(int argc, char **argv) { | |||
| 315 | glDeleteVertexArrays(1, &VAO); | 450 | glDeleteVertexArrays(1, &VAO); |
| 316 | glDeleteBuffers(1, &VBO); | 451 | glDeleteBuffers(1, &VBO); |
| 317 | glDeleteBuffers(1, &EBO); | 452 | glDeleteBuffers(1, &EBO); |
| 453 | glDeleteTextures(1, &texture); | ||
| 318 | glDeleteProgram(shaderProgram); | 454 | glDeleteProgram(shaderProgram); |
| 319 | glfwDestroyWindow(window); | 455 | glfwDestroyWindow(window); |
| 320 | glfwTerminate(); | 456 | glfwTerminate(); |
ファイル: a/shader/playground.glsl | b/shader/playground.glsl
| 前 | 新 | ||
|---|---|---|---|
| @@ -3,20 +3,22 @@ | |||
| 3 | in vec2 vUv; | 3 | in vec2 vUv; |
| 4 | out vec4 out_color; | 4 | out vec4 out_color; |
| 5 | 5 | ||
| 6 | uniform float uTime; // 起動してからの秒数 | 6 | uniform float uTime; |
| 7 | uniform vec2 uResolution; // 画面の大きさ(ピクセル) | 7 | uniform vec2 uResolution; |
| 8 | uniform vec2 uMouse; // マウスの位置(ピクセル、左下が原点) | 8 | uniform sampler2D uTexture; |
| 9 | 9 | ||
| 10 | void main() { | 10 | void main() { |
| 11 | // ピクセル座標を0〜1に正規化 | 11 | vec2 p = (2.0 * gl_FragCoord.xy - uResolution) / uResolution.y; |
| 12 | vec2 uv = gl_FragCoord.xy / uResolution; | ||
| 13 | 12 | ||
| 14 | // 時間で動くグラデーション | 13 | // 床の上の点:地平線(p.y = 0)に近い程遠い(距離は 1 / -p.y) |
| 15 | vec3 color = 0.5 + 0.5 * cos(uTime + uv.xyx + vec3(0.0, 2.0, 4.0)); | 14 | float depth = 1.0 / max(-p.y, 0.001); |
| 15 | vec2 uv = vec2(p.x * depth, depth) * 0.5; | ||
| 16 | uv.y += uTime * 0.25; // 前に進む | ||
| 16 | 17 | ||
| 17 | // マウスの周りに白い円 | 18 | // texture()はifの外で呼ぶ(理由は本文で) |
| 18 | float d = length(gl_FragCoord.xy - uMouse); | 19 | vec3 floorColor = texture(uTexture, uv).rgb; |
| 19 | color = mix(color, vec3(1.0), 1.0 - smoothstep(18.0, 20.0, d)); | 20 | vec3 skyColor = vec3(0.45, 0.6, 0.85); |
| 21 | vec3 color = p.y < 0.0 ? floorColor : skyColor; | ||
| 20 | 22 | ||
| 21 | out_color = vec4(color, 1.0); | 23 | out_color = vec4(color, 1.0); |
| 22 | } | 24 | } |
コメント(0)
まだコメントはありません。
ログインするとコメント出来ます。