2. GLSL Overview
GLSL has several dialects, and there are several types of shaders.
In the first part of this chapter I'll go through all of them, so you know which GLSL you're looking at when you find shader code on the internet.
The second, bigger part is a tour of the language itself: types, vectors, swizzling, matrices, qualifiers, functions, control flow, built-in variables and functions, number pitfalls and the preprocessor.
Every feature comes with a small fragment shader that you can paste into the GLSL tester from chapter 1, and a screenshot of what it draws.
From chapter 3 on we'll use all of this without stopping to explain the syntax again.
2.1 Dialects
In the case of GLSL, different platforms use different dialects.
They share the same core language (everything from section 2.3 on works in all of them), but the first lines of a shader and a few rules differ.
OpenGL Core
Shaders for OpenGL Core are meant for desktops with OpenGL 3.2 to 4.6 (in practice 3.3 and newer).
This is the dialect we'll use in this series.
Feel free to look at the shader files in the GLSL tester you downloaded in the previous chapter.
The first line of every shader says which GLSL version it is written in.
Each OpenGL version has its own GLSL version:
| OpenGL | GLSL | First line |
|---|---|---|
| 2.0 | 1.10 | #version 110 |
| 2.1 | 1.20 | #version 120 |
| 3.0 | 1.30 | #version 130 |
| 3.1 | 1.40 | #version 140 |
| 3.2 | 1.50 | #version 150 core |
| 3.3 | 3.30 | #version 330 core |
| 4.0 to 4.6 | 4.00 to 4.60 | #version 400 core to #version 460 core |
From 3.3 on, the numbers simply match.
core means the core profile, without the old deprecated features; it's also the default when you leave it out.
The other option, compatibility, still allows the old built-ins like gl_FragColor, but macOS doesn't support it and we won't use it.
#version 450 core

in vec2 vUv;
out vec4 out_color;

void main() {
  out_color = vec4(vUv, 0.0, 1.0);
}
OpenGL ES and WebGL
Shaders for OpenGL ES are meant for mobile devices and embedded systems, and WebGL is OpenGL ES in the browser.
This dialect is called GLSL ES, and it has its own version numbers:
| API | GLSL ES | First line |
|---|---|---|
| OpenGL ES 2.0, WebGL 1 | 1.00 | #version 100 |
| OpenGL ES 3.0, WebGL 2 | 3.00 | #version 300 es |
| OpenGL ES 3.1 | 3.10 | #version 310 es |
| OpenGL ES 3.2 | 3.20 | #version 320 es |
GLSL ES 3.00 is only slightly different from OpenGL Core.
The main difference is in the header: the es after the number, and a precision qualifier:
#version 300 es
precision highp float;

in vec2 vUv;
out vec4 out_color;

void main() {
  out_color = vec4(vUv, 0.0, 1.0);
}
In a GLSL ES fragment shader, floats have no default precision, so you must choose one (highp, mediump or lowp, see section 2.15).
If you forget the precision line, the compiler stops with an error like this:
0:3(1): error: No precision specified in this scope for type `vec2'
The old GLSL ES 1.00 (OpenGL ES 2.0 and WebGL 1) looks more different, because it comes from the time before in and out:
#version 100
precision mediump float;

varying vec2 vUv;

void main() {
  gl_FragColor = vec4(vUv, 0.0, 1.0);
}
- Inputs from the vertex shader are declared with
varying(in the vertex shader too, as the output), and vertex inputs withattribute. - There are no user-defined outputs: the fragment shader writes the built-in
gl_FragColor. - Textures are read with
texture2D()instead oftexture(). forloops are only guaranteed to work with constant bounds, and integers are not guaranteed to be real 32-bit integers.
GLSL ES 3.00 replaced all of this with in, out and a user-defined output like our out_color.
One more difference you'll hit quickly: GLSL ES never converts types automatically, so float x = 1; is an error there, while desktop GLSL accepts it (section 2.4).
Vulkan
This is a modified version of OpenGL Core 4.50 and later, with Vulkan-specific rules.
Unlike the dialects above, Vulkan doesn't take GLSL source: the shader is compiled to SPIR-V before use, for example with glslangValidator -V shader.frag -o frag.spv or glslc shader.frag -o frag.spv.
Interestingly, once compiled, there are tools (like SPIRV-Cross) that turn SPIR-V back into GLSL, HLSL or MSL.
That's a great way to see how the other two big shading languages express the same thing.
OpenGL Core:
#version 450 core

in vec2 vUv;
out vec4 out_color;

uniform vec3 colorA;
uniform vec3 colorB;

void main() {
  out_color = vec4(mix(colorA, colorB, vUv.x), 1.0);
}
Vulkan:
#version 450

layout(location = 0) in vec2 vUv;
layout(location = 0) out vec4 out_color;

layout(set = 0, binding = 0) uniform Colors {
  vec3 colorA;
  vec3 colorB;
};

void main() {
  out_color = vec4(mix(colorA, colorB, vUv.x), 1.0);
}
- Every input and output needs an explicit
layout(location = N). - Uniforms can't stand alone: they must be inside a uniform block with a descriptor
setandbinding, or in apush_constantblock. - Some built-ins have other names, for example
gl_VertexIndexandgl_InstanceIndexinstead ofgl_VertexIDandgl_InstanceID.
If you load the Vulkan version into our OpenGL tester, it fails with error: unrecognized layout identifier 'set', because descriptor sets don't exist in OpenGL.
Without set = 0, the same block works in OpenGL 4.2 and newer.
Nintendo Systems
Unfortunately, because of NDAs I can't say much about this, but in my experience, the shaders I used with Vulkan worked on the Nintendo Switch without changes.
2.2 Types of Shaders
There are several types of shaders.
To draw anything, you need a vertex shader and a fragment shader; the rest are used when needed.
To understand where each one runs, here is the graphics pipeline as Vulkan shows it (OpenGL's is the same):

The graphics pipeline is explained in more detail in the OpenGL series and later in the Vulkan series.
Vertex Shader
Vertex shaders process each vertex of a 3D model and transform its position from model space to clip space (by applying the model, view and projection transformations from linear algebra chapters 11 and 12).
They can also compute per-vertex attributes like normals, colours and texture coordinates for the later stages.
So they transform 3D coordinates, compute per-vertex lighting, and pass texture coordinates to the fragment shader.
Our tester's vertex shader does the simplest possible job: it passes the rectangle's corners straight through.
Tessellation Control Shader
Tessellation control shaders are part of the tessellation pipeline.
They work on patches (groups of control points) and decide how finely each patch is cut into smaller triangles by setting the tessellation levels, then pass data on to the tessellation evaluation shader.
They're used to control the level of detail of curved surfaces (e.g. Bézier patches) and terrain: close to the camera, many triangles; far away, few.
Tessellation Evaluation Shader
Between the two tessellation shaders, fixed hardware (the tessellator) generates the new vertices.
Tessellation evaluation shaders then run once for each of them and compute its final position and attributes from the patch, for example by moving it up and down with a height map.
They define the shape of the subdivided surface (e.g. smooth curves or detailed terrain).
Note: Tessellation arrived in OpenGL 4.0 (2010), so older hardware doesn't support it. macOS (4.1) has it.
Geometry Shader
Geometry shaders run on whole primitives (points, lines, triangles) after the vertex and tessellation stages, and can change, create or throw away geometry.
They can emit new vertices or change the type of primitive.
They're used for things like turning points into particle quads, extruding silhouettes for shadow volumes, or drawing the normals of a mesh as lines for debugging.
They're often slow on real hardware, so modern engines avoid them where they can; chapter 15 shows why.
Fragment Shader
Fragment shaders process each pixel (more precisely, each fragment) produced by rasterization and decide its final colour, and optionally its depth.
They handle texturing, per-pixel lighting, post-processing effects and so on.
So they apply textures, compute lighting, blend colours and apply fog.
Almost everything in this series happens in the fragment shader.
Compute Shader
Compute shaders are general-purpose shaders that are not part of the graphics pipeline.
They run arbitrary calculations on the GPU (physics simulations, image processing, machine learning tasks…).
They're used for the parallel processing of tasks like particle simulations, fluid dynamics, or post-processing effects like blur.
Note: Compute shaders arrived in OpenGL 4.3 (2012). macOS stops at 4.1, so there are no compute shaders in OpenGL on a Mac.
| Stage | Runs once per | Needed? | Since | macOS | In this series |
|---|---|---|---|---|---|
| Vertex | vertex | yes | OpenGL 2.0 | yes | chapters 3, 4, 13 |
| Tessellation control | output control point | no | OpenGL 4.0 | yes | chapter 15 |
| Tessellation evaluation | generated vertex | no | OpenGL 4.0 | yes | chapter 15 |
| Geometry | primitive | no | OpenGL 3.2 | yes | chapter 15 |
| Fragment | fragment | yes | OpenGL 2.0 | yes | every chapter |
| Compute | work item | separate | OpenGL 4.3 | no | chapter 15 |
Newer APIs have even more stages: mesh shaders (and task shaders) replace the vertex, tessellation and geometry stages with one compute-like stage, and ray tracing shaders trace rays through the scene.
They exist in Vulkan and DirectX 12; OpenGL only has mesh shaders through an NVIDIA extension, so we won't cover them here.
2.3 The Structure of a Shader
From here on we'll learn the language itself.
Let's start with the tester's fragment shader, piece by piece:
#version 450 core

in vec2 vUv;
out vec4 out_color;

uniform vec3 uColorA;
uniform vec3 uColorB;
uniform vec3 uColorC;

void main() {
  vec3 temp = mix(uColorA, uColorB, vUv.x);
  vec3 blendedColor = mix(temp, uColorC, vUv.y * 0.95);
  out_color = vec4(blendedColor, 1.0);
}
#version 450 coremust be the very first line (only comments and empty lines may come before it).in vec2 vUv;is an input: a value the vertex shader wrote, interpolated for this pixel.out vec4 out_color;is an output: what we write here becomes the pixel's colour.uniform vec3 uColorA;is a value set from the C program; it is the same for every pixel of one draw call.void main()is the entry point. Every shader stage has exactly onemain, with no parameters and no return value; it communicates only throughin,outanduniformvariables.
The rest looks like C: statements end with ;, blocks use { }, and comments are // and /* */.
There is no #include in standard GLSL, no pointers, no strings, no malloc and no printf.
A shader can't print anything, so the way to see a value is to turn it into a colour, which is what we'll do all chapter.
How to try the examples
Every example below is a complete fragment shader.
Paste it into shader/fragment.glsl (on a Mac into shader/fragment.mac.glsl, with #version 410 core as the first line) and restart the tester as in chapter 1.
The examples don't use the uniforms, which is fine: as we saw in chapter 1, setting a uniform that doesn't exist does nothing.
When you're done, put the original shader back (it's in section 2.3 above).
2.4 Scalar Types and Literals
GLSL has five scalar (single-number) types:
| Type | What it holds | Example literals |
|---|---|---|
bool |
true or false |
true |
int |
32-bit signed integer | 7, -3, 0x1F |
uint |
32-bit unsigned integer | 7u, 0xFFu |
float |
32-bit floating-point number | 1.0, 0.5, 1.5e3, 2.0f |
double |
64-bit floating-point number (GLSL 4.00+) | 1.0lf |
#version 450 core

in vec2 vUv;
out vec4 out_color;

void main() {
  bool  isOn  = true;
  int   count = -3;
  uint  mask  = 255u;
  float speed = 2.5;
  double big  = 1.0lf;
  float e = 1.5e3;  // 1500.0
  out_color = vec4(speed);
}
float is the type you'll use 99% of the time.
double exists, but on gaming GPUs it often runs many times slower than float, and GLSL ES doesn't have it at all.
Small trap: like in C, an integer literal starting with 0 is octal, so 010 is 8, not 10.
Integer or float? The 1/2 trap
1 and 1.0 are different things in GLSL.
1 is an int, 1.0 is a float, and the operators work on the types they get, exactly like in C.
Look at this shader:
#version 450 core

in vec2 vUv;
out vec4 out_color;

void main() {
  float a = 1 / 2;      // int / int = 0, then converted to 0.0
  float b = 1.0 / 2.0;  // float / float = 0.5

  float v = vUv.x < 0.5 ? a : b;  // left half: a, right half: b
  out_color = vec4(v, v, v, 1.0);
}

The left half is black, not grey.
1 / 2 is an integer division, which throws away the remainder, so the result is 0.
Only then is it converted to the float 0.0 for a.
1.0 / 2.0 is a float division and gives 0.5, the 50% grey on the right.
Desktop GLSL automatically converts int to float (and int to uint, and anything to double) when it has to, which is why float a = 1 / 2; compiles at all.
It never converts the other way: int i = 2.5; is an error, and you have to write int(2.5).
GLSL ES doesn't convert at all.
Rule of thumb: write every number that is meant to be a float with a decimal point:1.0,0.5,2.0. Then your shader behaves the same everywhere, and you never fall into the 1/2 trap.
Names you can't use
Names are made of letters, digits and _, and can't start with a digit, like in C.
Names that start with gl_ belong to GLSL, and names with two underscores in a row are reserved too.
GLSL also reserves a list of words for the future, and some of them are words you'd like to use: filter, input, output, common, active, half, long, short.
(sample used to be on that list too, but since GLSL 4.00 it is a real keyword, so it can't be a variable name either.)
When I first wrote the colour filter example of section 2.7, I called the variable filter, and got this:
0:8(7): error: illegal use of reserved word `filter'2.5 Vectors and Constructors
Vectors are the heart of GLSL.
A vector is a list of 2, 3 or 4 numbers that you work with as one value, exactly the vectors from linear algebra chapter 2.
A position, a direction, a colour, a UV coordinate: all vectors.
| Components | float |
int |
uint |
bool |
double |
|---|---|---|---|---|---|
| 2 | vec2 |
ivec2 |
uvec2 |
bvec2 |
dvec2 |
| 3 | vec3 |
ivec3 |
uvec3 |
bvec3 |
dvec3 |
| 4 | vec4 |
ivec4 |
uvec4 |
bvec4 |
dvec4 |
You make a vector with a constructor: the type name used like a function.
The arguments are used from left to right to fill the components, and vectors among the arguments are unpacked:
#version 450 core

in vec2 vUv;
out vec4 out_color;

void main() {
  vec3 a = vec3(1.0);                 // (1, 1, 1)
  vec3 b = vec3(1.0, 2.0, 3.0);       // (1, 2, 3)
  vec4 c = vec4(b, 1.0);              // (1, 2, 3, 1)
  vec4 d = vec4(vUv, 0.0, 1.0);       // (u, v, 0, 1)
  vec2 e = vec2(c);                   // (1, 2): z and w are dropped
  ivec2 f = ivec2(2.7, -2.7);         // (2, -2): truncated toward zero
  bvec3 g = bvec3(0.0, 1.0, 5.0);     // (false, true, true)
  out_color = d;
}
- A single number fills every component:
vec3(1.0)is (1, 1, 1). - Otherwise the number of components must be exactly enough.
vec4(vUv, 0.0)gives only 3 and is an error ("too few components"), andvec2(1.0, 2.0, 3.0)is an error too ("too many parameters"). - A single larger vector may be shortened:
vec2(c)keeps the first two components. - Constructors also convert:
int(2.7)is 2 andint(-2.7)is −2 (the fraction is cut off, toward zero),float(3)is 3.0,bool(0.0)is false and anything else is true.
This shader writes d, the UV coordinate itself, as the colour.
Red is u (0 on the left, 1 on the right) and green is v (0 at the bottom, 1 at the top):
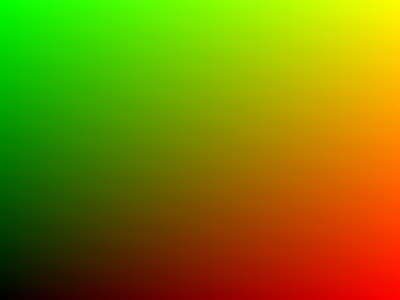
That's the most useful debugging picture in shader programming: whenever you don't know what a value looks like, put it into a colour.
Black is (0, 0), red is (1, 0), green is (0, 1), and red plus green is yellow at (1, 1).
2.6 Swizzling
To read the components of a vector, you write a dot and their names.
There are three sets of names for the same four components, so the code can say what the vector means:
x y z wfor positions and directionsr g b afor colourss t p qfor texture coordinates
The fun part: you can pick several components at once, in any order, and even repeat them.
This is called swizzling, and the result is a new vector:
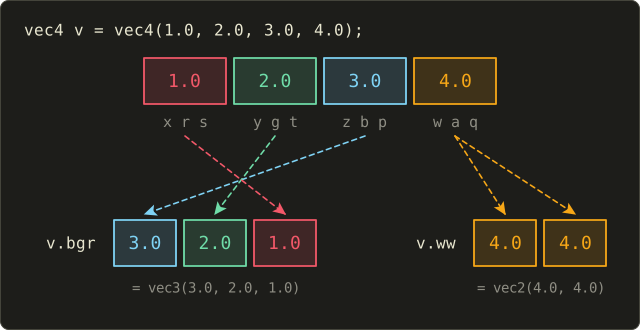
#version 450 core

in vec2 vUv;
out vec4 out_color;

void main() {
  vec4 v = vec4(1.0, 2.0, 3.0, 4.0);
  vec3 a = v.xyz;    // (1, 2, 3)
  vec3 b = v.bgr;    // (3, 2, 1)
  vec2 c = v.ww;     // (4, 4)
  vec4 d = v.xxyy;   // (1, 1, 2, 2)
  float e = v.q;     // 4
  out_color = d;
}
The rules are short:
- At most 4 names, and all from the same set:
v.xgis an error ("invalid swizzle"). - Only components that exist: a
vec2has no.z. - Reading may repeat a component (
v.xxx), writing may not:v.xx = vec2(2.0);is an error, because which value should win?
Let's swizzle a real picture.
This is the two-colour gradient the tester started with in its first version, red on the left and green on the right:
#version 450 core

in vec2 vUv;
out vec4 out_color;

void main() {
  vec3 red = vec3(1.0, 0.0, 0.0);
  vec3 green = vec3(0.0, 1.0, 0.0);
  vec3 col = mix(red, green, vUv.x);

  out_color = vec4(col, 1.0);
}
mix(a, b, t) blends from a to b: , so t = 0 gives a and t = 1 gives b (chapter 3 looks at it in detail).
Now change only the last line, so that red and blue swap places:
#version 450 core

in vec2 vUv;
out vec4 out_color;

void main() {
  vec3 red = vec3(1.0, 0.0, 0.0);
  vec3 green = vec3(0.0, 1.0, 0.0);
  vec3 col = mix(red, green, vUv.x);

  out_color = vec4(col.bgr, 1.0);  // reversed: (b, g, r)
}
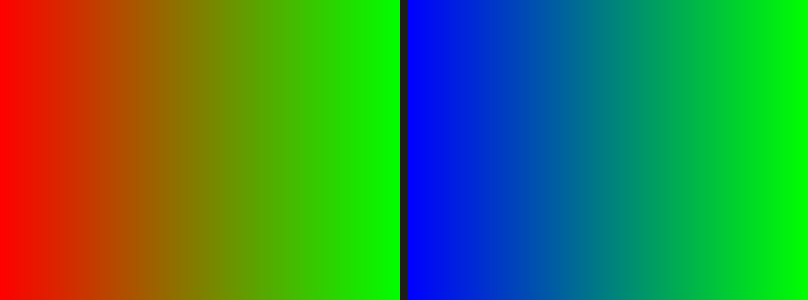
On the left, the colour is .
col.bgr reads it backwards, , so the red part moves into the blue channel and the left side turns blue.
Write masks
A swizzle on the left side of = writes only those components and leaves the others alone.
That's called a write mask:
#version 450 core

in vec2 vUv;
out vec4 out_color;

void main() {
  vec4 c = vec4(0.0);  // (0, 0, 0, 0)
  c.rg = vUv;          // write only red and green
  c.b = 1.0 - vUv.x;   // blue gets brighter towards the left
  c.a = 1.0;
  out_color = c;
}
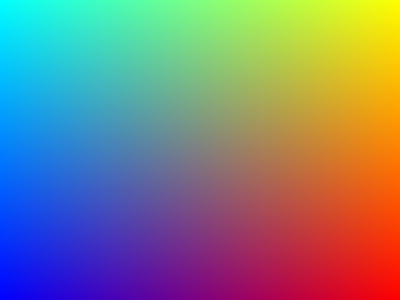
For the pixel at vUv = (0.25, 0.5), c goes from (0, 0, 0, 0) to (0.25, 0.5, 0, 0), then (0.25, 0.5, 0.75, 0) and finally (0.25, 0.5, 0.75, 1).
The masks can be in any order too: v.zy = vec2(3.0, 2.0); writes 3 into z and 2 into y.
2.7 Operators
GLSL has C's operators, and on vectors they work component by component:
#version 450 core

in vec2 vUv;
out vec4 out_color;

void main() {
  vec3 a = vec3(1.0, 2.0, 3.0);
  vec3 b = vec3(4.0, 5.0, 6.0);
  vec3 s = a + b;      // (5, 7, 9)
  vec3 p = a * b;      // (4, 10, 18): component-wise!
  vec3 k = a * 2.0;    // (2, 4, 6)
  vec3 q = b / a;      // (4, 2.5, 2)
  vec3 n = -a;         // (-1, -2, -3)
  bool same = (a == b);              // false: one bool for the whole vector
  bvec3 less = lessThan(a, b);       // (true, true, true)
  bool anyBig = any(greaterThan(b, vec3(5.5)));  // true
  bool allPos = all(greaterThan(a, vec3(0.0)));  // true
  out_color = vec4(p, 1.0);
}
Note that a * b on two vectors is not the dot product or the cross product from linear algebra.
It's the component-wise product (also called the Hadamard product).
The dot and cross products are functions: dot(a, b) and cross(a, b).
A vector and a scalar combine by applying the scalar to every component, so a * 2.0 doubles everything.
The component-wise product is exactly what you want for colours.
Multiplying a colour by another colour works like a coloured filter in front of a lamp: each channel is scaled separately.
#version 450 core

in vec2 vUv;
out vec4 out_color;

void main() {
  vec3 col = vec3(vUv, 0.0);              // the UV colours
  vec3 tint = vec3(1.0, 0.5, 1.0);        // halve the green channel
  col = col * tint + vec3(0.0, 0.0, 0.3);  // then add a little blue

  out_color = vec4(col, 1.0);
}

At vUv = (0.5, 0.8): col is (0.5, 0.8, 0), times (1, 0.5, 1) is (0.5, 0.4, 0), plus (0, 0, 0.3) is (0.5, 0.4, 0.3), a muted brown.
Compared to the UV picture of section 2.5, the green corner is much darker and every pixel has a bit of blue.
Comparisons
<, >, <= and >= only work on scalars.
a < b with two vectors is an error ("operands to relational operators must be scalar").
== and != do work on vectors, but they give one bool for the whole vector: true only if every component is equal.
For component-wise comparisons there are functions that return a bvec:
lessThan,lessThanEqual,greaterThan,greaterThanEqual,equal,notEqualcompare component by component.any(bv)is true if at least one component is true,all(bv)if all are, andnot(bv)flips each one.
Integer operators
For int and uint (and their vectors) there are a few more operators, like in C:
%is the remainder:7 % 3is 1. It only works on integers (7.0 % 2.0is an error; for floats there's themodfunction, chapter 7), and the result for negative numbers is undefined, so keep both sides positive.&,|,^,~,<<and>>are the bit operators (and, or, exclusive or, not, shifts). We'll need them for hashing in chapter 8.- Integer division truncates toward zero:
7 / 2is 3 and-7 / 2is −3.
For bool there are &&, ||, !, and one C doesn't have: ^^, the logical exclusive or.
2.8 Matrices
Matrices are the other big building block, and they work exactly like in linear algebra chapter 6:
mat2,mat3,mat4are square matrices of floats with 2, 3 or 4 rows and columns.matCxRhas C columns and R rows:mat2x3has 2 columns and 3 rows. Note the order: columns first. (mat4x4is the same asmat4.)dmat2todmat4hold doubles. There are no integer matrices.
Column-major: the constructor fills columns
GLSL stores matrices column by column, and the constructor fills them that way too.
Every group of three numbers in a mat3 constructor is one column, not one row:
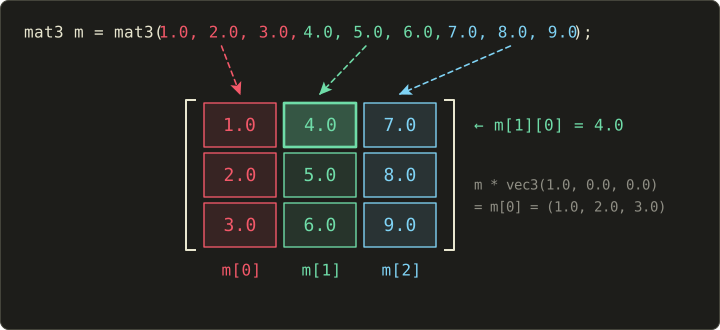
So mat3(1.0, 2.0, 3.0, 4.0, 5.0, 6.0, 7.0, 8.0, 9.0) is this matrix:
If you write the numbers in the shape of the matrix you have in mind (rows on lines), you get its transpose.
That's the most common matrix bug in GLSL.
Indexing follows the same order: m[i] is column i, as a vector, and m[col][row] is one number:
#version 450 core

in vec2 vUv;
out vec4 out_color;

void main() {
  mat3 m = mat3(
    1.0, 2.0, 3.0,  // column 0
    4.0, 5.0, 6.0,  // column 1
    7.0, 8.0, 9.0   // column 2
  );
  vec3 c1 = m[1];     // column 1: (4, 5, 6)
  float e = m[1][0];  // column 1, row 0: 4
  m[2][2] = 0.0;      // column 2, row 2: 9 becomes 0

  mat4 I = mat4(1.0);            // identity (1 on the diagonal)
  mat3 r = mat3(I);              // upper-left 3x3 of I
  mat2x3 t = mat2x3(1.0);        // 2 columns, 3 rows
  vec3 v = vec3(1.0, 0.0, 0.0);
  vec3 a = m * v;                // matrix times vector: column 0 = (1, 2, 3)
  vec3 b = v * m;                // row vector times matrix: (1, 4, 7)
  mat3 mm = m * m;               // matrix product
  mat3 cw = matrixCompMult(m, m);  // element by element
  out_color = vec4(a + b, 1.0);
}
In math notation, the element (row 1, column 2, counting from 1) is m[1][0] in GLSL: column index first, both counting from 0.
A single number makes a diagonal matrix (mat4(1.0) is the identity), and a matrix from a bigger matrix takes its upper-left corner.
Multiplication is real matrix multiplication
Unlike vectors, * with a matrix is the real matrix product from linear algebra, not a component-wise one:
m * v: the matrix times a column vector, . This is the one you'll use for transformations.v * m: the vector as a row vector times the matrix, which is the same as (linear algebra chapter 7).m * m: the matrix product.matrixCompMult(a, b): the element-by-element product, if you ever need it.
The sizes must fit: a mat3 times a vec4 is an error ("size mismatch for matrix multiplication").
Remember from linear algebra chapter 6 that adds up the columns, weighted by the components of :
So column 0 says where the x component goes, column 1 where y goes, column 2 where z goes.
For a colour, x, y, z are red, green and blue, and that gives us a nice experiment: a colour matrix that moves red into green, green into blue and blue into red.
#version 450 core

in vec2 vUv;
out vec4 out_color;

void main() {
  vec3 red = vec3(1.0, 0.0, 0.0);
  vec3 green = vec3(0.0, 1.0, 0.0);
  vec3 col = mix(red, green, vUv.x);

  // Each group of three numbers is one COLUMN
  mat3 m = mat3(
    0.0, 1.0, 0.0,  // column 0: where red goes   (to green)
    0.0, 0.0, 1.0,  // column 1: where green goes (to blue)
    1.0, 0.0, 0.0   // column 2: where blue goes  (to red)
  );

  if (vUv.y > 0.5) {
    col = m * col;  // top half: matrix times column vector
  } else {
    col = col * m;  // bottom half: row vector times matrix
  }
  out_color = vec4(col, 1.0);
}
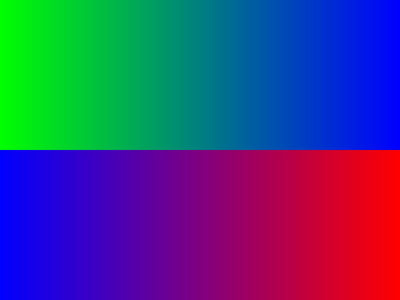
Let's check the left edge, where col is pure red (1, 0, 0).
Top half: , green, exactly what column 0 says.
Bottom half: col * m is , whose components are the dot products of col with the columns: , blue.
The two orders really give different results, which is why "multiply in the right order" matters so much with transformation matrices in chapter 13.
2.9 Arrays and Structs
Arrays work like in C, with fixed sizes, and they can also be built with a constructor.
.length() gives the number of elements:
#version 450 core

in vec2 vUv;
out vec4 out_color;

const vec3 palette[4] = vec3[4](
  vec3(0.91, 0.12, 0.39),  // pink
  vec3(1.00, 0.76, 0.03),  // yellow
  vec3(0.30, 0.69, 0.31),  // green
  vec3(0.13, 0.59, 0.95)   // blue
);

void main() {
  int i = int(vUv.x * 4.0);  // 0, 1, 2 or 3
  i = min(i, 3);             // never read past the end
  out_color = vec4(palette[i], 1.0);
}

vUv.x * 4.0 runs from 0 to almost 4, and int() cuts off the fraction, so each quarter of the window gets one index.
For example at vUv.x = 0.3: , int(1.2) is 1, yellow.
min(a, b) returns the smaller of the two values, so min(i, 3) makes sure the index is never 4, even if vUv.x were exactly 1.0.
Reading outside an array doesn't crash a shader; it's undefined, and you get garbage or zero, which is much harder to find.
Structs bundle values, like in C, and you get a constructor for free:
#version 450 core

in vec2 vUv;
out vec4 out_color;

struct Light {
  vec3 color;
  float intensity;
};

void main() {
  float weights[3] = float[3](0.25, 0.5, 0.25);
  float w[] = float[](1.0, 2.0);   // size taken from the initializer
  int n = weights.length();        // 3

  Light sun = Light(vec3(1.0, 0.9, 0.7), 2.0);
  vec3 lit = sun.color * sun.intensity;

  Light lights[2];
  lights[0] = sun;
  lights[1].color = vec3(0.2, 0.3, 1.0);
  lights[1].intensity = 0.5;
  out_color = vec4(lit * weights[1], 1.0);
}
We'll use exactly this kind of struct array for multiple lights in chapter 10.
2.10 Qualifiers
A qualifier in front of a variable says where its value comes from and who may change it.
These are the ones you'll see in this series:
| Qualifier | Meaning |
|---|---|
| (none) | an ordinary local or global variable |
const |
a constant: must be initialized and can never change |
in |
input of this stage: a vertex attribute in the vertex shader, an interpolated value from the vertex shader in the fragment shader |
out |
output of this stage: to the next stage, or the colour that goes to the framebuffer in the fragment shader |
uniform |
set from the C program, the same for every vertex and pixel of a draw call, read-only |
layout(location = N) |
gives an in or out a fixed number |
flat, smooth, noperspective |
how an out from the vertex shader is interpolated |
#version 450 core

in vec2 vUv;
layout(location = 0) out vec4 out_color;

const float PI = 3.14159265;
uniform float uTime;
uniform vec3 uTint = vec3(1.0);   // default value (desktop GLSL only)

layout(location = 1) out vec4 out_extra;

void main() {
  const int steps = 4;
  out_color = vec4(uTint * PI, 1.0);
  out_extra = vec4(float(steps));
}
layout(location = N)on a vertex input is the number you pass toglVertexAttribPointerin C. Our vertex shader haslayout(location = 0) in vec2 aPosition;andlayout(location = 1) in vec2 aUv;, which match the0and1inmain.c.- On a fragment shader output it chooses the colour buffer. With one output, location 0 (the default) is the window; extra outputs like
out_extraabove only matter when you render into several images at once. - Assigning to a
constor auniformis a compile error ("assignment to read-only variable"). - A uniform can have a default value, used until the C program sets it. That's desktop GLSL only; GLSL ES and Vulkan don't allow it.
- By default (
smooth), the rasterizer interpolates everyoutof the vertex shader across the triangle.flatturns that off and uses one vertex's value;intanduintoutputs must beflat, because an interpolated integer makes no sense. Chapter 3 looks at interpolation in detail.
2.11 Functions
Functions look like C functions.
They must be declared before they're used, either by defining them above, or with a prototype:
#version 450 core

in vec2 vUv;
out vec4 out_color;

float brightness(vec3 c);   // prototype: defined later

void split(in vec3 c, out float lo, out float hi) {
  lo = min(c.r, min(c.g, c.b));
  hi = max(c.r, max(c.g, c.b));
}

void clampInPlace(inout vec3 c) {
  c = clamp(c, 0.0, 1.0);
}

float twice(float x) { return 2.0 * x; }
vec3 twice(vec3 v) { return 2.0 * v; }   // overload

void main() {
  vec3 col = vec3(vUv, 0.5);
  float lo, hi;
  split(col, lo, hi);
  clampInPlace(col);
  out_color = vec4(twice(col) * brightness(col), 1.0);
}

float brightness(vec3 c) {
  return (c.r + c.g + c.b) / 3.0;
}
There are no pointers or references in GLSL, so parameters are passed by copying, and a qualifier says in which direction:
in(the default): the value is copied into the function. Changing it inside doesn't change the caller's variable.out: nothing comes in (the value is undefined at the start), and the final value is copied back to the caller when the function returns. That's how a function returns several values, likeloandhiabove.inout: copied in and copied back out, so the function can change the caller's variable.
Functions may be overloaded: two twice functions with different parameter types are fine, and the compiler picks by the argument type, the same way the built-in functions work for float, vec2, vec3 and vec4.
What's not allowed is recursion: a function may not call itself, directly or through another function ("function has static recursion").
GPUs have no call stack for it.
max(a, b) is the opposite of min, the larger of the two values.
clamp(x, a, b) keeps x between a and b: .
Both work per component on vectors.
Here is a small, visible example with an inout parameter:
#version 450 core

in vec2 vUv;
out vec4 out_color;

// Returns a colour between a and b
vec3 gradient(vec3 a, vec3 b, float t) {
  return mix(a, b, t);
}

// Changes c in place: amount 0 = unchanged, 1 = black
void darken(inout vec3 c, float amount) {
  c = c * (1.0 - amount);
}

void main() {
  vec3 col = gradient(vec3(1.0, 0.0, 0.0), vec3(0.0, 1.0, 0.0), vUv.x);
  darken(col, vUv.y);  // darker towards the top
  out_color = vec4(col, 1.0);
}
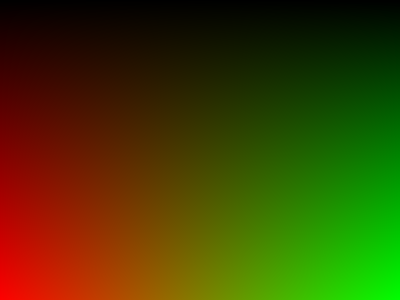
At the bottom (vUv.y = 0) the colour stays as it is, and at the top it's multiplied by almost 0.
In the middle of the window, , a dark olive.
2.12 Control Flow
if/else, for, while, do/while, switch, break, continue and return work like in C, and so does the ?: operator.
There's no goto.
And there's one statement that only exists in fragment shaders: discard, which throws the current fragment away, so nothing is written for this pixel.
#version 450 core

in vec2 vUv;
out vec4 out_color;

void main() {
  int bar = int(vUv.x * 10.0);  // which of the 10 bars: 0 to 9

  float height = 0.0;
  for (int i = 0; i <= bar; i++) {
    height += 0.1;  // bar 0: 0.1, bar 1: 0.2, ... bar 9: 1.0
  }

  if (vUv.y > height) {
    discard;  // above the bar: write nothing
  }

  vec3 col;
  if (bar % 2 == 0) {
    col = vec3(1.0, 0.85, 0.3);
  } else {
    col = vec3(0.95, 0.45, 0.2);
  }
  out_color = vec4(col, 1.0);
}

Every pixel computes which bar it's in, adds 0.1 once per bar up to its own, and throws itself away if it's above the bar.
The black above the bars isn't drawn by us at all: it's the clear colour from glClearColor in main.c, which shows wherever we discard.
bar % 2 alternates the colours.
switch works on integers and needs break like in C:
#version 450 core

in vec2 vUv;
out vec4 out_color;

void main() {
  vec3 col = vec3(0.0);

  if (vUv.x < 0.5) {
    col.r = 1.0;
  } else if (vUv.y < 0.5) {
    col.g = 1.0;
  } else {
    col.b = 1.0;
  }

  for (int i = 0; i < 4; i++) {
    if (i == 2) continue;  // skip i = 2
    col *= 0.9;
  }

  int k = 0;
  while (k < 3) {
    k++;
  }

  do {
    k--;
  } while (k > 0);

  int mode = int(vUv.y * 3.0);
  switch (mode) {
    case 0:
      col += vec3(0.1);
      break;
    case 1:
      col += vec3(0.2);
      break;
    default:
      col += vec3(0.3);
      break;
  }

  float v = vUv.x > 0.5 ? 1.0 : 0.0;  // ternary
  out_color = vec4(col * v, 1.0);
}
Branches on the GPU
A GPU doesn't run each pixel completely on its own.
It runs them in groups (usually 32 or 64, called warps or wavefronts) that execute the same instruction at the same time.
If all pixels of a group take the same side of an if, everything is fast.
If some go one way and some the other, the group runs both sides, and each pixel ignores the side it didn't take.
So a branch costs nothing when nearby pixels agree (like our bars, where the condition only changes at the bar edges), and can double the cost when they don't.
Don't be afraid of if in shaders, but remember that the work of both sides may be paid.
2.13 Built-in Variables
Besides your own in and out variables, every stage has a few built-in ones, all starting with gl_:
| Variable | Stage | Type | Meaning |
|---|---|---|---|
gl_Position |
vertex, out | vec4 |
the vertex position in clip space (must be written) |
gl_VertexID |
vertex, in | int |
the index of the current vertex |
gl_InstanceID |
vertex, in | int |
the index of the current instance when drawing several copies |
gl_PointSize |
vertex, out | float |
the size of a point when drawing points |
gl_FragCoord |
fragment, in | vec4 |
x, y: window position of the pixel; z: its depth; w: 1 divided by the clip-space w |
gl_FrontFacing |
fragment, in | bool |
true if the triangle faces the camera |
gl_FragDepth |
fragment, out | float |
overrides the depth of the fragment |
gl_PointCoord |
fragment, in | vec2 |
position inside a point, from 0 to 1 |
Our vertex shader writes gl_Position = vec4(aPosition, 0.0, 1.0);.
Clip space and the w component come from linear algebra chapter 12; with w = 1.0, the x and y we write are directly the normalized device coordinates from −1 to 1.
In the fragment shader, gl_FragColor is not in this list: it was removed from the core profile, and we write our own out vec4 out_color instead.
Writing gl_FragDepth works, but it usually turns off the GPU's early depth test, so only do it when you need it.
gl_FragCoord is the most useful one for us.
Its xy is the position of the pixel in the window, in pixels, with (0, 0) in the bottom-left corner, like vUv.
It points to the centre of the pixel, so the bottom-left pixel has (0.5, 0.5), and the top-right pixel of our 800 × 600 window has (799.5, 599.5):
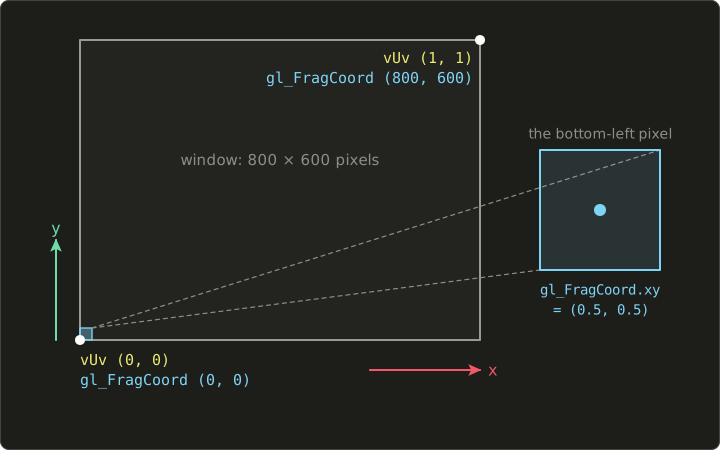
vUv depends on the rectangle we draw, gl_FragCoord only on the window.
Since it's in pixels, it's perfect for patterns with a fixed size in pixels, like a checkerboard:
#version 450 core

in vec2 vUv;
out vec4 out_color;

void main() {
  ivec2 cell = ivec2(gl_FragCoord.xy) / 50;  // 50x50-pixel cells
  bool even = (cell.x + cell.y) % 2 == 0;

  vec3 col = even ? vec3(0.95) : vec3(0.15);
  out_color = vec4(col, 1.0);
}
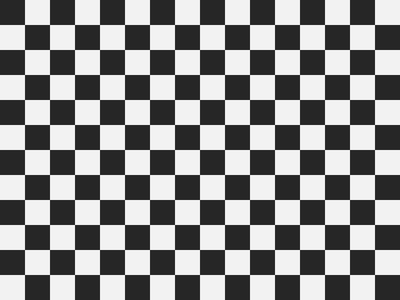
The pixel at (125.5, 75.5) becomes ivec2(125, 75) and then, by integer division, cell (2, 1).
is odd, so it's dark.
Neighbouring cells always differ by 1 in x or y, so the colours alternate in both directions.
Note: On a Mac with a Retina display, the window's framebuffer has twice as many pixels as the window size says, so gl_FragCoord goes up to 1600 × 1200 and the squares look half as big. Chapter 5 shows how to deal with that.
2.14 Built-in Functions
GLSL comes with a large library of math functions, and almost all of them work on float and, per component, on vec2, vec3 and vec4.
They're fast (many are single GPU instructions), so use them instead of writing your own.
Here are the most important ones with the chapter where we use them first.
I'll explain each one again with a picture when we get there.
| Function | What it computes | Explained in |
|---|---|---|
min(a, b), max(a, b) |
the smaller / larger value | 2 |
clamp(x, a, b) |
, keeps x between a and b | 2 |
mix(a, b, t) |
, blends from a to b | 2, 3 |
abs(x), sign(x) |
, and −1, 0 or 1 | 3, 6 |
floor(x), ceil(x) |
, | 7 |
fract(x) |
, the part after the decimal point | 5, 7 |
mod(x, y) |
7 | |
step(e, x) |
0 if x is less than e, otherwise 1 | 6 |
smoothstep(e0, e1, x) |
with | 3, 6 |
sin, cos, tan, asin, acos, atan |
trigonometry, in radians | 3, 7 |
radians(d), degrees(r) |
and | 3 |
pow(x, y), sqrt(x), inversesqrt(x) |
, , | 9, 10 |
exp, log, exp2, log2 |
, , , | 6, 14 |
length(v), distance(a, b) |
, | 3, 6 |
dot(a, b) |
3, 4 | |
cross(a, b) |
(vec3 only) | 12, 14 |
normalize(v) |
4 | |
reflect(i, n) |
9 | |
transpose(m), inverse(m), determinant(m) |
, , | 13 |
lessThan, equal, any, all, … |
component-wise comparisons | 2 |
texture(s, uv), texelFetch, textureSize |
read from a texture | 11 |
dFdx, dFdy, fwidth |
how fast a value changes from one pixel to the next | 6, 12 |
floatBitsToUint, uintBitsToFloat |
reinterpret the bits of a number | — |
The math is the same as in the linear algebra series, so length, dot, cross and normalize do exactly what linear algebra chapters 3 to 5 describe.
Note that length is a function, length(v), while .length() on an array is the number of elements.
2.15 Precision and Number Pitfalls
Precision qualifiers
In GLSL ES, every float has a precision: highp (a real 32-bit float), mediump (on many mobile GPUs a 16-bit float with about 3 decimal digits) or lowp (enough for a colour from 0 to 1).
mediump is faster and uses less power, which matters on phones, but it runs out fast: a 16-bit float can't hold numbers above 65504, and at 1000 the next number it can store is 1000.5.
In desktop GLSL these qualifiers are allowed so that the same code compiles, but they do nothing:
#version 450 core

in vec2 vUv;
out vec4 out_color;

precision highp float;   // accepted on desktop, but does nothing
highp vec2 hp;
mediump float mp;
lowp vec4 lp;

void main() {
  out_color = vec4(vUv, 0.0, 1.0);
}
float is not exact
A 32-bit float has about 7 significant decimal digits.
Two consequences that hit shader programmers all the time:
- Sums drift. In the bar shader above, adding 0.1 ten times doesn't give 1.0 but 1.0000001, because 0.1 can't be stored exactly. Never test floats with
==; test against a small range instead. - Big numbers lose the small steps. Above 65536, the distance between two neighbouring floats is . If a game passes the time in seconds and has been running for a day (86,400 seconds), the time can only change in steps of about 0.008, and an animation like
sin(time * 20.0)starts to stutter. Games reset or wrap their time values for this reason. We'll meet the same problem with random numbers in chapter 8.
Other things that are undefined
- Dividing by zero doesn't crash a shader, but the result is undefined: typically infinity or NaN ("not a number") for floats, garbage for integers.
sqrtof a negative number,logof zero or less,pow(x, y)with negative x, andasin/acosoutside −1 to 1 are undefined too. A NaN spreads through every calculation it touches, and often shows up as black or flickering pixels.%with negative numbers, and shifting by 32 bits or more, are undefined.
When a shader shows black spots or flickers, a NaN or a division by zero is the first thing to look for.
2.16 The Preprocessor
Before compiling, GLSL runs a preprocessor that works like C's:
#define NAME valueand macros with parameters,#undef.#if,#ifdef,#ifndef,#elif,#else,#endifto include or leave out code.#errorto stop with a message,#pragma,#line, and#extensionto turn on extensions.- Predefined:
__VERSION__(e.g. 450),__LINE__,GL_core_profilein the core profile andGL_ESin GLSL ES.
There's no #include in standard GLSL (some compilers like glslang offer one as an extension), and no strings.
#version 450 core
#define STRIPES 8
#define USE_UV_COLOR 1

in vec2 vUv;
out vec4 out_color;

void main() {
#if USE_UV_COLOR
  vec3 col = vec3(vUv, 0.0);
#else
  vec3 col = vec3(1.0);
#endif

  int stripe = int(vUv.x * float(STRIPES));
  if (stripe % 2 == 1) {
    col *= 0.3;
  }
  out_color = vec4(col, 1.0);
}
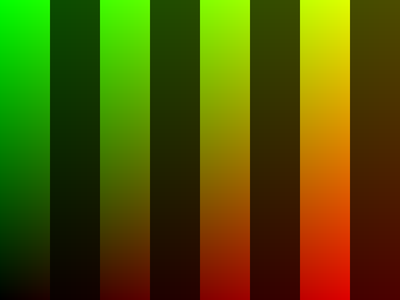
Change USE_UV_COLOR to 0 and the stripes become white and dark grey; change STRIPES to 4 and you get four wide stripes.
Note float(STRIPES): STRIPES is replaced by the text 8, an int, so we convert it before multiplying it with a float (desktop GLSL would convert it for us, but GLSL ES wouldn't).
Here are a few more forms, all valid:
#version 450 core
#define PI 3.14159265
#define SQUARE(x) ((x) * (x))
#define QUALITY 2

in vec2 vUv;
out vec4 out_color;

void main() {
#ifdef GL_core_profile
  float a = 1.0;
#else
  float a = 0.0;
#endif

#if QUALITY >= 2
  float s = SQUARE(vUv.x + 1.0);
#elif QUALITY == 1
  float s = vUv.x;
#else
  float s = 0.0;
#endif

#if __VERSION__ < 410
#error "This shader needs GLSL 4.10 or newer"
#endif
  out_color = vec4(s * a / PI);
}
As in C, put brackets around macro parameters: without them, SQUARE(vUv.x + 1.0) would become vUv.x + 1.0 * vUv.x + 1.0.
2.17 How This Is Used in Real Games
- Uber-shaders and permutations. Engines write one big shader with many
#ifblocks (normal map on or off, shadows on or off, number of lights…) and compile it many times with different#defines, which the C++ code adds in front of the source before compiling. Each result is a shader permutation; big games have tens of thousands of them, which is a big part of why shader compilation takes so long. - Packing data into vector channels. Swizzles make it cheap to store several values in one
vec4. A common texture layout stores ambient occlusion, roughness and metalness in the r, g and b channels of one texture (often called an ORM texture), and the shader reads them with.r,.g,.b. - Colour matrices. Colour grading, colour-blindness simulation and the "sepia" or "night vision" filters in games are often just a
mat3ormat4multiplied with the colour, as in section 2.8. - Cross-compiling. Engines that support several APIs write one shader language and translate it: glslang turns GLSL into SPIR-V, SPIRV-Cross turns SPIR-V into GLSL ES, HLSL or MSL. That's why knowing the dialect differences of section 2.1 is useful even if you only write one of them.
- Mobile precision. Mobile games use
mediumpwherever they can for speed and battery life, and keephighpfor positions and texture coordinates, where the missing digits would show up as wobbling or blurry textures.
2.18 Summary
- Dialects: desktop GLSL (
#version 450 core, which we use; 410 on macOS), GLSL ES (#version 300 eswithin/outand required float precision;#version 100withattribute/varying/gl_FragColor), and Vulkan GLSL (#version 450with explicit locations and uniform blocks with set and binding, compiled to SPIR-V). - Stages: vertex and fragment are needed to draw; tessellation (4.0), geometry (3.2) and compute (4.3, not on macOS) are optional.
- Scalars:
bool,int,uint,float,double.1 / 2is 0; write floats with a decimal point. Desktop GLSL convertsinttofloatautomatically, GLSL ES never does. - Vectors:
vec2/vec3/vec4andivec,uvec,bvec. Constructors fill components left to right; one number fills all of them. - Swizzling:
.xyzw,.rgba,.stpq, in any order, repeated when reading, as a write mask when writing. - Operators on vectors work per component;
vec * vecis not the dot product. UselessThanand friends withany/allto compare vectors. - Matrices are column-major: the constructor fills columns,
m[col][row],m * vis andv * mis . - Qualifiers:
const,in,out,uniform,layout(location = N),flat/smooth. Functions copy their parameters (in,out,inout), may be overloaded, and can't be recursive. - Control flow is C's, plus
discardin the fragment shader. Divergent branches in a group of pixels run both sides. gl_Position(vertex) andgl_FragCoord(fragment, in pixels, centres at .5, origin bottom left) are the most important built-in variables.- Floats are not exact: don't compare with
==, and watch out for big values like long-running time. - The preprocessor (
#define,#if) is how engines build shader permutations.
2.19 Challenges
- ★ With
vec4 v = vec4(1.0, 2.0, 3.0, 4.0);, what arev.wzyx,v.xxw,v.gaandvec3(v.zw, v.x)? And which of these lines are errors:v.xyzx,v.rgz,v.xx = vec2(0.0),v.yx = vec2(5.0, 6.0)? - ★ What are
7 / 2,7.0 / 2.0,int(-3.9),010 + 1andmod(7.0, 3.0)(use the formula from the table)? Which one would give a different value than you might expect at first sight? - ★ For
mat3 m = mat3(2.0, 0.0, 0.0, 1.0, 3.0, 0.0, 0.0, 0.0, 1.0);, write the matrix as rows and columns, then computem * vec3(1.0, 1.0, 1.0)andvec3(1.0, 1.0, 1.0) * m. What arem[1]andm[1][0]? - ★★ Write a fragment shader that shows the UV picture of section 2.5 with red and green swapped, using only a swizzle. Green should now be at the bottom right, red at the top left, and yellow stays at the top right.
- ★★ Make a grey-scale version of the red to green gradient of section 2.6 with a
mat3whose three columns are allvec3(0.3333). Every pixel should be a grey with the brightness of the original colour's average, which turns out to be the same everywhere for this gradient: a flat grey of about 33%. Explain why with the column view of . - ★★ Change the checkerboard of section 2.13 so that the cells are 100 × 100 pixels and the light squares show the UV colours from section 2.5 instead of white. Then change it to use
vUvinstead ofgl_FragCoordto make 8 × 8 cells. What's the difference when you change the window size? - ★★★ Write a function
vec3 palette(int i)that returns one of four colours with aswitch, and use it with aforloop to draw the bars of section 2.12 with four repeating colours. Then make the number of bars a#defineand check that 5, 10 and 20 bars all fill the window exactly.
コメント(0)
まだコメントはありません。
ログインするとコメント出来ます。