14. Raymarching
In the last chapter we drew 3D the way games normally do it: triangles, matrices and a rasterizer.
In this chapter we throw all of that away and draw a 3D scene with no geometry at all, entirely inside one fragment shader.
Every pixel shoots a ray into the scene and walks along it until it hits something, using the distance functions from chapter 6, now in 3D.
This technique is called raymarching, and the particular kind we use is sphere tracing.
It is the technique behind most of the famous demos on Shadertoy, and it is a wonderful way to see the ideas of the whole series working together: coordinates (chapter 5), distance functions and smooth union (chapter 6), transformations and repetition (chapter 7), lighting (chapters 9 and 10), plus the camera basis from linear algebra chapter 11.
We go back to the shader playground from chapter 5: start from that project (not from chapter 13's), because this chapter needs no C changes at all.
Everything happens in shader/playground.glsl, and you can keep the program running and press R after every change.
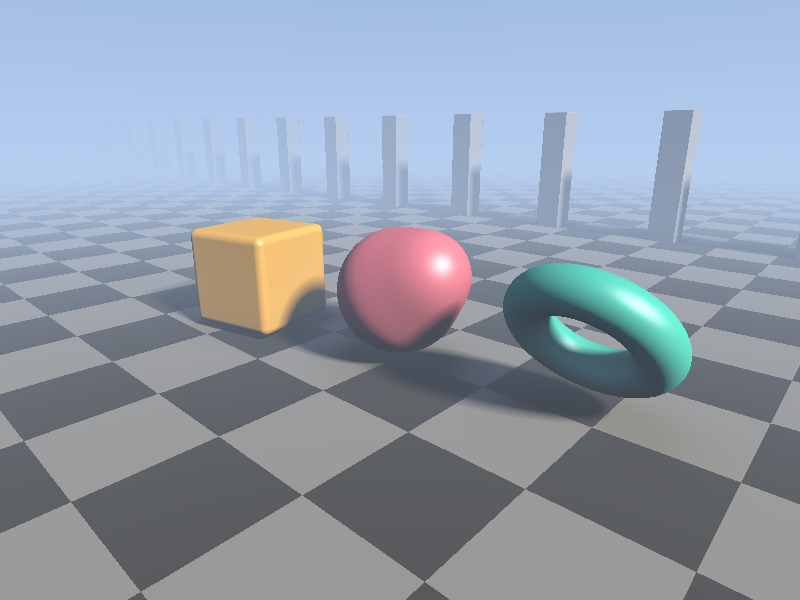
At the end we will have this scene, with soft shadows, ambient occlusion, fog, infinite pillars and an orbiting camera:
14.1 The idea
With rasterization, we loop over the triangles and ask "which pixels does this triangle cover?".
Ray-based methods turn that around: we loop over the pixels (the fragment shader already does that for us) and ask "what does this pixel see?".
For each pixel we make a ray, a starting point (the camera) and a unit direction , and every point on the ray is
where is the distance travelled along the ray.
The question is then: for which smallest does touch a surface?
For a sphere or a plane you could solve an equation for (that is classic ray tracing).
For complicated, blended, twisted shapes there is no such formula.
But with a signed distance function (SDF) there is a very simple loop that works for all of them, and that is the trick of this chapter.
14.2 A camera made of rays
First we need one ray per pixel.
We use the centred coordinates from chapter 5, where goes from −1 to 1 and is scaled by the aspect ratio (−1.333 to 1.333 for 800×600):
vec2 uv = (2.0 * gl_FragCoord.xy - uResolution) / uResolution.y;
The camera sits at and looks at a target.
From those two points we build an orthonormal basis, exactly like lookAt in linear algebra chapter 11 (and mat4LookAt in chapter 13):
Then we imagine an image plane at distance (the focal length) in front of the camera.
The pixel at uv is the point on that plane, relative to the camera, and the ray goes through it:
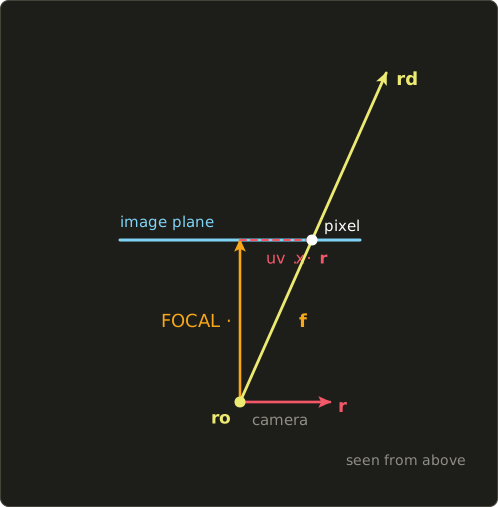
The top edge of the screen has , so half of the vertical field of view is .
With that is , a vertical field of view of about 58°.
A larger zooms in, a smaller one gives a wide angle.
Replace the playground with this and press R:
#version 450 core

in vec2 vUv;
out vec4 out_color;

uniform float uTime;       // seconds since start
uniform vec2 uResolution;  // screen size (pixels)
uniform vec2 uMouse;       // mouse position (pixels, origin bottom left)

void main() {
  // centred coordinates, y from -1 to 1 (chapter 5)
  vec2 uv = (2.0 * gl_FragCoord.xy - uResolution) / uResolution.y;

  vec3 ro = vec3(0.0, 2.2, 5.0); // ray origin = camera position
  vec3 target = vec3(0.0, 0.6, 0.0);

  // the same orthonormal basis as lookAt (linear algebra chapter 11)
  vec3 forward = normalize(target - ro);
  vec3 right = normalize(cross(forward, vec3(0.0, 1.0, 0.0)));
  vec3 up = cross(right, forward);
  const float FOCAL = 1.8; // focal length: larger = narrower view
  vec3 rd = normalize(uv.x * right + uv.y * up + FOCAL * forward);

  out_color = vec4(rd * 0.5 + 0.5, 1.0);
}
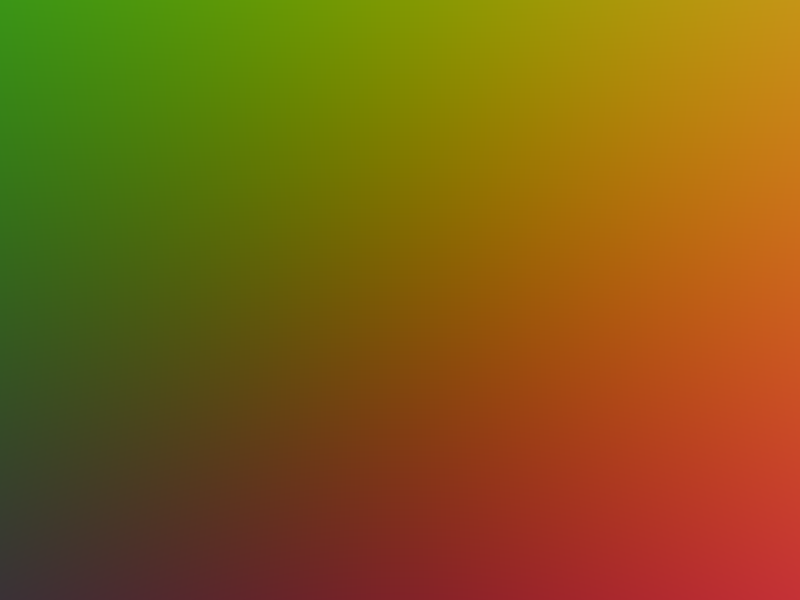
As always, debug with colours first: red grows towards the right (the ray's ), green towards the top, and the blue part is weak everywhere because all rays point mostly towards −Z.
If your picture is mirrored, your cross product is the wrong way round.
14.3 Sphere tracing
Distance functions in 3D
A signed distance function returns, for any point , the distance to the nearest surface: positive outside, negative inside, zero exactly on it.
The sphere is the same as the circle in chapter 6, with one more coordinate:
float sdSphere(vec3 p, float r) {
  return length(p) - r;
}
(To put the sphere somewhere else we move the point instead, sdSphere(p - center, r), just like in chapter 7.)
What the loop is
The SDF value at a point is the radius of a sphere that is guaranteed to be empty: nothing in the scene is closer than that.
So it is always safe to move along the ray by exactly that distance, whatever direction the ray goes.
We repeat until the distance gets tiny (we hit something) or gets huge (we missed):
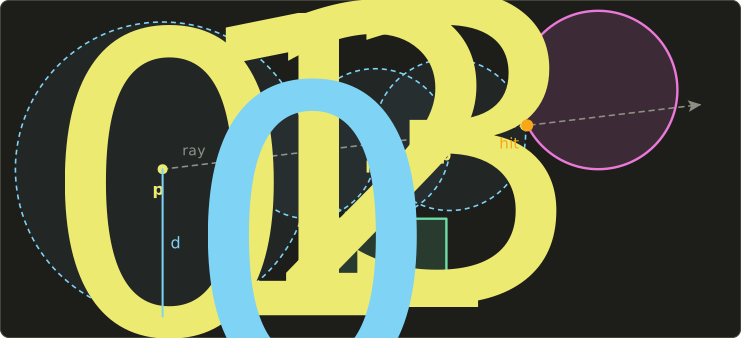
Far from everything the steps are large; near a surface they get small, and the points converge to the surface.
Notice how the ray that passes close to the box has to take a few small steps even though it does not hit it.
A worked example
Ray from along , two spheres of radius 1: at beside the ray and at right in front.
The scene's distance is the smaller of the two, , and :
| Step | ||||
|---|---|---|---|---|
| 0 | 0.000 | 2.606 | 7.000 | 2.606 |
| 1 | 2.606 | 1.039 | 4.394 | 1.039 |
| 2 | 3.644 | 1.101 | 3.356 | 1.101 |
| 3 | 4.745 | 1.654 | 2.255 | 1.654 |
| 4 | 6.400 | 2.944 | 0.600 | 0.600 |
| 5 | 7.000 | 3.472 | 0.000 | hit |
For example step 1: .
While the ray passes sphere , the steps are short (about 1), because is close; once it is past, the steps grow again, and the last step lands exactly on 's surface at , which is as it should be.
The code
const int MAX_STEPS = 128;   // max steps per ray
const float MAX_DIST = 40.0; // farther than this = "nothing"
const float SURF_DIST = 0.001;

float sdSphere(vec3 p, float r) {
  return length(p) - r;
}

// the whole scene: distance to the nearest surface
float map(vec3 p) {
  return sdSphere(p - vec3(0.0, 0.7, 0.0), 0.6);
}

// returns the hit distance t (-1 if nothing was hit)
float raymarch(vec3 ro, vec3 rd) {
  float t = 0.0;
  for (int i = 0; i < MAX_STEPS; i++) {
    float d = map(ro + rd * t);
    if (d < SURF_DIST * t) return t; // close enough: hit
    t += d;                          // step by the safe distance
    if (t > MAX_DIST) break;         // too far: miss
  }
  return -1.0;
}
And at the end of main, instead of the ray colour:
  float t = raymarch(ro, rd);
  vec3 color = t > 0.0 ? vec3(1.0) : vec3(0.0);
  out_color = vec4(color, 1.0);
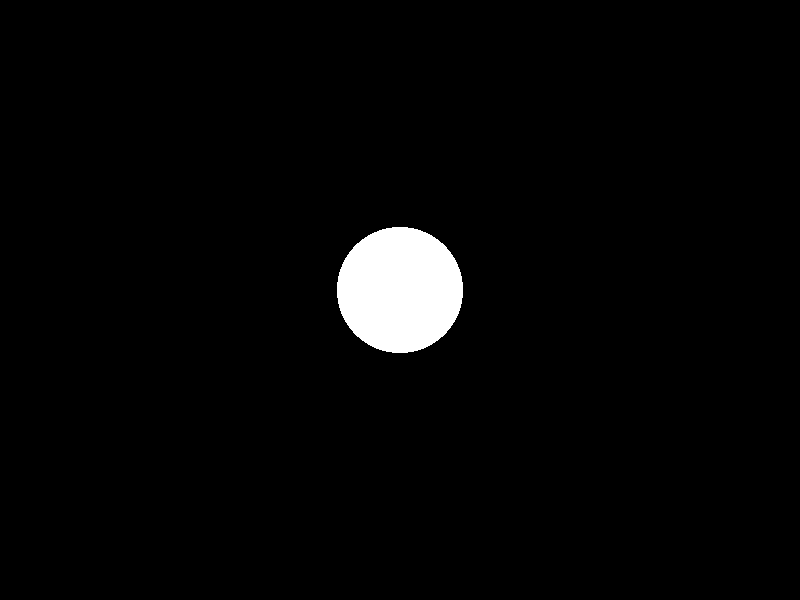
Only a white disc, but it is a real 3D sphere: move ro and it stays round, seen from any side.
map is the convention used almost everywhere: one function that describes the whole scene as a distance field.
Three things about the loop:
- The hit test is
d < SURF_DIST * t, notd < SURF_DIST. A pixel far away covers a bigger area of the scene than a pixel close by, so the tolerance grows with the distance. This saves many steps in the distance and has no visible cost. - There are always two ways out besides a hit:
MAX_STEPS(the ray crawls along a surface without reaching it) andMAX_DIST(it flew off into the sky). Without them a pixel could loop for a very long time. - GLSL loops need no special syntax, but a loop whose number of iterations differs between neighbouring pixels makes them wait for each other (more about this in 14.9).
Seeing the cost
Let me add a floor, the plane , whose SDF is simply the height (for a point above it, the nearest point of the plane is straight below).
min of two SDFs is their union (chapter 6):
// the whole scene: distance to the nearest surface
float map(vec3 p) {
  float sphere = sdSphere(p - vec3(0.0, 0.7, 0.0), 0.6);
  return min(sphere, p.y); // sphere and floor (the plane y = 0)
}
A useful debug view counts the steps instead of drawing the surface:
// count how many steps a ray needs (for debugging)
int countSteps(vec3 ro, vec3 rd) {
  float t = 0.0;
  for (int i = 0; i < MAX_STEPS; i++) {
    float d = map(ro + rd * t);
    if (d < SURF_DIST * t || t > MAX_DIST) return i;
    t += d;
  }
  return MAX_STEPS;
}
  float s = float(countSteps(ro, rd)) / 64.0;
  vec3 color = mix(vec3(0.0, 0.0, 0.3), vec3(1.0, 0.9, 0.2), clamp(s, 0.0, 1.0));
  out_color = vec4(color, 1.0);
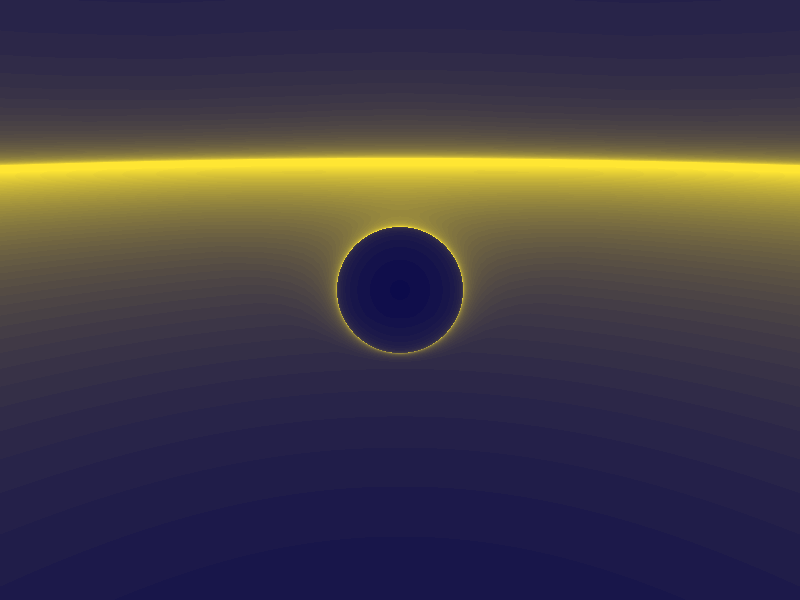
Rays that hit the floor or the middle of the sphere straight on need only a few steps.
Rays that graze a surface are expensive: the rim of the sphere glows, and so does the horizon, where the rays fly almost parallel to the floor and the distance to it stays small for a long way.
This picture is the first thing to look at when a raymarcher is slow.
14.4 Normals from the gradient
For lighting we need a normal, but there is no mesh to store it in.
Fortunately the SDF knows it: the distance grows fastest in the direction pointing straight away from the surface, and the direction of fastest growth is the gradient:
We do not have the derivatives as formulas, so we measure them with central differences: evaluate the SDF a tiny step forwards and backwards along each axis.
The division by is the same for all three components, and we normalize anyway, so it can be left out:
// normal = gradient of the distance field (central differences)
vec3 calcNormal(vec3 p) {
  const vec2 e = vec2(0.001, 0.0);
  return normalize(vec3(
    map(p + e.xyy) - map(p - e.xyy),
    map(p + e.yxy) - map(p - e.yxy),
    map(p + e.yyx) - map(p - e.yyx)));
}
The swizzles are a neat trick from chapter 2: with e = (0.001, 0), e.xyy is , e.yxy is and e.yyx is .
Worked example: for a sphere the gradient should be the direction from the centre, .
Take our sphere (centre , radius 0.6) and the point at angle 0.5 rad from the top in the xy plane, .
The exact normal is , and the central differences give to four decimals.
Show the normals as colours (sdSphere alone in map again, so that the floor does not fill the picture):
  vec3 color = vec3(0.0);
  float t = raymarch(ro, rd);
  if (t > 0.0) {
    vec3 p = ro + rd * t;
    vec3 n = calcNormal(p);
    color = n * 0.5 + 0.5;
  }
  out_color = vec4(color, 1.0);
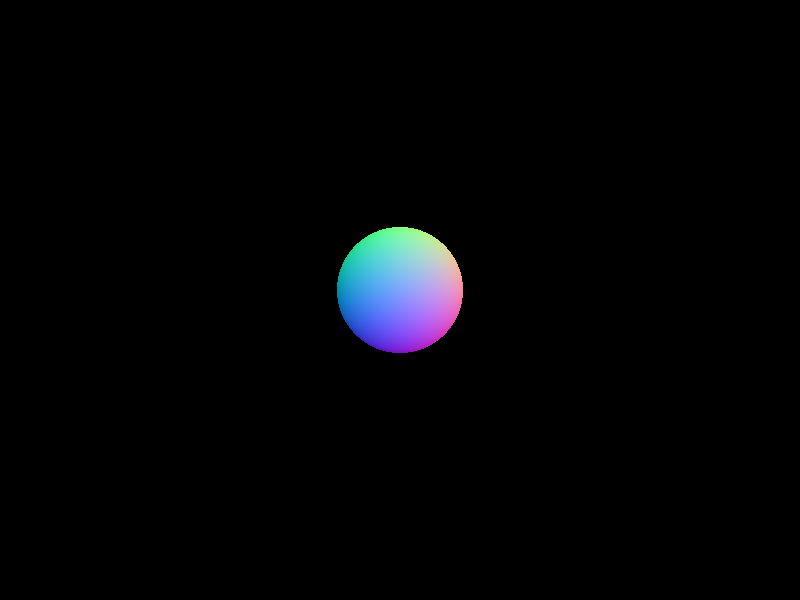
Six extra map calls per pixel is the price; for a complex scene that is noticeable, and there is a cheaper four-sample version in the challenges.
14.5 Materials and lighting
To colour different objects differently, map now returns two numbers: the distance and a material id.
A vec2 does that nicely, and instead of min we keep whichever result is closer:
// the whole scene: x = distance, y = material id
vec2 map(vec3 p) {
  // floor (the plane y = 0)
  vec2 res = vec2(p.y, 0.0);

  float sphere = sdSphere(p - vec3(0.0, 0.7, 0.0), 0.6);
  if (sphere < res.x) res = vec2(sphere, 1.0);

  return res;
}
raymarch returns the id too, with −1 meaning "missed", and calcNormal uses only the distance, map(...).x:
// returns x = hit distance t, y = material id (-1 if nothing was hit)
vec2 raymarch(vec3 ro, vec3 rd) {
  float t = 0.0;
  for (int i = 0; i < MAX_STEPS; i++) {
    vec2 h = map(ro + rd * t);
    if (h.x < SURF_DIST * t) return vec2(t, h.y); // close enough: hit
    t += h.x;                                     // step by the safe distance
    if (t > MAX_DIST) break;                      // too far: miss
  }
  return vec2(t, -1.0);
}

// normal = gradient of the distance field (central differences)
vec3 calcNormal(vec3 p) {
  const vec2 e = vec2(0.001, 0.0);
  return normalize(vec3(
    map(p + e.xyy).x - map(p - e.xyy).x,
    map(p + e.yxy).x - map(p - e.yxy).x,
    map(p + e.yyx).x - map(p - e.yyx).x));
}
The floor gets a checkerboard in world space (chapter 7's floor and mod, on and of the hit point):
vec3 materialColor(float id, vec3 p) {
  if (id < 0.5) {
    float checker = mod(floor(p.x) + floor(p.z), 2.0);
    return mix(vec3(0.08), vec3(0.35), checker);
  }
  return vec3(0.9, 0.25, 0.35);
}
(Comparing with id < 0.5 instead of id == 1.0 is a safety habit: the id is a float, and exact float comparisons are fragile.)
The lighting is the Blinn-Phong model of chapter 9 with a sky-coloured hemisphere ambient from chapter 10.
The view direction, from the surface to the camera, is simply , so the half vector is :
  vec3 skyColor = vec3(0.45, 0.6, 0.85) - 0.4 * rd.y;
  vec3 color = skyColor;

  vec2 hit = raymarch(ro, rd);
  if (hit.y >= 0.0) {
    vec3 p = ro + rd * hit.x;
    vec3 n = calcNormal(p);
    vec3 albedo = materialColor(hit.y, p);

    vec3 l = normalize(vec3(0.8, 0.6, 0.1)); // direction towards the light
    vec3 h = normalize(l - rd);              // half vector (the view direction is -rd)
    float diffuse = max(dot(n, l), 0.0);
    float specular = pow(max(dot(n, h), 0.0), 32.0) * diffuse;
    float sky = 0.5 + 0.5 * n.y;

    vec3 lit = albedo * vec3(1.3, 1.2, 1.0) * diffuse;
    lit += albedo * vec3(0.12, 0.15, 0.22) * sky;
    lit += vec3(0.8) * specular;
    color = lit;
  }

  out_color = vec4(pow(color, vec3(1.0 / 2.2)), 1.0); // gamma correction
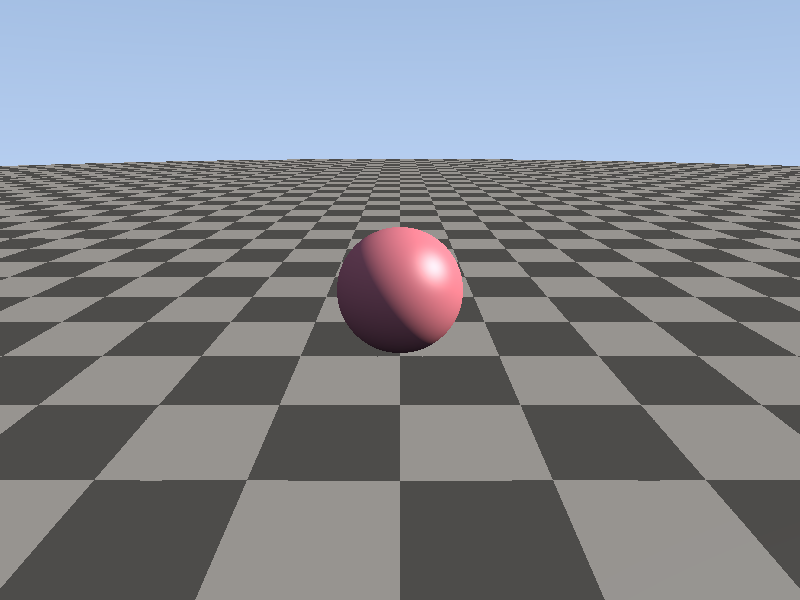
The sky colour gets darker towards the top (- 0.4 * rd.y), and the whole image is gamma corrected as in chapter 10.
14.6 More shapes, and combining them
The box
The 3D box is the 2D box from chapter 6 with one more axis.
For a box centred on the origin with half-sizes , let (component-wise): a positive component means we are outside the box along that axis.
Outside, the distance is the length of the positive parts; inside, it is the (negative) distance to the closest face, the largest component of :
float sdBox(vec3 p, vec3 b) {
  vec3 q = abs(p) - b;
  return length(max(q, 0.0)) + min(max(q.x, max(q.y, q.z)), 0.0);
}
Three checks with :
- : , so . Half a unit in front of the +X face.
- : , so , the distance to the edge.
- : , so . Inside, half a unit from the +X face.
Subtracting a constant from any SDF grows the shape by that amount and rounds its corners (chapter 6), so sdBox(q, vec3(0.45)) - 0.08 is a box with rounded edges.
The torus
A torus is a circle of radius swept around a ring of radius in the xz plane.
First find the distance from to the ring, measured in the plane that contains the y axis and : horizontally , vertically .
The torus is then a circle SDF in that 2D plane:
float sdTorus(vec3 p, float R, float r) {
  vec2 q = vec2(length(p.xz) - R, p.y);
  return length(q) - r;
}
Example: , , gives and .
Combining and transforming
The tools from chapters 6 and 7 work unchanged in 3D:
// smooth union (the same smin as in chapter 6)
float smin(float a, float b, float k) {
  float h = clamp(0.5 + 0.5 * (b - a) / k, 0.0, 1.0);
  return mix(b, a, h) - k * h * (1.0 - h);
}

mat2 rot(float a) {
  float c = cos(a), s = sin(a);
  return mat2(c, s, -s, c);
}
mat2(c, s, -s, c) fills the matrix column by column, so the columns are and , the counter-clockwise rotation of linear algebra chapter 8.
To rotate a 3D object around the y axis we rotate the point's xz components, q.xz = rot(a) * q.xz.
As in chapter 7, transforming the point moves the shape the opposite way, which for an animation does not matter at all.
The new map:
// the whole scene: x = distance, y = material id
vec2 map(vec3 p) {
  // floor (the plane y = 0)
  vec2 res = vec2(p.y, 0.0);

  // centre: two spheres smoothly merged
  float bob = 0.35 * sin(uTime * 1.5);
  float a = sdSphere(p - vec3(0.0, 0.7, 0.0), 0.6);
  float b = sdSphere(p - vec3(0.45, 1.3 + bob, 0.1), 0.35);
  float blob = smin(a, b, 0.3);
  if (blob < res.x) res = vec2(blob, 1.0);

  // left: a spinning box with rounded edges
  vec3 q = p - vec3(-1.9, 0.6, 0.3);
  q.xz = rot(uTime * 0.6) * q.xz;
  float box = sdBox(q, vec3(0.45)) - 0.08;
  if (box < res.x) res = vec2(box, 2.0);

  // right: a tilted torus
  q = p - vec3(1.9, 0.75, 0.0);
  q.yz = rot(0.9) * q.yz;
  float torus = sdTorus(q, 0.5, 0.18);
  if (torus < res.x) res = vec2(torus, 3.0);

  return res;
}
with two more colours in materialColor:
  if (id < 1.5) return vec3(0.9, 0.25, 0.35);
  if (id < 2.5) return vec3(0.95, 0.55, 0.1);
  return vec3(0.1, 0.7, 0.6);
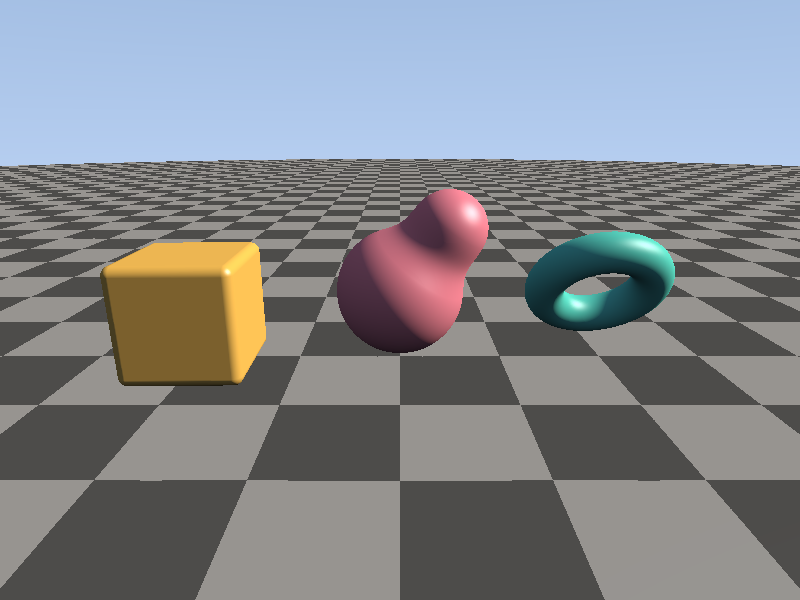
The small sphere bobs up and down and melts into the big one; the box spins.
Try changing the k of smin and watch the neck between the spheres get thicker or thinner.
A note on correctness: sphere tracing needs a distance that is never larger than the true distance, otherwise a step can jump through a thin object. smin and rotations are fine. Non-uniform scaling or twisting a point usually is not: if you do that, multiply the distance by a safety factor such as 0.5 (smaller, safer steps).
14.7 Shadows
Hard shadows
Here raymarching shines: a shadow is just another ray.
From the hit point we march towards the light; if that ray hits anything, the point is in shadow.
// hard shadow: march towards the light, 0 if anything is in the way
float hardShadow(vec3 ro, vec3 rd) {
  float t = 0.02;
  for (int i = 0; i < 64; i++) {
    float h = map(ro + rd * t).x;
    if (h < 0.0005) return 0.0;
    t += h;
    if (t > 12.0) break;
  }
  return 1.0;
}
Two details matter.
We start the shadow ray slightly off the surface, p + n * 0.002, and at t = 0.02, because at the hit point itself the distance is about 0 and the ray would immediately "hit" its own surface (this artefact is called shadow acne in every renderer).
And the shadow only darkens the direct light, not the ambient (sky) part:
    float shadow = hardShadow(p + n * 0.002, l);
    float specular = pow(max(dot(n, h), 0.0), 32.0) * diffuse;
    float sky = 0.5 + 0.5 * n.y;

    vec3 lit = albedo * vec3(1.3, 1.2, 1.0) * diffuse * shadow;
    lit += albedo * vec3(0.12, 0.15, 0.22) * sky;
    lit += vec3(0.8) * specular * shadow;
Soft shadows almost for free
Real lights have a size, so shadows have a soft edge, the penumbra.
The SDF gives us a cheap and famous approximation (popularised by Inigo Quilez).
While marching towards the light, at each step we know the distance travelled and the distance to the nearest object.
The ratio says how wide the gap is as seen from the point: roughly the angle by which the ray misses the occluder.
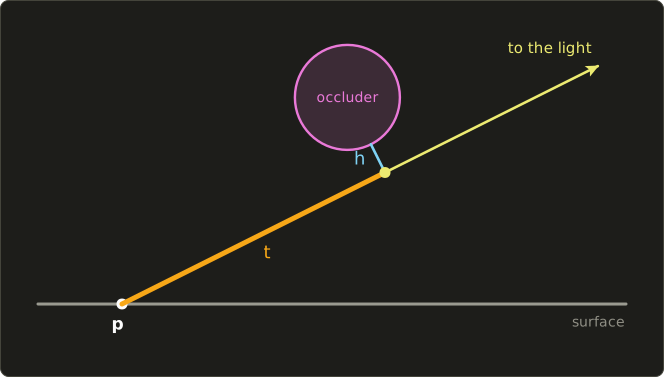
A small ratio means the light is almost blocked; so we take the smallest ratio along the whole ray:
// soft shadow: the closer the ray to the light passes an object, the darker
float softShadow(vec3 ro, vec3 rd, float k) {
  float res = 1.0;
  float t = 0.02;
  for (int i = 0; i < 64; i++) {
    float h = map(ro + rd * t).x;
    if (h < 0.0005) return 0.0;
    res = min(res, k * h / t);
    t += clamp(h, 0.02, 0.4);
    if (t > 12.0) break;
  }
  return clamp(res, 0.0, 1.0);
}
controls the hardness: a large (like 32) gives sharp shadows, a small one (like 4) very soft ones; I use 8.
The step is clamped between 0.02 and 0.4: the minimum keeps the loop from crawling, the maximum keeps it from jumping over the point where the ray passes closest to an object, which would miss the darkest part of the penumbra.
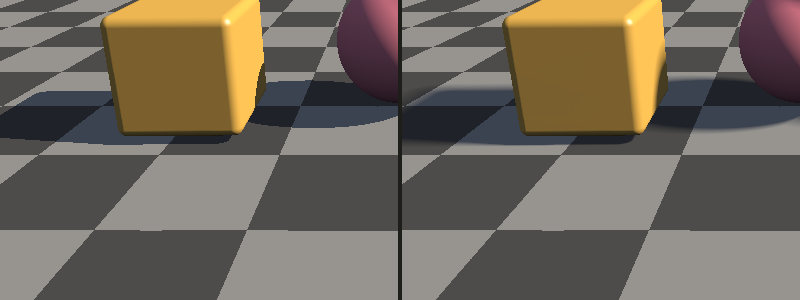
On the left every shadow edge is equally sharp.
On the right the edge is crisp where the shadow touches the box and gets softer the farther it is from the box, just like a real shadow.
14.8 Ambient occlusion, fog and repetition
Ambient occlusion
Corners and the ground right under an object get less light from the sky, because the object blocks part of the sky.
That is ambient occlusion (AO), and the SDF approximates it with a handful of samples along the normal.
At height above an open, flat surface the distance would be exactly ; if it is less, something is nearby:
with and weights , so nearby samples count more.
// ambient occlusion: sample the distance field a few times along the normal
float ambientOcclusion(vec3 p, vec3 n) {
  float occ = 0.0;
  float weight = 1.0;
  for (int i = 1; i <= 5; i++) {
    float h = 0.03 + 0.12 * float(i); // distance from the surface
    float d = map(p + n * h).x;       // how much space there actually is
    occ += (h - d) * weight;
    weight *= 0.6;
  }
  return clamp(1.0 - 2.0 * occ, 0.0, 1.0);
}
The AO only multiplies the ambient term (lit += albedo * vec3(0.12, 0.15, 0.22) * sky * ao;).
Here it is on its own, as a colour:
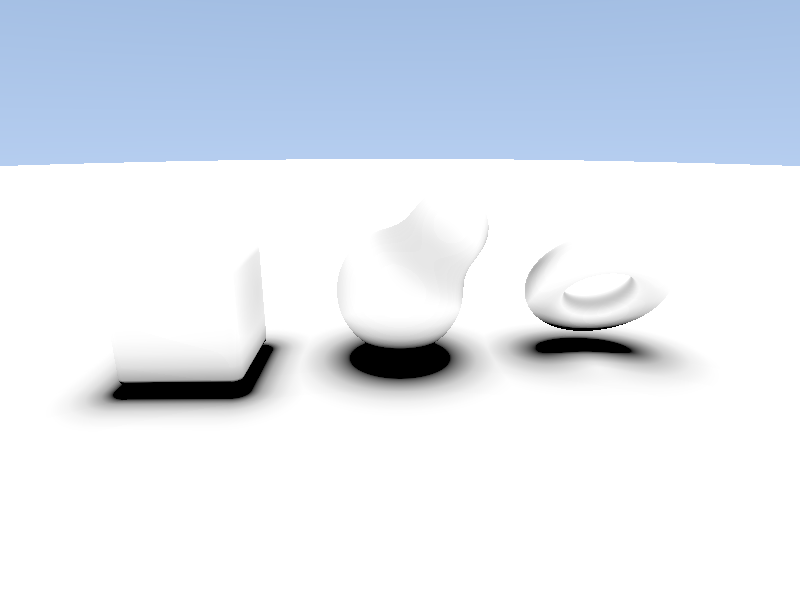
The effect in the lit image is subtle but important: it "glues" the objects to the floor.
Infinite repetition with mod
mod from chapter 7 repeats space.
If we fold the x coordinate into one cell of width 2.5, centred on 0, every SDF we evaluate there appears once per cell, forever, for the price of one:
  // back: endless pillars with mod
  q = p - vec3(0.0, 0.0, -8.0);
  q.x = mod(q.x + 1.25, 2.5) - 1.25;
  float pillar = sdBox(q, vec3(0.25, 2.5, 0.25));
  if (pillar < res.x) res = vec2(pillar, 4.0);
GLSL's mod(x, y) is , which is always between 0 and for positive , even for negative (unlike C's fmod), so the cells continue nicely to the left.
+ 1.25 and - 1.25 shift the cell so that it runs from −1.25 to 1.25 instead of 0 to 2.5, putting the pillar in its centre.
This is only exact while the shape stays inside its cell; a pillar 0.5 wide in a 2.5 cell is safe.
The pillars get material 4, a grey: if (id < 3.5) return vec3(0.1, 0.7, 0.6); followed by return vec3(0.55, 0.55, 0.6);.
Fog
Infinite pillars need something to hide the infinity.
Exponential fog blends towards the sky colour with distance:
At with : , barely visible; at : , mostly sky.
Using instead of keeps the near objects clear and makes the fog close in quickly.
exp(x) is .
    // fog: the farther, the closer to the sky colour
    float fog = 1.0 - exp(-0.004 * hit.x * hit.x);
    color = mix(lit, skyColor, fog);
The orbiting camera
Finally the camera circles around the scene, and moving the mouse left and right turns it further:
  // camera: orbits around the origin (move the mouse left/right to turn it)
  float angle = 0.25 * uTime + 6.2831853 * (uMouse.x / uResolution.x - 0.5);
  vec3 ro = vec3(5.0 * sin(angle), 2.2, 5.0 * cos(angle)); // ray origin = camera position
is a circle of radius 5 at height 2.2, and since the basis is rebuilt from ro and target every frame, the camera always looks at the centre.
With the mouse in the middle of the window the offset is 0; from the left edge to the right edge it adds one full turn ().
The complete final playground.glsl is in the diff at the end of the chapter.
Its main combines everything:
    float diffuse = max(dot(n, l), 0.0);
    float shadow = softShadow(p + n * 0.002, l, 8.0);
    float specular = pow(max(dot(n, h), 0.0), 32.0) * diffuse;
    float ao = ambientOcclusion(p, n);
    float sky = 0.5 + 0.5 * n.y;

    vec3 lit = albedo * vec3(1.3, 1.2, 1.0) * diffuse * shadow;
    lit += albedo * vec3(0.12, 0.15, 0.22) * sky * ao;
    lit += vec3(0.8) * specular * shadow;
14.9 Performance
Raymarching is simple but not cheap.
The cost per frame is roughly
and our pixel does one march (up to 128 steps), 6 map calls for the normal, up to 64 for the shadow and 5 for AO.
At 800×600 that can be tens of millions of map calls per frame.
Things that help, roughly in order of importance:
- Fewer steps where nothing happens: a good
MAX_DIST, the relative hit tolerance, and the step-count view from 14.3 to find the expensive pixels. - Cheaper
map: test a cheap bounding shape (a sphere or box around a complex object) first and only evaluate the expensive SDF when the point is close. - Fewer extra rays: shadow rays with fewer steps and a maximum distance, a 4-sample normal instead of 6.
- Lower resolution: many demos render at half resolution and scale up.
- Divergence: GPUs run pixels in groups (32 or 64 at a time) that execute the same instruction together. If one pixel in the group needs 120 steps and the others 10, they all wait for the slow one. Keeping neighbouring rays similar (no noisy scenes at the horizon) keeps the GPU busy.
On macOS (OpenGL 4.1) everything in this chapter works unchanged; it only uses features from the playground.
On an integrated GPU the final scene may be slow in a large window; make the window smaller or lower MAX_STEPS to 64.
14.10 New GLSL in this chapter
Almost nothing in this chapter is new GLSL; it is new ways of using what we already know.
| Feature | What it does |
|---|---|
for loop with break and return |
Marching loops; always give them a maximum count |
exp(x) |
, here for exponential fog |
mod(x, y) on coordinates |
: infinite repetition of space |
mat2(c, s, -s, c) |
Column-by-column constructor: a 2D rotation |
q.xz = rot(a) * q.xz |
Swizzle write mask: rotate two components of a vec3 |
e.xyy, e.yxy, e.yyx |
Swizzles to build the three axis offsets |
vec2 return value |
Returning distance and material id together |
14.11 How this is used in real games and engines
- Shadertoy and the demoscene: whole worlds in a few kilobytes of shader code, almost all made with SDF raymarching.
- Distance-field shadows and AO in engines: Unreal Engine builds signed distance fields for meshes and uses them for soft shadows and ambient occlusion over long distances, the same
min(k h / t)and normal-sampling ideas as here. - SDF-based games: Media Molecule's Dreams lets players sculpt with SDF shapes, and Claybook rendered its deformable clay world by tracing distance fields.
- Volumetric effects: clouds, smoke, fog and god rays are raymarched in fixed steps through a density field (a close cousin of sphere tracing).
- Screen-space reflections and ambient occlusion march rays through the depth buffer instead of an SDF.
- Collision and physics: an SDF answers "how far am I from anything?" in one call, which is used for particle collisions and character controllers.
14.12 Summary
- Raymarching draws a 3D scene in a fragment shader: one ray per pixel, .
- The camera ray is built from a lookAt basis: , with the focal length setting the field of view.
- Sphere tracing steps by the SDF value, which is always safe; stop on a hit (
d < SURF_DIST * t), onMAX_DISTor afterMAX_STEPS. map(p)describes the whole scene;min(or comparing) combines objects,sminblends them, transforming the point moves them,modrepeats them.- Normals are the normalized gradient of the SDF, measured with central differences.
- Shadows are rays towards the light;
min(k h / t)along the way gives soft shadows. AO samples the SDF along the normal. Fog blends to the sky with . - Cost is pixels × steps ×
map; the step-count view shows where the time goes, and grazing rays are the most expensive.
14.13 Challenges
- ★ Using the formula for
sdBoxwith , compute the distance for , and (you should get 2, and −0.5). - ★ Redo the worked example of 14.3 with sphere moved to . How many steps does it take now, and at which does it hit (it should still be exactly )?
- ★★ Add a capsule (a line segment with a radius, the 3D version of chapter 6's segment SDF: project onto , clamp to 0..1, and take the distance to that point minus the radius) and place it lying on the floor as a fifth material.
- ★★ Replace
calcNormalwith the four-sample "tetrahedron" version: sumk * map(p + k * 0.001).xfor the four vectorsk= , , , and normalize. The picture should look the same with a third fewermapcalls. - ★★ Make the camera follow the mouse in both directions: use
uMouse.yto move the camera's height between 0.5 and 5. The floor should never disappear above the camera (clamp the height). - ★★ Repeat the pillars in both and with
modonq.xz(a forest of pillars), and use the cell numberfloor(...)to give each pillar a different height. Remember to scale the distance down if pillars get close to their cell borders. - ★★★ Add reflections: when the ray hits the floor, march a second ray from the hit point in the direction
reflect(rd, n)(reflect(i, n)) and mix 30% of its lit colour into the floor. You should see the objects mirrored in the checkerboard.
ファイル: a/shader/playground.glsl | b/shader/playground.glsl
| 前 | 新 | ||
|---|---|---|---|
| @@ -7,16 +7,176 @@ uniform float uTime; // 起動してからの秒数 | |||
| 7 | uniform vec2 uResolution; // 画面の大きさ(ピクセル) | 7 | uniform vec2 uResolution; // 画面の大きさ(ピクセル) |
| 8 | uniform vec2 uMouse; // マウスの位置(ピクセル、左下が原点) | 8 | uniform vec2 uMouse; // マウスの位置(ピクセル、左下が原点) |
| 9 | 9 | ||
| 10 | const int MAX_STEPS = 128; // レイ1本あたりの最大ステップ数 | ||
| 11 | const float MAX_DIST = 40.0; // 此れより遠くは「何もない」 | ||
| 12 | const float SURF_DIST = 0.001; | ||
| 13 | |||
| 14 | //------------------------------------------ | ||
| 15 | // 距離関数(SDF) | ||
| 16 | //------------------------------------------ | ||
| 17 | |||
| 18 | float sdSphere(vec3 p, float r) { | ||
| 19 | return length(p) - r; | ||
| 20 | } | ||
| 21 | |||
| 22 | float sdBox(vec3 p, vec3 b) { | ||
| 23 | vec3 q = abs(p) - b; | ||
| 24 | return length(max(q, 0.0)) + min(max(q.x, max(q.y, q.z)), 0.0); | ||
| 25 | } | ||
| 26 | |||
| 27 | float sdTorus(vec3 p, float R, float r) { | ||
| 28 | vec2 q = vec2(length(p.xz) - R, p.y); | ||
| 29 | return length(q) - r; | ||
| 30 | } | ||
| 31 | |||
| 32 | // 滑らかな和集合(第6章のsminと同じ) | ||
| 33 | float smin(float a, float b, float k) { | ||
| 34 | float h = clamp(0.5 + 0.5 * (b - a) / k, 0.0, 1.0); | ||
| 35 | return mix(b, a, h) - k * h * (1.0 - h); | ||
| 36 | } | ||
| 37 | |||
| 38 | mat2 rot(float a) { | ||
| 39 | float c = cos(a), s = sin(a); | ||
| 40 | return mat2(c, s, -s, c); | ||
| 41 | } | ||
| 42 | |||
| 43 | // シーン全体:x=距離、y=マテリアル番号 | ||
| 44 | vec2 map(vec3 p) { | ||
| 45 | // 床(y = 0の平面) | ||
| 46 | vec2 res = vec2(p.y, 0.0); | ||
| 47 | |||
| 48 | // 中央:二つの球を滑らかにくっつけた物 | ||
| 49 | float bob = 0.35 * sin(uTime * 1.5); | ||
| 50 | float a = sdSphere(p - vec3(0.0, 0.7, 0.0), 0.6); | ||
| 51 | float b = sdSphere(p - vec3(0.45, 1.3 + bob, 0.1), 0.35); | ||
| 52 | float blob = smin(a, b, 0.3); | ||
| 53 | if (blob < res.x) res = vec2(blob, 1.0); | ||
| 54 | |||
| 55 | // 左:回転する角の丸い箱 | ||
| 56 | vec3 q = p - vec3(-1.9, 0.6, 0.3); | ||
| 57 | q.xz = rot(uTime * 0.6) * q.xz; | ||
| 58 | float box = sdBox(q, vec3(0.45)) - 0.08; | ||
| 59 | if (box < res.x) res = vec2(box, 2.0); | ||
| 60 | |||
| 61 | // 右:傾いたトーラス | ||
| 62 | q = p - vec3(1.9, 0.75, 0.0); | ||
| 63 | q.yz = rot(0.9) * q.yz; | ||
| 64 | float torus = sdTorus(q, 0.5, 0.18); | ||
| 65 | if (torus < res.x) res = vec2(torus, 3.0); | ||
| 66 | |||
| 67 | // 奥:modで無限に並ぶ柱 | ||
| 68 | q = p - vec3(0.0, 0.0, -8.0); | ||
| 69 | q.x = mod(q.x + 1.25, 2.5) - 1.25; | ||
| 70 | float pillar = sdBox(q, vec3(0.25, 2.5, 0.25)); | ||
| 71 | if (pillar < res.x) res = vec2(pillar, 4.0); | ||
| 72 | |||
| 73 | return res; | ||
| 74 | } | ||
| 75 | |||
| 76 | //------------------------------------------ | ||
| 77 | // レイマーチング | ||
| 78 | //------------------------------------------ | ||
| 79 | |||
| 80 | // 戻り値:x=当たった距離t、y=マテリアル番号(何にも当たらなかったら-1) | ||
| 81 | vec2 raymarch(vec3 ro, vec3 rd) { | ||
| 82 | float t = 0.0; | ||
| 83 | for (int i = 0; i < MAX_STEPS; i++) { | ||
| 84 | vec2 h = map(ro + rd * t); | ||
| 85 | if (h.x < SURF_DIST * t) return vec2(t, h.y); // 十分に近い:当たり | ||
| 86 | t += h.x; // 安全な距離だけ進む | ||
| 87 | if (t > MAX_DIST) break; // 遠過ぎ:外れ | ||
| 88 | } | ||
| 89 | return vec2(t, -1.0); | ||
| 90 | } | ||
| 91 | |||
| 92 | // 法線=距離場の勾配(中心差分) | ||
| 93 | vec3 calcNormal(vec3 p) { | ||
| 94 | const vec2 e = vec2(0.001, 0.0); | ||
| 95 | return normalize(vec3( | ||
| 96 | map(p + e.xyy).x - map(p - e.xyy).x, | ||
| 97 | map(p + e.yxy).x - map(p - e.yxy).x, | ||
| 98 | map(p + e.yyx).x - map(p - e.yyx).x)); | ||
| 99 | } | ||
| 100 | |||
| 101 | // 柔らかい影:光へ向かうレイが物体の近くを通る程暗くする | ||
| 102 | float softShadow(vec3 ro, vec3 rd, float k) { | ||
| 103 | float res = 1.0; | ||
| 104 | float t = 0.02; | ||
| 105 | for (int i = 0; i < 64; i++) { | ||
| 106 | float h = map(ro + rd * t).x; | ||
| 107 | if (h < 0.0005) return 0.0; | ||
| 108 | res = min(res, k * h / t); | ||
| 109 | t += clamp(h, 0.02, 0.4); | ||
| 110 | if (t > 12.0) break; | ||
| 111 | } | ||
| 112 | return clamp(res, 0.0, 1.0); | ||
| 113 | } | ||
| 114 | |||
| 115 | // アンビエントオクルージョン:法線方向に何回か距離場を調べる | ||
| 116 | float ambientOcclusion(vec3 p, vec3 n) { | ||
| 117 | float occ = 0.0; | ||
| 118 | float weight = 1.0; | ||
| 119 | for (int i = 1; i <= 5; i++) { | ||
| 120 | float h = 0.03 + 0.12 * float(i); // 表面からの距離 | ||
| 121 | float d = map(p + n * h).x; // 実際に空いている距離 | ||
| 122 | occ += (h - d) * weight; | ||
| 123 | weight *= 0.6; | ||
| 124 | } | ||
| 125 | return clamp(1.0 - 2.0 * occ, 0.0, 1.0); | ||
| 126 | } | ||
| 127 | |||
| 128 | vec3 materialColor(float id, vec3 p) { | ||
| 129 | if (id < 0.5) { | ||
| 130 | float checker = mod(floor(p.x) + floor(p.z), 2.0); | ||
| 131 | return mix(vec3(0.08), vec3(0.35), checker); | ||
| 132 | } | ||
| 133 | if (id < 1.5) return vec3(0.9, 0.25, 0.35); | ||
| 134 | if (id < 2.5) return vec3(0.95, 0.55, 0.1); | ||
| 135 | if (id < 3.5) return vec3(0.1, 0.7, 0.6); | ||
| 136 | return vec3(0.55, 0.55, 0.6); | ||
| 137 | } | ||
| 138 | |||
| 10 | void main() { | 139 | void main() { |
| 11 | // ピクセル座標を0〜1に正規化 | 140 | // 中心が原点、縦が-1〜1の座標(第5章) |
| 12 | vec2 uv = gl_FragCoord.xy / uResolution; | 141 | vec2 uv = (2.0 * gl_FragCoord.xy - uResolution) / uResolution.y; |
| 142 | |||
| 143 | // カメラ:原点の周りを回る(マウスを左右に動かすと角度がずれる) | ||
| 144 | float angle = 0.25 * uTime + 6.2831853 * (uMouse.x / uResolution.x - 0.5); | ||
| 145 | vec3 ro = vec3(5.0 * sin(angle), 2.2, 5.0 * cos(angle)); // レイの原点=カメラの位置 | ||
| 146 | vec3 target = vec3(0.0, 0.6, 0.0); | ||
| 147 | |||
| 148 | // lookAtと同じ正規直交基底(線型代数の第11章) | ||
| 149 | vec3 forward = normalize(target - ro); | ||
| 150 | vec3 right = normalize(cross(forward, vec3(0.0, 1.0, 0.0))); | ||
| 151 | vec3 up = cross(right, forward); | ||
| 152 | const float FOCAL = 1.8; // 焦点距離:大きい程視野が狭い | ||
| 153 | vec3 rd = normalize(uv.x * right + uv.y * up + FOCAL * forward); | ||
| 154 | |||
| 155 | vec3 skyColor = vec3(0.45, 0.6, 0.85) - 0.4 * rd.y; | ||
| 156 | vec3 color = skyColor; | ||
| 157 | |||
| 158 | vec2 hit = raymarch(ro, rd); | ||
| 159 | if (hit.y >= 0.0) { | ||
| 160 | vec3 p = ro + rd * hit.x; | ||
| 161 | vec3 n = calcNormal(p); | ||
| 162 | vec3 albedo = materialColor(hit.y, p); | ||
| 163 | |||
| 164 | vec3 l = normalize(vec3(0.8, 0.6, 0.1)); // 光の方へ向かう方向 | ||
| 165 | vec3 h = normalize(l - rd); // ハーフベクトル(視線は-rd) | ||
| 166 | float diffuse = max(dot(n, l), 0.0); | ||
| 167 | float shadow = softShadow(p + n * 0.002, l, 8.0); | ||
| 168 | float specular = pow(max(dot(n, h), 0.0), 32.0) * diffuse; | ||
| 169 | float ao = ambientOcclusion(p, n); | ||
| 170 | float sky = 0.5 + 0.5 * n.y; | ||
| 13 | 171 | ||
| 14 | // 時間で動くグラデーション | 172 | vec3 lit = albedo * vec3(1.3, 1.2, 1.0) * diffuse * shadow; |
| 15 | vec3 color = 0.5 + 0.5 * cos(uTime + uv.xyx + vec3(0.0, 2.0, 4.0)); | 173 | lit += albedo * vec3(0.12, 0.15, 0.22) * sky * ao; |
| 174 | lit += vec3(0.8) * specular * shadow; | ||
| 16 | 175 | ||
| 17 | // マウスの周りに白い円 | 176 | // 霧:遠い程空の色に近づける |
| 18 | float d = length(gl_FragCoord.xy - uMouse); | 177 | float fog = 1.0 - exp(-0.004 * hit.x * hit.x); |
| 19 | color = mix(color, vec3(1.0), 1.0 - smoothstep(18.0, 20.0, d)); | 178 | color = mix(lit, skyColor, fog); |
| 179 | } | ||
| 20 | 180 | ||
| 21 | out_color = vec4(color, 1.0); | 181 | out_color = vec4(pow(color, vec3(1.0 / 2.2)), 1.0); // ガンマ補正 |
| 22 | } | 182 | } |
コメント(0)
まだコメントはありません。
ログインするとコメント出来ます。