3. Gradients
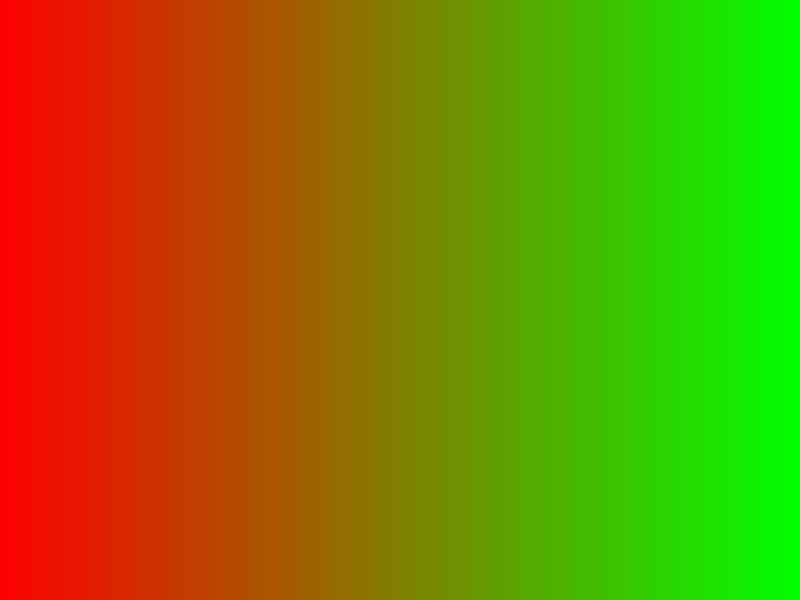
When you started the GLSL shader tester in chapter 1, it showed a gradient covering the whole window.
In this chapter I take the shaders that draw that gradient apart line by line, and we figure out why every pixel gets a different color when there are only four vertices.
Then we add a color, move the color values into the shader, animate the colors from C, and finally build diagonal, radial and smoothstep gradients.
Gradients look boring, but games use them everywhere: skies, fog, UI, health bars, screen fades.
And the "interpolation" you learn here is the foundation for lighting and textures in later chapters.
The project you downloaded in chapter 1 already contains the final result of this chapter (the animated three-color gradient), except for the macOSfragment.mac.glsl, which is still the two-color version, so a Mac shows two colors until section 3.3. This chapter walks through the steps that lead there. If you want to type along, first putfragment.glsland the uniform lines inmain.cback to the two-color version shown in section 3.1.
3.1 Breaking down the shaders
Let's look at the code we already have.
The tester uses two shaders.
The vertex shader (vertex.glsl) runs once per vertex, and the fragment shader (fragment.glsl) runs once per pixel.
On macOS, vertex.mac.glsl and fragment.mac.glsl are loaded instead. They are identical except that the first line is #version 410 core.
vertex.glsl
#version 450 core

layout(location = 0) in vec2 aPosition;
layout(location = 1) in vec2 aUv;
out vec2 vUv;

void main() {
  vUv = aUv;
  gl_Position = vec4(aPosition, 0.0, 1.0);
}
The first thing we see is #version 450 core.
It says that the shader uses GLSL version 4.50 with the core profile.
In the core profile, old deprecated features (like gl_FragColor) are not available, and in return the driver doesn't have to do extra compatibility work.
This line must always be the very first line of the file.
layout(location = 0) in vec2 aPosition;
layout(location = 1) in vec2 aUv;
These lines define the vertex shader's input attributes, which the C code provides.
In the C code, each vertex is four floats (position x, y and UV u, v):
  // set up the vertex data (fullscreen quad)
  float vertices[] = {
    -1.0f, -1.0f, 0.0f, 0.0f, // bottom left (position, UV)
     1.0f, -1.0f, 1.0f, 0.0f, // bottom right
     1.0f,  1.0f, 1.0f, 1.0f, // top right
    -1.0f,  1.0f, 0.0f, 1.0f  // top left
  };
  GLuint indices[] = { 0, 1, 2, 2, 3, 0 };
  ...
  // vertex attributes: position (location 0), UV (location 1)
  glVertexAttribPointer(0, 2, GL_FLOAT, GL_FALSE, 4 * sizeof(float), (void *)0);
  glEnableVertexAttribArray(0);
  size_t offset = 2 * sizeof(float);
  glVertexAttribPointer(1, 2, GL_FLOAT, GL_FALSE, 4 * sizeof(float), (void *)offset);
  glEnableVertexAttribArray(1);
The layout(location = 0) and layout(location = 1) parts explicitly assign the binding location of each vertex attribute.
That number is the first argument of glVertexAttribPointer.
The 2D vector (vec2) aPosition goes to location 0 and holds the vertex position in X and Y.
Location 1 gets another 2D vector, aUv, which holds the texture coordinates (U and V).
The remaining arguments of glVertexAttribPointer mean "two floats", "don't normalize", "a new vertex starts every 4 * sizeof(float) bytes" and "this attribute starts this many bytes into the vertex".
Finally, the in keyword marks these as input variables that come from the vertex buffer into the shader.
The quad is made of two triangles (indices 0, 1, 2 and 2, 3, 0).
Notice that the UVs are placed so that the bottom left is and the top right is .
out vec2 vUv;
This declares an output (out) variable vUv of type vec2, which is passed to the next stage of the pipeline (here, the fragment shader).
The fragment shader receives it with an in variable of the same name and the same type.
void main() {
  vUv = aUv;
  gl_Position = vec4(aPosition, 0.0, 1.0);
}
This is the main function, the entry point of the vertex shader, and it runs once for each vertex.
vUv = aUv; copies the input texture coordinate aUv into the output variable vUv.
On its way to the fragment shader, this value goes through "interpolation", which I explain in the next section.
gl_Position = vec4(aPosition, 0.0, 1.0); sets the built-in variable gl_Position, the final position of the vertex in clip space.
aPosition is a vec2, so it only has X and Y. That's why we add z = 0.0 and w = 1.0.
Because , this position is directly the normalized device coordinate (NDC, x and y from −1 to 1), and a square from −1 to 1 covers the whole window.
fragment.glsl
Here is the fragment shader in its starting state (two colors):
#version 450 core

in vec2 vUv;
out vec4 out_color;

uniform vec3 uColorA;
uniform vec3 uColorB;

void main() {
  vec3 blendedColor = mix(uColorA, uColorB, vUv.x);
  out_color = vec4(blendedColor, 1.0);
}
As mentioned above, the vertex shader passes data to the fragment shader.
So here, in vec2 vUv; comes in from the vertex shader.
There is also out vec4 out_color;, an output variable of type vec4 (a 4D vector) that holds the final color (RGBA).
This value is written to the framebuffer.
When a fragment shader has only one out variable, it automatically becomes output number 0 (the screen).
uniform vec3 uColorA;
uniform vec3 uColorB;
These two are uniform variables, each a 3D vector (vec3) that holds an RGB color.
Uniforms are global variables set from the C code, and they have the same value for every vertex and fragment during one draw call.
In main.c, these two lines set them right before drawing:
    glUniform3f(glGetUniformLocation(shaderProgram, "uColorA"), 1.0f, 0.0f, 0.0f); // red
    glUniform3f(glGetUniformLocation(shaderProgram, "uColorB"), 0.0f, 1.0f, 0.0f); // green
glGetUniformLocation looks up the number (location) of a variable by its name in the shader, and glUniform3f writes three floats to that location.
glUniform* works on the program currently bound with glUseProgram, so always call it after glUseProgram.
void main() {
  vec3 blendedColor = mix(uColorA, uColorB, vUv.x);
  out_color = vec4(blendedColor, 1.0);
}
This main function runs for each fragment (pixel) of the primitive being rendered.
vec3 blendedColor = mix(uColorA, uColorB, vUv.x); uses the mix function to linearly interpolate between uColorA and uColorB.
The interpolation factor is vUv.x, the x component of the UV coordinate (0 at the left edge of the window, 1 at the right edge).
mix(a, b, t) computes:
This is exactly the linear interpolation (lerp) from chapter 2 of the linear algebra series.
GLSL just calls it mix instead of lerp.
Used on a vec3, the same formula is applied to R, G and B separately (component-wise).
When vUv.x = 0, blendedColor = uColorA.
When vUv.x = 1, blendedColor = uColorB.
Values in between blend the two colors proportionally.
For example, a quarter of the way from the left ():
That's 75% red and 25% green, a red leaning slightly towards yellow.
In the middle () we get , a 50/50 blend.
The result is a smooth gradient from uColorA to uColorB.
out_color = vec4(blendedColor, 1.0); turns the blended RGB color (vec3) into a vec4 by adding an alpha value of 1.0 (fully opaque).
It is assigned to out_color and becomes the final color of the fragment.
3.2 Interpolation: how the colors spread
The vertex shader only runs once per vertex.
For this quad that's 4 times (the indices reference vertices 6 times, but the GPU can reuse the result for a vertex it has already processed).
An 800×600 window, on the other hand, has 480,000 pixels, and the fragment shader runs for every one of them.
So how do the vUv values of 4 vertices turn into 480,000 different values?
The answer is the rasterizer, which sits between the vertex shader and the fragment shader.
The rasterizer is fixed-function hardware on the GPU (a part you can't program), and it does this:
- It takes the
gl_Positionof the three vertices of a triangle and finds the triangle on the screen. - It finds every pixel that the triangle covers.
- For the center of each pixel, it computes "weights" for the three vertices. The weights are at least 0 and add up to 1 (these are called barycentric coordinates).
- It blends every
outvariable of the vertex shader with those weights and hands the result to the matchinginvariable of the fragment shader.
As a formula, this is exactly a linear combination from chapter 2 of the linear algebra series:
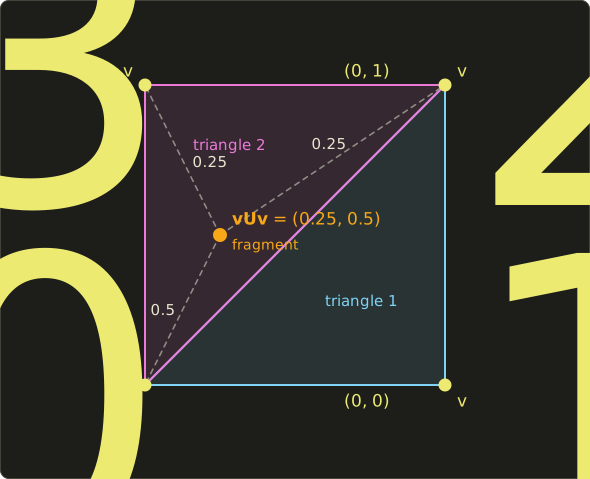
The point in the picture lies inside triangle 2 (vertices ).
Its weights are 0.5 for , 0.25 for and 0.25 for , so:
We get the same value as the position of the point.
Because the UVs of this quad are laid out just like the positions, vUv tells us "where on the screen are we" as a number from 0 to 1.
To be precise, it is computed at the center of the pixel, so the 201st pixel from the left (x = 200) gets .
That also means no pixel ever gets vUv.x of exactly 0 or 1.
You can change how a value is interpolated by putting a qualifier in front of the out/in variables.
smooth(the default): perspective-correct interpolation. It corrects with the ofgl_Positionso that things look right in 3D.noperspective: plain linear interpolation on the screen.flat: no interpolation. The value of one vertex of the triangle (the last one by default) is used for the whole triangle. Integerinvariables of the fragment shader must beflat.
The quad in this chapter has , so smooth and noperspective give the same result.
You'll see the difference in chapter 13, when we work in 3D.
3.3 Adding another color
Let's add a third color: blue.
First, add this line to main.c below the two lines:
glUniform3f(glGetUniformLocation(shaderProgram, "uColorC"), 0.0f, 0.0f, 1.0f); // blueThis adds a new variable that the fragment shader can use.
In fragment.glsl, add this declaration:
uniform vec3 uColorC;
Next, in the main function, declare a vec3 called temp, move the value of blendedColor into it, and mix that with uColorC.
The second interpolation runs along the Y axis, and I hold it back a little so that blue doesn't take over completely.
void main() {
  vec3 temp = mix(uColorA, uColorB, vUv.x);
  vec3 blendedColor = mix(temp, uColorC, vUv.y * 0.95);
  out_color = vec4(blendedColor, 1.0);
}
On macOS, make the same change in fragment.mac.glsl too (keep #version 410 core as the first line).
The downloaded fragment.mac.glsl is still the two-color version, so this is where a Mac gets its third color.
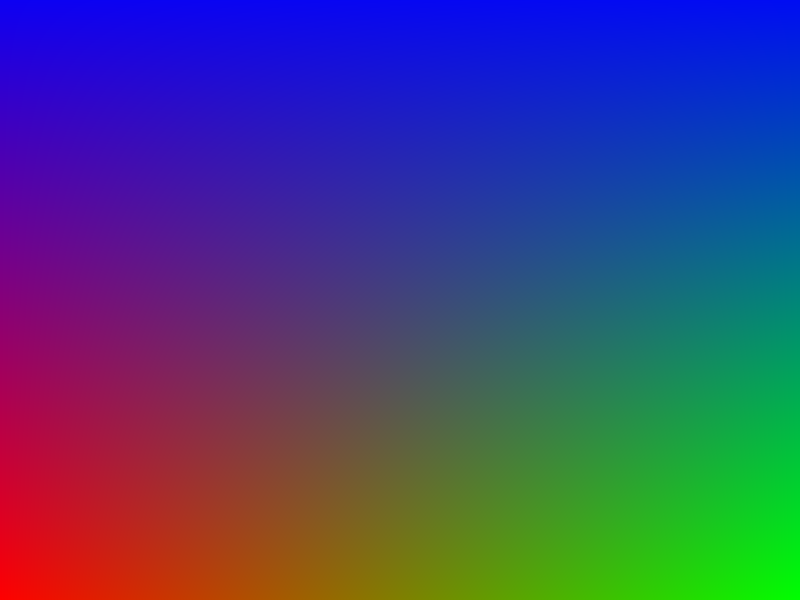
The first mix paints the bottom edge from red to green, and the second mix pulls that towards blue the higher you go.
Because the factor is vUv.y * 0.95, even the very top is only 95% blue, and 5% of the bottom color remains.
Let's compute the four corners and the center:
| vUv | temp | blendedColor |
|---|---|---|
| (0, 0) | (1, 0, 0) | (1, 0, 0) red |
| (1, 0) | (0, 1, 0) | (0, 1, 0) green |
| (0, 1) | (1, 0, 0) | (0.05, 0, 0.95) |
| (1, 1) | (0, 1, 0) | (0, 0.05, 0.95) |
| (0.5, 0.5) | (0.5, 0.5, 0) | (0.2625, 0.2625, 0.475) |
In the center, , so we get .
If you check the center pixel of the screenshot, it is in 8 bits, that is and , just as computed.
If you did everything right, the result looks like this:
Before moving on, play with vUv.x, vUv.y and calculations on them to understand what happens.
For example, changing vUv.y * 0.95 to vUv.y * vUv.y pushes the blue up towards the top.
3.4 Moving the color values into the shader
The only problem with defining the colors in C is that you have to recompile the C code every time you try a color.
If we move uColorA, uColorB and uColorC into the fragment shader, though, we can test right away without compiling.
Shader files are read at run time, so restarting the program is enough.
So in main.c, comment out the three lines:
    // set the uniforms
    //glUniform3f(glGetUniformLocation(shaderProgram, "uColorA"), 1.0f, 0.0f, 0.0f); // red
    //glUniform3f(glGetUniformLocation(shaderProgram, "uColorB"), 0.0f, 1.0f, 0.0f); // green
    //glUniform3f(glGetUniformLocation(shaderProgram, "uColorC"), 0.0f, 0.0f, 1.0f); // blue
And in fragment.glsl:
#version 450 core

in vec2 vUv;
out vec4 out_color;

//uniform vec3 uColorA;
//uniform vec3 uColorB;
//uniform vec3 uColorC;

void main() {
  vec3 colorA = vec3(1.0, 0.0, 0.0); // red
  vec3 colorB = vec3(0.0, 1.0, 0.0); // green
  vec3 colorC = vec3(0.0, 0.0, 1.0); // blue

  vec3 temp = mix(colorA, colorB, vUv.x);
  vec3 blendedColor = mix(temp, colorC, vUv.y * 0.95);
  out_color = vec4(blendedColor, 1.0);
}
I use names without the u (colorA and so on) for the local variables.
A name starting with u marks a uniform, and using it for something that isn't a uniform gets confusing later.
Actually, it would work even if you didn't comment out the three lines in C.
When you look up a uniform that doesn't exist in the shader (or isn't used), glGetUniformLocation returns −1, and glUniform3f on location −1 silently does nothing.
Not getting an error is convenient, but it also means nobody tells you when you misspell a uniform name.
When "I set the value but nothing changes", suspect the spelling first.
Now you can see each color change by just restarting the program.
No compiling needed!
- Windows: when you run with the debugger in Visual Studio (F5), the working directory is the project folder, so the files in the
shaderfolder are read directly. Save the shader, close the window and press F5 again.main.cdidn't change, so nothing gets recompiled. If you startglsltester.exeinx64\Debugdirectly by double-clicking, it can't find theshaderfolder, so in that case copy the exe to the project root and start it from there. - macOS: edit
fragment.mac.glsl, notfragment.glsl. On every build, Xcode copies the.mac.glslfiles into theshaderfolder of the build output (the Copy Files build phase), so save and press CMD + R, and it starts with the new shader without recompilingmain.c. - Unix:
build-unix.shalready writes the binary to the project root, so just run./glsltesteragain from the project root. There is no need to run the build script again.
To check, let's change the colors.
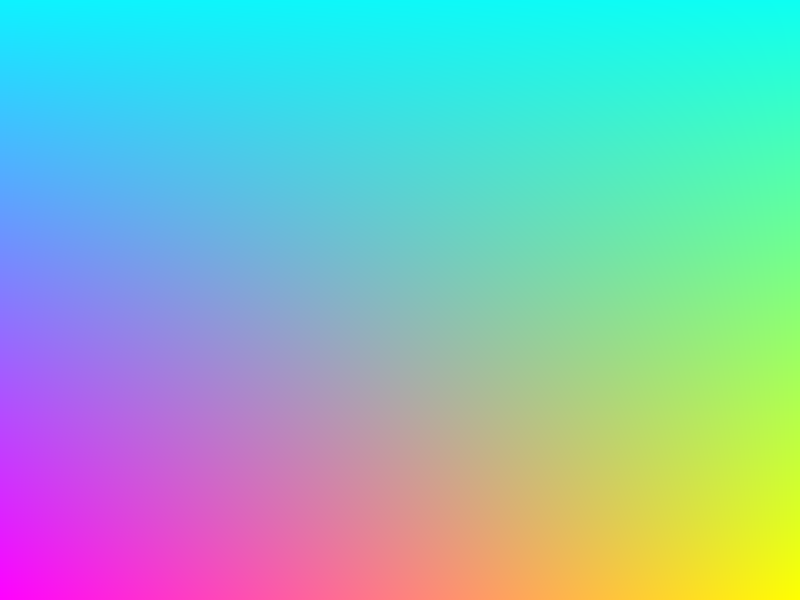
Set colorA to vec3(1.0, 0.0, 1.0) (magenta), colorB to vec3(1.0, 1.0, 0.0) (yellow) and colorC to vec3(0.0, 1.0, 1.0) (cyan):
  vec3 colorA = vec3(1.0, 0.0, 1.0); // magenta
  vec3 colorB = vec3(1.0, 1.0, 0.0); // yellow
  vec3 colorC = vec3(0.0, 1.0, 1.0); // cyan
Restart the GLSL shader tester without compiling, and you get this:
3.5 Color animation
Finally, let's do something more fun.
So far the colors have been static, so let's rotate them over time.
There is a problem, though.
Our shader doesn't know what time it is.
The C program knows the time (glfwGetTime()), so the colors have to be computed in C and passed in as uniforms.
So let's undo the change from the previous section.
(In chapter 5 we'll pass the time itself as a uniform and animate inside the shader.)
In fragment.glsl:
#version 450 core

in vec2 vUv;
out vec4 out_color;

uniform vec3 uColorA;
uniform vec3 uColorB;
uniform vec3 uColorC;

void main() {
  vec3 temp = mix(uColorA, uColorB, vUv.x);
  vec3 blendedColor = mix(temp, uColorC, vUv.y * 0.95);
  out_color = vec4(blendedColor, 1.0);
}
And in main.c, uncomment the three lines:
    // set the uniforms
    glUniform3f(glGetUniformLocation(shaderProgram, "uColorA"), 1.0f, 0.0f, 0.0f); // red
    glUniform3f(glGetUniformLocation(shaderProgram, "uColorB"), 0.0f, 1.0f, 0.0f); // green
    glUniform3f(glGetUniformLocation(shaderProgram, "uColorC"), 0.0f, 0.0f, 1.0f); // blue
Handling the colors as nine loose floats is hard to read, so we use vector.h from the project's include directory.
This header defines small types called Vector2, Vector3 and Vector4.
They are unions, so you can call the same values v.x, v.y, v.z or v.r, v.g, v.b. It's the same idea as swizzling in GLSL.
typedef union {
  struct {
    float x;
    float y;
    float z;
  };
  struct {
    float r;
    float g;
    float b;
  };
} Vector3;
Add the vector.h and math.h headers to main.c, and change the uniform part of the while loop like this:
#include <vector.h>
#include <math.h>
...
    // animate the colors over time
    float time = (float)glfwGetTime();
    float speed = 1.0f; // animation speed
    float phase = 2.0f * 3.14159f / 3.0f; // 120 degree phase offset (for 3 colors)

    // uColorA: red -> green -> blue
    Vector3 colorA;
    colorA.r = sin(time * speed + 0.0f) * 0.5f + 0.5f; // 0.0 to 1.0
    colorA.g = sin(time * speed + phase) * 0.5f + 0.5f;
    colorA.b = sin(time * speed + 2.0f * phase) * 0.5f + 0.5f;

    // uColorB: green -> blue -> red
    Vector3 colorB;
    colorB.r = sin(time * speed + 2.0f * phase) * 0.5f + 0.5f;
    colorB.g = sin(time * speed + 0.0f) * 0.5f + 0.5f;
    colorB.b = sin(time * speed + phase) * 0.5f + 0.5f;

    // uColorC: blue -> red -> green
    Vector3 colorC;
    colorC.r = sin(time * speed + phase) * 0.5f + 0.5f;
    colorC.g = sin(time * speed + 2.0f * phase) * 0.5f + 0.5f;
    colorC.b = sin(time * speed + 0.0f) * 0.5f + 0.5f;

    // set the uniforms
    glUniform3f(glGetUniformLocation(shaderProgram, "uColorA"), colorA.r, colorA.g, colorA.b);
    glUniform3f(glGetUniformLocation(shaderProgram, "uColorB"), colorB.r, colorB.g, colorB.b);
    glUniform3f(glGetUniformLocation(shaderProgram, "uColorC"), colorC.r, colorC.g, colorC.b);
glfwGetTime() returns the number of seconds since GLFW was initialized.
Every channel is computed with the same kind of formula:
is speed and (phi) is the phase, how far the wave is shifted.
swings between −1 and 1, so multiplying by 0.5 and adding 0.5 gives the range 0 to 1, which we can use directly as a color.
The three phases are , (120°) and (240°), so the R, G and B waves are shifted by exactly a third of a period.
That's why, when red is at its brightest, green and blue are darker, and over time the brightest channel moves "red → green → blue".
The three colors are the same values in a different order, so the three corners always show different colors.
Let's compute colorA at :
Three sines shifted by 120° always add up to 0, so is always 1.5.
That's why the brightness stays roughly the same while only the hue rotates.
On Unix, sin lives in the math library, so you need -lm when linking (build-unix.sh already has it).
Now, here's some homework: play with the values.
Change speed, phase and 0.5f and figure out what each one does.
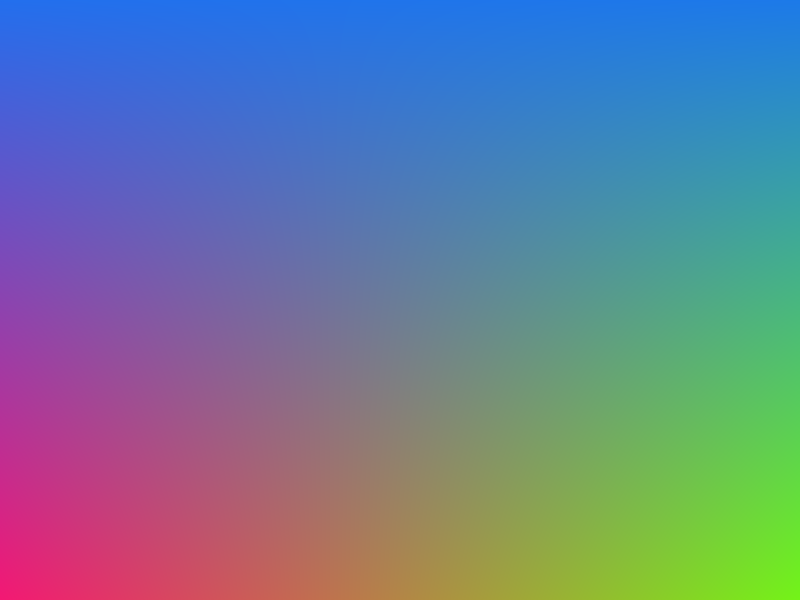
The final result looks like this (a 5-second recording):
3.6 Other gradient shapes
Every gradient so far used vUv.x or vUv.y directly as the mix factor.
Just by changing how we build the factor , we can give a gradient any shape we like.
Try the shaders in this section by replacing the whole fragment.glsl (they don't use the uniforms, so the C side can stay as it is).
Diagonal gradients
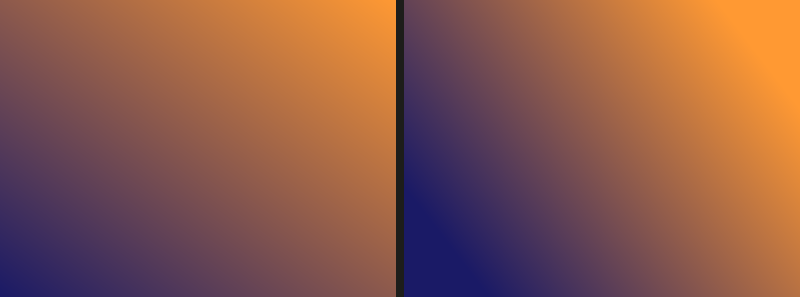
For a gradient from the bottom left to the top right, use the average of x and y as the factor:
#version 450 core

in vec2 vUv;
out vec4 out_color;

void main() {
  vec3 colorA = vec3(0.1, 0.1, 0.4); // navy
  vec3 colorB = vec3(1.0, 0.6, 0.2); // orange

  // 0 at the bottom left, 1 at the top right
  float t = (vUv.x + vUv.y) * 0.5;
  out_color = vec4(mix(colorA, colorB, t), 1.0);
}
For a gradient at any angle, use the dot product from chapter 4 of the linear algebra series.
The dot product with a unit vector tells us "how far along that direction we are", so we use that value, measured from the center of the screen, as the factor:
#version 450 core

in vec2 vUv;
out vec4 out_color;

void main() {
  vec3 colorA = vec3(0.1, 0.1, 0.4); // navy
  vec3 colorB = vec3(1.0, 0.6, 0.2); // orange

  float angle = radians(30.0);              // direction of the gradient
  vec2 dir = vec2(cos(angle), sin(angle));  // direction vector of length 1
  float t = dot(vUv - 0.5, dir) + 0.5;      // distance from the center along dir
  t = clamp(t, 0.0, 1.0);
  out_color = vec4(mix(colorA, colorB, t), 1.0);
}
Subtracting a float from a vec2, like vUv - 0.5, subtracts it from every component.
radians converts degrees to radians ().
clamp(t, 0.0, 1.0) keeps in the range 0 to 1.
Why do we need it?
With 30°, the top right corner gives , which is more than 1.
mix doesn't limit , so at we get , a color that has "overshot" the orange.
Anything above 1 gets cut off when it's written to the screen, but it isn't the color we wanted.
If you want a gradient to stop at its two end colors, the standard move is to limit the factor with clamp.
Radial gradients
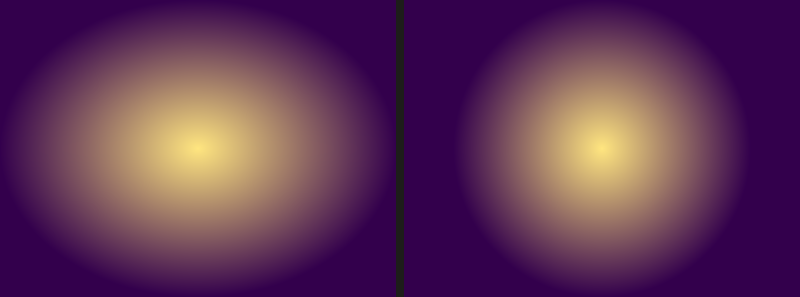
If we use the distance from the center as the factor, we get a circular (radial) gradient.
The distance is the vector length from chapter 3 of the linear algebra series, called length in GLSL:
#version 450 core

in vec2 vUv;
out vec4 out_color;

void main() {
  vec3 inner = vec3(1.0, 0.9, 0.5); // color in the center
  vec3 outer = vec3(0.2, 0.0, 0.3); // color outside

  vec2 p = vUv - 0.5;          // put the center at (0, 0)
  p.x *= 800.0 / 600.0;        // so that it stays a circle on a wide window
  float t = length(p) * 2.0;   // 0 in the center, 1 at the top and bottom edges
  t = clamp(t, 0.0, 1.0);
  out_color = vec4(mix(inner, outer, t), 1.0);
}
Without the line p.x *= 800.0 / 600.0;, you get an ellipse instead of a circle.
UVs go from 0 to 1 both horizontally and vertically, but the window is 800 pixels wide and 600 pixels tall, so 0.1 in UV is 80 pixels horizontally and 60 pixels vertically.
Multiplying x by the aspect ratio of the window, , gives x and y the same unit.
I wrote the numbers directly here, which breaks as soon as the window size changes.
In chapter 5 we'll receive the window size as a uniform and fix this properly.
Let's check with numbers.
In the center of the screen, , so .
In the middle of the top edge, , so .
In the middle of the right edge, , so , and clamp turns it into 1.
Smoothing with smoothstep
A linear gradient starts and stops changing abruptly, so you can sometimes see a faint "crease" at its ends.
smoothstep is an S-shaped curve whose slope is 0 at both ends, and it fixes that:
If is at most the result is 0, if it's at least the result is 1, and in between it goes smoothly from 0 to 1.
For example, has , so it is .
A linear ramp would be at 0.25 there, but smoothstep has only moved 0.156.
In the middle, , it gives , the same as linear.
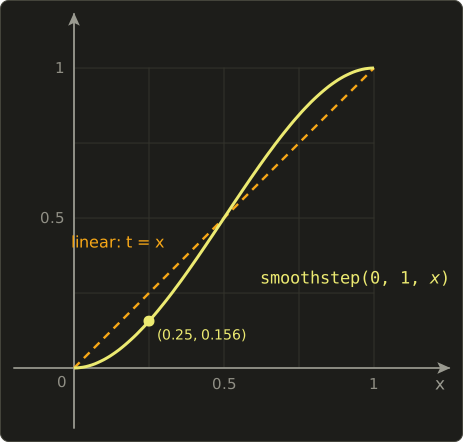
Let's compare them with the top half of the screen linear and the bottom half smoothstep:
#version 450 core

in vec2 vUv;
out vec4 out_color;

void main() {
  vec3 colorA = vec3(0.1, 0.1, 0.4); // navy
  vec3 colorB = vec3(1.0, 0.6, 0.2); // orange

  float t;
  if (vUv.y > 0.5) {
    t = vUv.x;                         // top half: linear
  } else {
    t = smoothstep(0.0, 1.0, vUv.x);   // bottom half: smoothstep
  }
  vec3 color = mix(colorA, colorB, t);

  // draw a thin line where the halves meet
  if (abs(vUv.y - 0.5) < 0.002) color = vec3(1.0);
  out_color = vec4(color, 1.0);
}
abs is the absolute value.
abs(vUv.y - 0.5) < 0.002 means "vUv.y is within 0.002 of 0.5", which draws a line 2 to 3 pixels tall across the middle of the window.
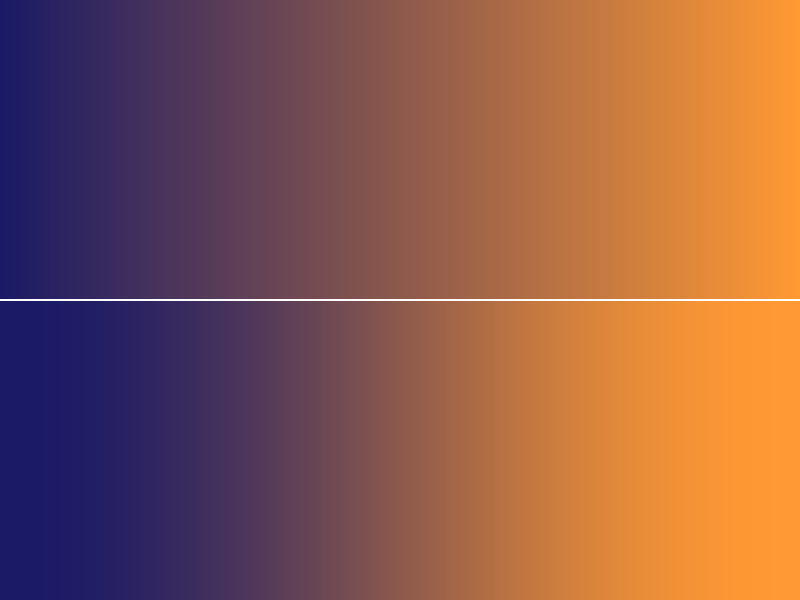
In the bottom half, the end colors stay longer at the left and right, and the change happens quickly in the middle.
If you move and of smoothstep close together (for example smoothstep(0.45, 0.55, vUv.x)), you get a sharp gradient that is almost a hard edge.
This property is extremely useful in chapter 6 for smoothing the edges of shapes (anti-aliasing).
Chaining several colors
By stacking mix calls, you can chain as many colors as you like.
Let's make a sunset with three colors: ground, horizon and sky:
#version 450 core

in vec2 vUv;
out vec4 out_color;

void main() {
  vec3 ground  = vec3(0.05, 0.04, 0.08);
  vec3 horizon = vec3(1.0, 0.55, 0.25);
  vec3 sky     = vec3(0.15, 0.2, 0.5);

  vec3 color = mix(ground, horizon, smoothstep(0.25, 0.32, vUv.y));
  color = mix(color, sky, smoothstep(0.32, 0.9, vUv.y));
  out_color = vec4(color, 1.0);
}
The first mix switches from the ground to the horizon color in the narrow range where vUv.y is 0.25 to 0.32, and the second mix fades to the sky color over the wide range 0.32 to 0.9.
A narrow smoothstep range gives a crisp boundary, a wide one gives a soft one.

3.7 GLSL features used in this chapter
mix(a, b, t): . Linear interpolation. Works component-wise on vectors and does not limit .clamp(x, lo, hi): . Keeps a value inside a range.smoothstep(e0, e1, x): , where is mapped from to onto 0 to 1 and clamped.length(v): the length of a vector, (plus in 3D).dot(a, b): the dot product . The dot product with a unit vector is the component along that direction.sin(x),cos(x): take the angle in radians.radians(deg)converts degrees to radians.abs(x): the absolute value.in/out: pass values between stages. Names and types must match.smooth/noperspective/flat: qualifiers that change how values are interpolated.uniform: a value set from C withglUniform*that stays constant during a draw. Setting a uniform that doesn't exist is silently ignored.
3.8 How games and engines use this
Gradients and interpolation hide in almost every part of a game's screen.
- Skies: many games draw the sky as a two- or three-color gradient. Use the y component of the view direction as the factor, and looking up gives you the sky color, looking down the horizon color.
- Fog: use the distance from the camera as the factor and
mixthe object's color towards the fog color. It's an old technique that makes distant things slowly melt into the air. - Vertex colors: games from the PlayStation era often stored colors on the vertices instead of using textures, and let the rasterizer's interpolation paint the faces. Even today, engines put non-color data on vertices (terrain blend weights, how much grass sways) and let it interpolate.
- UI: buttons, health bars, text shadows. The "remaining amount" of a bar is classically made with
steporsmoothstep. - Screen effects: a fade in or out is just "
mixthe screen color towards black". The red flash when you take damage is the same thing. - Values that move over time: the sine formula from this chapter drives blinking items, UI that glows as if breathing, wobbling water and every other "wiggle" in a game.
3.9 Summary
- The vertex shader runs once per vertex, the fragment shader once per pixel.
- The rasterizer interpolates the vertex shader's
outvariables with barycentric weights and passes them to the fragment shader'sinvariables. mix(a, b, t)is , the same as lerp from linear algebra.- By changing how the factor is built you get horizontal, vertical, diagonal (
dot), radial (length) and other gradients. mixdoesn't limit , soclampit when it can leave the range.smoothstepis an S-curve with zero slope at both ends, used for smooth transitions.- Shaders are read at run time, so shader-only changes can be tested without recompiling C.
- Values that change over time can be computed in C and passed as uniforms (in chapter 5 we pass the time itself).
3.10 Challenges
- ★ In the two-color shader (red to green), compute by hand the color of the pixel where
vUv.x = 0.75. Then, in the three-color shader, compute the colors atvUv = (0.5, 0)andvUv = (0.5, 1). - ★ Compute
smoothstep(0.0, 1.0, 0.75)andsmoothstep(2.0, 4.0, 3.0)by hand (hint: for the second one, find first). - ★★ Make the gradient vertical. Red should be at the bottom and green at the top, with no change in color horizontally.
- ★★ Write a shader with a different color in each corner (for example red bottom left, green bottom right, blue top left, white top right). Hint:
mixalong the bottom edge and the top edge separately, thenmixthose two withvUv.y. Each corner should be exactly its color, and the center should be the average of the four, the gray . - ★★ Turn the radial gradient into a "ring". Only the places at distance 0.3 from the center should be bright, getting darker the farther you are from that distance (hint:
abs(length(p) - 0.3)). - ★★ Predict what happens when you set
phaseto0.0finmain.c, then try it. All channels get the same value, so the whole screen should stay gray and pulse between black and white. - ★★★ The middle of the red-to-green
mix, , looks like a slightly dark, muddy yellow. Find out why (keywords: sRGB, gamma). Then convert the colors into "linear space" withpow(color, vec3(2.2))before themix, convert back withpow(result, vec3(1.0 / 2.2)), and compare how the middle changes. Chapter 10 covers gamma in detail.
ファイル: a/main.c | b/main.c
| 前 | 新 | ||
|---|---|---|---|
| @@ -9,6 +9,8 @@ | |||
| 9 | #include <GLFW/glfw3.h> | 9 | #include <GLFW/glfw3.h> |
| 10 | #include <stdio.h> | 10 | #include <stdio.h> |
| 11 | #include <stdlib.h> | 11 | #include <stdlib.h> |
| 12 | #include <vector.h> | ||
| 13 | #include <math.h> | ||
| 12 | 14 | ||
| 13 | // ファイルパスを構築(プラットフォームに応じて) | 15 | // ファイルパスを構築(プラットフォームに応じて) |
| 14 | char *constructFilePath(const char *basePath) { | 16 | char *constructFilePath(const char *basePath) { |
| @@ -229,9 +231,33 @@ int main(int argc, char **argv) { | |||
| 229 | // シェーダープログラムを使用 | 231 | // シェーダープログラムを使用 |
| 230 | glUseProgram(shaderProgram); | 232 | glUseProgram(shaderProgram); |
| 231 | 233 | ||
| 234 | // 時間に基づいて色をアニメーション | ||
| 235 | float time = (float)glfwGetTime(); | ||
| 236 | float speed = 1.0f; // アニメーションの速度 | ||
| 237 | float phase = 2.0f * 3.14159f / 3.0f; // // 120度の位相差(3色用) | ||
| 238 | |||
| 239 | // uColorA: 赤 -> 緑 -> 青 | ||
| 240 | Vector3 colorA; | ||
| 241 | colorA.r = sin(time * speed + 0.0f) * 0.5f + 0.5f; // 0.0 to 1.0 | ||
| 242 | colorA.g = sin(time * speed + phase) * 0.5f + 0.5f; | ||
| 243 | colorA.b = sin(time * speed + 2.0f * phase) * 0.5f + 0.5f; | ||
| 244 | |||
| 245 | // uColorB: 緑 -> 青 -> 赤 | ||
| 246 | Vector3 colorB; | ||
| 247 | colorB.r = sin(time * speed + 2.0f * phase) * 0.5f + 0.5f; | ||
| 248 | colorB.g = sin(time * speed + 0.0f) * 0.5f + 0.5f; | ||
| 249 | colorB.b = sin(time * speed + phase) * 0.5f + 0.5f; | ||
| 250 | |||
| 251 | // uColorC: 青 -> 赤 -> 緑 | ||
| 252 | Vector3 colorC; | ||
| 253 | colorC.r = sin(time * speed + phase) * 0.5f + 0.5f; | ||
| 254 | colorC.g = sin(time * speed + 2.0f * phase) * 0.5f + 0.5f; | ||
| 255 | colorC.b = sin(time * speed + 0.0f) * 0.5f + 0.5f; | ||
| 256 | |||
| 232 | // ユニフォームを設定 | 257 | // ユニフォームを設定 |
| 233 | glUniform3f(glGetUniformLocation(shaderProgram, "uColorA"), 1.0f, 0.0f, 0.0f); // 赤 | 258 | glUniform3f(glGetUniformLocation(shaderProgram, "uColorA"), colorA.r, colorA.g, colorA.b); // 赤 |
| 234 | glUniform3f(glGetUniformLocation(shaderProgram, "uColorB"), 0.0f, 1.0f, 0.0f); // 緑 | 259 | glUniform3f(glGetUniformLocation(shaderProgram, "uColorB"), colorB.r, colorB.g, colorB.b); // 緑 |
| 260 | glUniform3f(glGetUniformLocation(shaderProgram, "uColorC"), colorC.r, colorC.g, colorC.b); // 青 | ||
| 235 | 261 | ||
| 236 | // クアッドを描画 | 262 | // クアッドを描画 |
| 237 | glBindVertexArray(VAO); | 263 | glBindVertexArray(VAO); |
ファイル: a/shader/fragment.glsl | b/shader/fragment.glsl
| 前 | 新 | ||
|---|---|---|---|
| @@ -5,8 +5,10 @@ out vec4 out_color; | |||
| 5 | 5 | ||
| 6 | uniform vec3 uColorA; | 6 | uniform vec3 uColorA; |
| 7 | uniform vec3 uColorB; | 7 | uniform vec3 uColorB; |
| 8 | uniform vec3 uColorC; | ||
| 8 | 9 | ||
| 9 | void main() { | 10 | void main() { |
| 10 | vec3 blendedColor = mix(uColorA, uColorB, vUv.x); | 11 | vec3 temp = mix(uColorA, uColorB, vUv.x); |
| 12 | vec3 blendedColor = mix(temp, uColorC, vUv.y * 0.95); | ||
| 11 | out_color = vec4(blendedColor, 1.0); | 13 | out_color = vec4(blendedColor, 1.0); |
| 12 | } | 14 | } |
ファイル: a/shader/fragment.mac.glsl | b/shader/fragment.mac.glsl
| 前 | 新 | ||
|---|---|---|---|
| @@ -5,8 +5,10 @@ out vec4 out_color; | |||
| 5 | 5 | ||
| 6 | uniform vec3 uColorA; | 6 | uniform vec3 uColorA; |
| 7 | uniform vec3 uColorB; | 7 | uniform vec3 uColorB; |
| 8 | uniform vec3 uColorC; | ||
| 8 | 9 | ||
| 9 | void main() { | 10 | void main() { |
| 10 | vec3 blendedColor = mix(uColorA, uColorB, vUv.x); | 11 | vec3 temp = mix(uColorA, uColorB, vUv.x); |
| 12 | vec3 blendedColor = mix(temp, uColorC, vUv.y * 0.95); | ||
| 11 | out_color = vec4(blendedColor, 1.0); | 13 | out_color = vec4(blendedColor, 1.0); |
| 12 | } | 14 | } |
コメント(0)
まだコメントはありません。
ログインするとコメント出来ます。