現在のブログ
ゲーム開発ブログ (2025年~) Gamedev Blog (2025~)
レガシーブログ
テクノロジーブログ (2018~2024年) リリースノート (2023~2025年) MeatBSD (2024年)
【Vulkan】Game Engine 0: Basic Renderer Setup
I have finished writing the complete documentation for NVN and Vulkan programming targeted at the Nintendo Switch, and posted it on 076 Studio's intranet.
This will serve as study material for future new hires.
I plan to rewrite a PC-oriented Vulkan guide on this blog in the near future, but first I would like to give a high-level overview of the basic elements required for a game engine.
Creating your own game engine is not as scary as many people think.
The hardest part is getting the rendering engine up and running, but once you overcome that, the rest is relatively straightforward.
This time, the focus will be on the rendering engine.
Details will be explained in future full tutorials.
The purpose of this article is to teach the basic setup method for a renderer that follows the official specification.
What a Game Engine Needs
First, let's take a high-level look at the breakdown of a game engine.
When most beginners hear "game engine," they imagine a large scene editor where you can attach scripts.
However, the real definition is simply a collection of the functions needed to run a game.
A good game engine is one that aligns with the intended game design.
Technically, it is possible to create an extremely general-purpose engine like Unity or Godot, or to take a highly specialized engine like Unreal Engine and extend it for general use.
However, the highest performance and quality are achieved by building an engine specialized for the type of game you are making.
Of course, some components can be reused in future projects, so you don't have to write everything from scratch every single time.
A typical engine is built in roughly the following order:
- Renderer (Vulkan, DirectX, Metal, NVN, GNM, etc.)
- Basic primitive generation (cube, capsule, sphere, etc.)
- Debug interface (Dear ImGui)
- Asset loading (3D models, 2D textures, audio files, etc.)
- Physics engine
- GUI and particle system
- Gameplay code
Platform-dependent code is handled during the renderer development stage.
This is because we implement the parts with the biggest differences first.
Vulkan is cross-platform, but it has native support on Windows, Linux, BSD, Android, Switch, and Switch 2.
On macOS and iOS it runs through the MoltenVK translation layer.
DirectX is exclusive to Microsoft platforms.
NVN is exclusive to Nintendo platforms.
GNM is exclusive to PlayStation platforms.
Metal is exclusive to Apple platforms.
Vulkan is the most attractive option in terms of multi-platform support, but historically game companies have used DirectX or console-specific APIs.
At the time, OpenGL was the mainstream, but it wasn't very suitable for high-performance games.
Vulkan is extremely well suited for this, but by the time it appeared, many game companies had already become dependent on Unreal or Unity, so using Vulkan often became nothing more than ticking a checkbox.
Also, most developers do not implement their own physics engine and instead use commercially available libraries.
However, we like tinkering with computers, so we will make our own.
You might wonder: if DirectX and console-specific APIs are more commonly used, why not learn DirectX?
Here are the reasons:
- Vulkan has less abstraction, so you can learn more deeply about how the GPU works internally.
- Linux is growing as a target platform, Windows market share is trending downward, and gamers are strongly demanding that Windows games also run on Linux.
- Vulkan's naming conventions are similar to those of Nintendo and Sony APIs, so knowledge gained from Vulkan transfers more easily than from DirectX.
- Despite DirectX's historical popularity, it is easier to find Vulkan support than DirectX 12 support. Much of the available DirectX support is still for version 11 or earlier, which is closer to OpenGL.
As a rule, most of this is not particularly difficult.
The hardest parts are the renderer setup and recording the calls that tell the GPU what to do in command buffers.
You may not understand what that means right now, but it will become clear once the public Vulkan tutorial is released.
I will try to explain without going into too much detail.
What a 3D Renderer Does
Drawing a triangle on the screen is the "Hello, World" of graphics programming.
However, you need to do this every time to confirm that the renderer is functioning correctly.
The renderer setup method differs for each API, and people coming from DirectX may get confused by the naming conventions.
For some reason, only Microsoft names the pipeline differently from other APIs.
Some APIs (especially Metal) abstract away many parts, while console-specific APIs place more emphasis on manual memory management.
However, the basic concepts are almost the same across most APIs.
To draw a triangle in Vulkan, follow these steps:
Step 1: Instance Creation and Physical Device Selection
This varies by API, but in Vulkan you first create an instance.
Console-specific APIs bootstrap the device + API right away, and there is only one device choice.
DirectX and Metal skip instantiation and go straight to device creation.
The reason physical devices exist is because Vulkan is designed to use multiple GPUs simultaneously.
However, not all GPUs are the same.
Some have more VRAM, some do not support ray casting, etc.
The main purpose is to loop through all available graphics cards and select the most suitable one.
Step 2: Logical Device and Queue Family Creation
This is a Vulkan-specific feature.
Only Vulkan clearly distinguishes between physical and logical devices.
With a logical device, you can describe the features you want to use in more detail.
Queue families are also Vulkan-specific.
All APIs allow you to submit render commands to queues for parallel processing on the GPU.
In Vulkan, these can be split into separate families, each easily handling a specific set of operations.
For example, one family may handle graphics, another compute, and another memory transfers.
However, modern graphics cards support all the necessary queue operations.
Step 3: Window Surface and Swapchain Creation
This is the most platform-dependent part.
On PC, you instantiate a window using the OS-provided window API (WinAPI, Xlib/XCB, Cocoa, Wayland, Haiku API, Plan9 API, etc.).
Alternatively, if you use a cross-platform library like GLFW or SDL, you no longer need to worry about it.
In the tutorial series we will create our own window library, but in this article we will use GLFW.
On smartphones and game consoles, you use the visual interface and layering system provided by each platform's SDK.
Simply opening a window is not enough.
You need to draw graphics to that window.
That is the role of the window surface.
The swapchain is a collection of render targets.
It distinguishes between the image currently being drawn and the image being displayed on screen, ensuring that only completed images are shown.
Each time you draw a frame, the swapchain provides the image to draw to.
Step 4: Image Views and Dynamic Rendering
Previously, you had to create framebuffers and render passes.
Since Vulkan 1.3, dynamic rendering has made predefined render passes and framebuffers unnecessary, allowing you to specify render attachments directly when recording commands.
Step 5: Graphics Pipeline Setup
The graphics pipeline describes the configurable state of the graphics card, such as viewport size, depth buffer operations, shader modules, scissor settings, etc.
A characteristic of Vulkan is that almost all pipeline settings must be decided in advance.
Changing a shader or slightly modifying the vertex layout requires recreating the entire pipeline.
Therefore, you will create many pipeline objects in advance to cover all combinations of rendering operations.
Basic settings such as viewport size and clear color can still be changed dynamically.
Step 6: Command Pool and Command Buffer
This is the most tedious central part common to all graphics APIs.
For every render command, you need to begin recording, bind the graphics pipeline, draw vertices, end recording, and submit the command to the queue.
Since Vulkan 1.3 this operation has been simplified so that only begin and end rendering are needed.
However, other APIs may still require manual control in some cases.
Step 7: Main Loop
In the main loop, you acquire an image, submit the correct draw command buffer, and return the image to the swapchain to present the frame.
Why Are There So Many Steps?
As you may have noticed in Odin or Rust language reviews, OpenGL requires very few steps.
This is because OpenGL is a 1990s API, created when GPUs had just been invented and could do almost nothing.
GPUs were so new that most computers at the time still didn't even have one.
The Nintendo 64 had a highly proprietary RSP, and even official developers were not allowed to fully understand how it worked.
The Nintendo DS was the last console without a GPU, instead featuring three rendering engines (one of which was for 3D).
Today, any computer, console, or smartphone you buy comes with a GPU — whether discrete or integrated — 100% of the time.
OpenGL evolved over the years to support newer, more programmable GPUs.
However, there was a limit to how much could be added, so Vulkan was designed from scratch.
Apple completely deprecated OpenGL and created its own API called "Metal" instead.
The Nintendo 3DS and Wii U still used APIs similar to OpenGL, but with proprietary modifications.
However, with the arrival of the PlayStation 5 and Nintendo Switch, both Nintendo and Sony transitioned to new APIs better suited for modern GPUs.
And only Microsoft performed a modern rewrite of their API while maintaining backward compatibility under the same name.
Is Vulkan Difficult?
After reading this far, you might think Vulkan is very difficult.
In reality, however, Vulkan is not difficult.
It is just verbose.
Imagine if CPUs in the 1980s had gone through the same evolution.
At first you could write a complete program with just a few handwritten assembly instructions.
As CPUs became more flexible, C appeared, and later C++ emerged for complete control.
Of course that didn't actually happen with CPUs, but it is exactly what happened with GPUs.
From almost no programmability to nearly complete programmability.
Some fixed-function elements still remain, but they too will eventually become programmable.
Depending on your previous graphics programming experience, setting up a minimal Vulkan renderer can take anywhere from one full day of work to an entire month.
The first time I did it, it took me 23 days.
The second time took 10 days, and the third time only 3 days.
Porting it to the Nintendo Switch afterward took another two weeks.
So don't be surprised if you spend a full two weeks on Vulkan setup and still don't see a triangle.
Let's Get Started
That's enough talking.
Let's actually write some code.
The specification is available here: Vulkan Specification
If you cannot read English, use an LLM such as Grok or ChatGPT to translate the page.
The specification is a constantly updated document, so I will not include a full translation on this blog as it would become outdated in just a few months.
The most common way to write Vulkan code is to use the C API from C++.
However, since we are already writing in C++, let's use the C++ API.
Please download and install GLFW, GLM, the Vulkan SDK, a text editor, and a C++20 compiler in advance.
Many people tend to overcomplicate things by splitting code into classes from the very beginning.
However, I recommend implementing Vulkan in a procedural style first, then refactoring it into classes afterward.
When you are touching Vulkan for the first time, you still don't fully understand what you're trying to do, so it is best to keep everything as simple as possible at first and split it up only after it is working.
The complete source code is available here: Gitler
If you are using Visual Studio, I recommend using #pragma region to divide sections.
This way, even as the code grows, you can collapse sections to keep it readable.
Example:
#pragma region check
  bool isTrue = false;
#pragma endregion
Window Creation
Before we begin, we need to create a window.
This project already includes the Windows version of the GLFW and GLM libraries.
For other OSes, please install them using your Linux distribution's package manager, BSD's ports tree, or macOS's Homebrew.
#include <iostream>
#include <string>
#include <GLFW/glfw3.h>

int main() {
  int winWidth = 800;
  int winHeight = 600;
  std::string winName = reinterpret_cast<const char *>(u8"Vulkanレンダー");

  glfwInit();
  glfwWindowHint(GLFW_CLIENT_API, GLFW_NO_API);
  glfwWindowHint(GLFW_RESIZABLE, GLFW_FALSE);
  GLFWwindow *window = glfwCreateWindow(winWidth, winHeight, winName.c_str(), nullptr, nullptr);

  while (!glfwWindowShouldClose(window)) {
    if (glfwGetKey(window, GLFW_KEY_Q) == GLFW_PRESS) {
      glfwSetWindowShouldClose(window, true);
    }

    glfwPollEvents();
  }

  glfwDestroyWindow(window);
  glfwTerminate();
}
Even though we haven't written a single line of Vulkan code yet, you can already see the difference from OpenGL code — especially in the window hint section.
By default, GLFW creates an OpenGL context of the specified version.
For Vulkan, we need to tell GLFW not to create a context.
Also, since Vulkan's swapchain handles resizing, we instruct GLFW to make the window non-resizable.
Instance
Next, we create the Vulkan instance.
Only one instance is created, and it serves as the connection between the game engine and the GPU driver.
According to the Vulkan specification, the required elements are as follows:
typedef struct VkApplicationInfo {
    VkStructureType    sType;
    const void*        pNext;
    const char*        pApplicationName;
    uint32_t           applicationVersion;
    const char*        pEngineName;
    uint32_t           engineVersion;
    uint32_t           apiVersion;
} VkApplicationInfo;

typedef struct VkInstanceCreateInfo {
    VkStructureType             sType;
    const void*                 pNext;
    VkInstanceCreateFlags       flags;
    const VkApplicationInfo*    pApplicationInfo;
    uint32_t                    enabledLayerCount;
    const char* const*          ppEnabledLayerNames;
    uint32_t                    enabledExtensionCount;
    const char* const*          ppEnabledExtensionNames;
} VkInstanceCreateInfo;
The most commonly used fields are sType and pNext.
pNext is the way to pass another Create Info to the current one.
sType is only required in the C API for structure types.
In the C++ and RAII APIs, it is set automatically.
Once the Create Info is defined, create the instance like this:
VkResult vkCreateInstance(
    const VkInstanceCreateInfo*                 pCreateInfo,
    const VkAllocationCallbacks*                pAllocator,
    VkInstance*                                 pInstance);
If you are using macOS, you must set the VK_INSTANCE_CREATE_ENUMERATE_PORTABILITY_BIT_KHR flag, otherwise it will not work.
On other desktop OSes this is optional.
...
#define VULKAN_HPP_DISPATCH_LOADER_DYNAMIC 1
#include <vulkan/vulkan.hpp>

VULKAN_HPP_DEFAULT_DISPATCH_LOADER_DYNAMIC_STORAGE

int main() {
  ...
  vk::ApplicationInfo applicationInfo = {};
  applicationInfo.pApplicationName = "Vulkan Render";
  applicationInfo.applicationVersion = vk::makeVersion(1, 0, 0);
  applicationInfo.pEngineName = "Small Engine";
  applicationInfo.engineVersion = vk::makeVersion(1, 0, 0);
  applicationInfo.apiVersion = vk::ApiVersion14;

  VULKAN_HPP_DEFAULT_DISPATCHER.init();

  vk::InstanceCreateInfo instanceCreateInfo = {};
  instanceCreateInfo.pApplicationInfo = &applicationInfo;
  ...
}
Before creating the instance, there is one more thing we need to do: retrieve the required extensions.
In this case, we can ask GLFW for the extensions it needs.
...
  uint32_t glfwExtCount = 0;
  const char **glfwExt = glfwGetRequiredInstanceExtensions(&glfwExtCount);

  instanceCreateInfo.enabledExtensionCount = glfwExtCount;
  instanceCreateInfo.ppEnabledExtensionNames = glfwExt;

  vk::Instance instance = vk::createInstance(instanceCreateInfo);
  VULKAN_HPP_DEFAULT_DISPATCHER.init(instance);

  while (!glfwWindowShouldClose(window)) {
    ...
  }

  instance.destroy();
...
This is a theme that will come up repeatedly in future setup steps, so get used to it.
If you compile and run now, it may look like nothing has changed.
However, behind the scenes a Vulkan instance has been created and destroyed.
Validation Layers
Next, we add validation layers.
Validation layers are used to investigate why drawing is incorrect and should only be enabled in debug mode.
In release mode, you can ignore them.
#include <vector>
#include <cassert>
...
int main() {
  ...
  uint32_t glfwExtCount = 0;
  const char **glfwExt = glfwGetRequiredInstanceExtensions(&glfwExtCount);
  std::vector<const char *> ext(glfwExt, glfwExt + glfwExtCount);
  ext.push_back(*glfwExt);

#ifndef NDEBUG
  ext.push_back(VK_EXT_DEBUG_UTILS_EXTENSION_NAME);

  std::vector<const char *> reqLayers = { "VK_LAYER_KHRONOS_validation" };

  uint32_t layerCount;
  auto res1 = vk::enumerateInstanceLayerProperties(&layerCount, nullptr);

  std::vector<vk::LayerProperties> availLayers(layerCount);
  auto res2 = vk::enumerateInstanceLayerProperties(&layerCount, availLayers.data());

  bool layerFound = std::ranges::any_of(reqLayers, [&](const char *r) {
    return std::ranges::any_of(availLayers, [&](const auto &p) {
      return strcmp(r, p.layerName) == 0;
    });
  });

  if (!layerFound) {
    assert(false && "必要なレイヤーを見つけられませんでした。\n");
    return -1;
  }

  instanceCreateInfo.enabledLayerCount = static_cast<uint32_t>(reqLayers.size());
  instanceCreateInfo.ppEnabledLayerNames = reqLayers.data();
#else
  instanceCreateInfo.enabledLayerCount = 0;
#endif

  instanceCreateInfo.enabledExtensionCount = static_cast<uint32_t>(ext.size());
  instanceCreateInfo.ppEnabledExtensionNames = ext.data();

  vk::Instance instance = vk::createInstance(instanceCreateInfo);
  VULKAN_HPP_DEFAULT_DISPATCHER.init(instance);
  ...
}
This should still compile and run.
Next, add the debug callback function above the main function.
static VKAPI_ATTR vk::Bool32 VKAPI_CALL debugCallback(
  vk::DebugUtilsMessageSeverityFlagBitsEXT severity,
  vk::DebugUtilsMessageTypeFlagsEXT type,
  const vk::DebugUtilsMessengerCallbackDataEXT *pCallbackData,
  void *pUserData) {
  if (severity >= vk::DebugUtilsMessageSeverityFlagBitsEXT::eWarning) {
    std::cerr << "validation layer: type " << to_string(type)
      << " msg: " << pCallbackData->pMessage << std::endl;
  }

  return vk::False;
}
Details will be explained in the full tutorial.
For now, I have simplified it to fit everything in one article.
#ifndef NDEBUG
  vk::DebugUtilsMessageSeverityFlagsEXT severityFlags(vk::DebugUtilsMessageSeverityFlagBitsEXT::eWarning
                                                    | vk::DebugUtilsMessageSeverityFlagBitsEXT::eError);
  vk::DebugUtilsMessageTypeFlagsEXT messageTypeFlags(vk::DebugUtilsMessageTypeFlagBitsEXT::eGeneral
                                                   | vk::DebugUtilsMessageTypeFlagBitsEXT::ePerformance
                                                   | vk::DebugUtilsMessageTypeFlagBitsEXT::eValidation);
  vk::DebugUtilsMessengerCreateInfoEXT debugUtilsInfo = {};
  debugUtilsInfo.messageSeverity = severityFlags;
  debugUtilsInfo.messageType = messageTypeFlags;
  debugUtilsInfo.pfnUserCallback = &debugCallback;
  vk::DebugUtilsMessengerEXT debugMessenger = instance.createDebugUtilsMessengerEXT(debugUtilsInfo);
#endif

...

#ifndef NDEBUG
  instance.destroyDebugUtilsMessengerEXT(debugMessenger);
#endif
Physical Device and Queue Families
Next, we implement the physical device.
...
#include <map>
...

int main() {
  ...
    auto physDevs = instance.enumeratePhysicalDevices();
  if (physDevs.empty()) {
    assert(false && "Vulkanを対応しているGPUを見つけられませんでした。");
    return -1;
  }

  std::multimap<int, vk::PhysicalDevice> physDevices;
  for (const auto &dev : physDevs) {
    auto devProp = dev.getProperties();
    auto devFeat = dev.getFeatures();
    uint32_t score = 0;

    if (devProp.deviceType == vk::PhysicalDeviceType::eDiscreteGpu) score += 1000;
    score += devProp.limits.maxImageDimension2D;
    if (!devFeat.geometryShader) continue;
    if (devProp.apiVersion < vk::ApiVersion13) continue;
    physDevices.insert(std::make_pair(score, dev));
  }

  if (physDevices.empty()) {
    assert(false && "良いGPUを見つけられませんでした。");
    return -1;
  }

  vk::PhysicalDevice physicalDevice = physDevices.rbegin()->second;
  ...
}
First, we enumerate all available physical GPUs (both discrete and integrated).
Then we examine them all and prioritize discrete GPUs and those with the largest maximum image dimensions.
We exclude GPUs that do not support geometry shaders or are too old to fully support Vulkan 1.3.
Feel free to adjust this according to your own needs.
This is just to give you an idea of the setup process.
A complete list of available device properties can be found here:
typedef struct VkPhysicalDeviceProperties {
    uint32_t                            apiVersion;
    uint32_t                            driverVersion;
    uint32_t                            vendorID;
    uint32_t                            deviceID;
    VkPhysicalDeviceType                deviceType;
    char                                deviceName[VK_MAX_PHYSICAL_DEVICE_NAME_SIZE];
    uint8_t                             pipelineCacheUUID[VK_UUID_SIZE];
    VkPhysicalDeviceLimits              limits;
    VkPhysicalDeviceSparseProperties    sparseProperties;
} VkPhysicalDeviceProperties;
The feature list is much longer, so please check it yourself.
Everything can be confirmed by opening vulkan_core.h.
On Windows it is usually located at C:\Vulkan\(current version)\Include\vulkan\vulkan_core.h
On Linux: /usr/include/vulkan/vulkan_core.h
On macOS and BSD: /usr/local/include/vulkan/vulkan_core.h
Next is the queue family check.
This allows further validation of the suitable GPU.
...
#include <ranges>
...
int main() {
  ...
  auto queueFamilies = physicalDevice.getQueueFamilyProperties();
  bool supportsGfx = std::ranges::any_of(queueFamilies, [](auto const &q) {
    return !!(q.queueFlags & vk::QueueFlagBits::eGraphics);
  });

  std::vector<const char *> reqDevExt = { vk::KHRSwapchainExtensionName };
  auto availDevExt = physicalDevice.enumerateDeviceExtensionProperties();
  bool supportAllExt = std::ranges::all_of(reqDevExt, [&availDevExt](auto const &reqDevExt) {
    return std::ranges::any_of(availDevExt, [reqDevExt](auto const &e) {
      return strcmp(e.extensionName, reqDevExt) == 0;;
    });
  });

  auto features = physicalDevice.template getFeatures2<vk::PhysicalDeviceFeatures2,
                                                       vk::PhysicalDeviceVulkan13Features,
                                                       vk::PhysicalDeviceExtendedDynamicStateFeaturesEXT>();
  bool supportReqFeature = features.template get<vk::PhysicalDeviceVulkan13Features>().dynamicRendering
                        && features.template get<vk::PhysicalDeviceExtendedDynamicStateFeaturesEXT>().extendedDynamicState;

  if (!supportAllExt || !supportsGfx || !supportReqFeature) {
    assert(false && "利用可能なGPUを見つけられませんでした。");
    return -1;
  }
  ...
}
Logical Device and Queues
Next, we create the logical device.
The logical device is what we actually interface with.
Since this article is getting quite long and there is still a lot left to do, I will stop the explanation here and continue in the later tutorial series.
  std::vector<vk::QueueFamilyProperties> queueFamProps = physicalDevice.getQueueFamilyProperties();
  auto gfxQueueFamProp = std::ranges::find_if(queueFamProps, [](auto const &q) {
    return (q.queueFlags & vk::QueueFlagBits::eGraphics) != static_cast<vk::QueueFlags>(0);
  });
  auto gfxIdx = static_cast<uint32_t>(std::distance(queueFamProps.begin(), gfxQueueFamProp));
  float queuePriority = .5f;

  vk::PhysicalDeviceFeatures2 baseFeatures{};
  vk::PhysicalDeviceVulkan13Features features13{};
  features13.dynamicRendering = true;
  features13.synchronization2 = true;

  vk::PhysicalDeviceExtendedDynamicStateFeaturesEXT extDynState{};
  extDynState.extendedDynamicState = true;

  vk::StructureChain<vk::PhysicalDeviceFeatures2,
                     vk::PhysicalDeviceVulkan13Features,
                     vk::PhysicalDeviceExtendedDynamicStateFeaturesEXT> featureChain = {
    baseFeatures,
    features13,
    extDynState,
  };

  vk::DeviceQueueCreateInfo devQueueCreateInfo = {};
  devQueueCreateInfo.queueFamilyIndex = gfxIdx;
  devQueueCreateInfo.queueCount = 1;
  devQueueCreateInfo.pQueuePriorities = &queuePriority;

  vk::DeviceCreateInfo devCreateInfo = {};
  devCreateInfo.pNext = &featureChain.get<vk::PhysicalDeviceFeatures2>();
  devCreateInfo.queueCreateInfoCount = 1;
  devCreateInfo.pQueueCreateInfos = &devQueueCreateInfo;
  devCreateInfo.enabledExtensionCount = static_cast<uint32_t>(reqDevExt.size());
  devCreateInfo.ppEnabledExtensionNames = reqDevExt.data();

  vk::Device device = physicalDevice.createDevice(devCreateInfo);
  VULKAN_HPP_DEFAULT_DISPATCHER.init(device);
  vk::Queue gfxQueue = device.getQueue(gfxIdx, 0);
  ...
  device.destroy();
  ...
Window Surface Creation
...
#if defined(_WIN64)
#define VK_USE_PLATFORM_WIN32_KHR
#elif defined(__APPLE__)
#define VK_USE_PLATFORM_METAL_EXT
#else
#define VK_USE_PLATFORM_XCB_KHR
#endif
#define GLFW_INCLUDE_VULKAN
#include <GLFW/glfw3.h>

#if defined(_WIN64)
#define GLFW_EXPOSE_NATIVE_WIN32
#elif defined(__APPLE__)
#define GLFW_EXPOSE_NATIVE_COCOA
#else
#define GLFW_EXPOSE_NATIVE_X11
#endif
#include <GLFW/glfw3native.h>
...
int main() {
  ...
  // Instance

#if defined(_WIN64)
  vk::Win32SurfaceCreateInfoKHR surfaceCreateInfo = {};
  surfaceCreateInfo.hinstance = GetModuleHandle(nullptr);
  surfaceCreateInfo.hwnd = glfwGetWin32Window(window);

  vk::SurfaceKHR surface = instance.createWin32SurfaceKHR(surfaceCreateInfo);
#elif defined(__APPLE__)
  vk::MetalSurfaceCreateInfoEXT surfaceCreateInfo = {};
  surfaceCreateInfo.pLayer = glfwGetCocoaWindow(window);

  vk::SurfaceKHR surface = instance.createMetalSurfaceEXT(surfaceCreateInfo);
#else
  vk::XcbSurfaceCreateInfoKHR surfaceCreateInfo = {};
  surfaceCreateInfo.connection = glfwGetX11Display();
  surfaceCreateInfo.window = glfwGetX11Window(window);

  vk::SurfaceKHR surface = instance.createXcbSurfaceKHR(surfaceCreateInfo);
#endif

  // Physical Device
  ...
  instance.destroySurfaceKHR(surface);
}
The reason for separating by platform is that GLFW can only be queried via the C API.
Most other people get the surface using the C API and then convert it to the C++ API, so information like the above is hard to find.
That's why I decided to write it separately for each OS.
We also create the presentation queue inside the logical device.
  ...
  std::vector<vk::QueueFamilyProperties> queueFamProps = physicalDevice.getQueueFamilyProperties();
  auto gfxQueueFamProp = std::ranges::find_if(queueFamProps, [](auto const &q) {
    return (q.queueFlags & vk::QueueFlagBits::eGraphics) != static_cast<vk::QueueFlags>(0);
  });

  uint32_t queueIdx = ~0;
  for (uint32_t q = 0; q < queueFamProps.size(); ++q) {
    if ((queueFamProps[q].queueFlags & vk::QueueFlagBits::eGraphics)
        && physicalDevice.getSurfaceSupportKHR(q, surface)) {
      queueIdx = q;
      break;
    }
  }

  if (queueIdx == ~0) {
    assert(false && "グラフィックと表示塞翁しているキューを見つけられませんでした。");
    return -1;
  }
  ...
Swapchain
#define NOMINMAX
...
#include <algorithm>
#include <limits>
...
  auto surfaceCapabilities = physicalDevice.getSurfaceCapabilitiesKHR(surface);
  std::vector<vk::SurfaceFormatKHR> availFormats = physicalDevice.getSurfaceFormatsKHR(surface);
  std::vector<vk::PresentModeKHR> availPresentModes = physicalDevice.getSurfacePresentModesKHR(surface);
  assert(!availFormats.empty());

  const auto formatIt = std::ranges::find_if(availFormats, [](const auto &format) {
    return format.format == vk::Format::eB8G8R8A8Srgb && format.colorSpace == vk::ColorSpaceKHR::eSrgbNonlinear;
  });

  vk::SurfaceFormatKHR swapChainFormat = formatIt != availFormats.end() ? *formatIt : availFormats[0];

  assert(std::ranges::any_of(availPresentModes, [](auto present) { return present == vk::PresentModeKHR::eFifo; }));
  vk::PresentModeKHR presentMode = std::ranges::any_of(availPresentModes, [](const vk::PresentModeKHR val) {
    return vk::PresentModeKHR::eMailbox == val;
  }) ? vk::PresentModeKHR::eMailbox : vk::PresentModeKHR::eFifo;

  if (surfaceCapabilities.currentExtent.width != std::numeric_limits<uint32_t>::max()) {
    swapChainExtent = surfaceCapabilities.currentExtent;
  } else {
    int width, height;
    glfwGetFramebufferSize(window, &width, &height);
    swapChainExtent.width = std::clamp<uint32_t>(width, surfaceCapabilities.minImageExtent.width, surfaceCapabilities.maxImageExtent.width);
    swapChainExtent.height = std::clamp<uint32_t>(height, surfaceCapabilities.minImageExtent.height, surfaceCapabilities.maxImageExtent.height);
  }

  uint32_t minImageCount = std::max(3u, surfaceCapabilities.minImageCount);
  if ((0 < surfaceCapabilities.maxImageCount) && (surfaceCapabilities.maxImageCount < minImageCount)) {
    minImageCount = surfaceCapabilities.maxImageCount;
  }

  vk::SwapchainCreateInfoKHR swapChainCreateInfo = {};
  swapChainCreateInfo.surface = surface;
  swapChainCreateInfo.minImageCount = minImageCount;
  swapChainCreateInfo.imageFormat = swapChainFormat.format;
  swapChainCreateInfo.imageColorSpace = swapChainFormat.colorSpace;
  swapChainCreateInfo.imageExtent = swapChainExtent;
  swapChainCreateInfo.imageArrayLayers = 1;
  swapChainCreateInfo.imageUsage = vk::ImageUsageFlagBits::eColorAttachment;
  swapChainCreateInfo.imageSharingMode = vk::SharingMode::eExclusive;
  swapChainCreateInfo.preTransform = surfaceCapabilities.currentTransform;
  swapChainCreateInfo.compositeAlpha = vk::CompositeAlphaFlagBitsKHR::eOpaque;
  swapChainCreateInfo.presentMode = presentMode;
  swapChainCreateInfo.clipped = true;

  vk::SwapchainKHR swapChain = device.createSwapchainKHR(swapChainCreateInfo);
  std::vector<vk::Image> swapChainImages = device.getSwapchainImagesKHR(swapChain);
...
  if (swapChain) device.destroySwapchainKHR(swapChain);
...
Image Views
Next are the image views.
...
  assert(swapChainImageViews.empty());

  vk::ImageSubresourceRange subrange = {};
  subrange.aspectMask = vk::ImageAspectFlagBits::eColor;
  subrange.levelCount = 1;
  subrange.layerCount = 1;

  vk::ImageViewCreateInfo imgViewCreateInfo = {};
  imgViewCreateInfo.viewType = vk::ImageViewType::e2D;
  imgViewCreateInfo.format = swapChainFormat.format;
  imgViewCreateInfo.subresourceRange = subrange;
  imgViewCreateInfo.components = {
    vk::ComponentSwizzle::eIdentity,
    vk::ComponentSwizzle::eIdentity,
    vk::ComponentSwizzle::eIdentity,
    vk::ComponentSwizzle::eIdentity,
  };

  for (auto &img : swapChainImages) {
    imgViewCreateInfo.image = img;
    swapChainImageViews.push_back(device.createImageView(imgViewCreateInfo));
  }
...
  for (auto &view : swapChainImageViews) device.destroyImageView(view);
  swapChainImageViews.clear();
...
Graphics Pipeline
shader.vert
#version 450

layout(location = 0) out vec3 fragColor;

vec2 pos[3] = vec2[](
  vec2(0.0, -0.5),
  vec2(0.5, 0.5),
  vec2(-0.5, 0.5)
);

vec3 col[3] = vec3[](
  vec3(1.0, 0.0, 0.0),
  vec3(0.0, 1.0, 0.0),
  vec3(0.0, 0.0, 1.0)
);

void main() {
  gl_Position = vec4(pos[gl_VertexIndex], 0.0, 1.0);
  fragColor = col[gl_VertexIndex];
}
shader.frag
#version 450

layout(location = 0) in vec3 fragColor;
layout(location = 0) out vec4 outColor;

void main() {
  outColor = vec4(fragColor, 1.0);
}
Windows
> C:\\Vulkan\\(current-version)\\Bin\\glslc.exe shader.vert -o vert.spv
> C:\\Vulkan\\(current-version)\\Bin\\glslc.exe shader.frag -o frag.spv
Linux
$ /usr/share/vulkan/bin/glslc shader.vert -o vert.spv
$ /usr/share/vulkan/bin/glslc shader.frag -o frag.spv
BSD + macOS
$ /usr/local/share/vulkan/bin/glslc shader.vert -o vert.spv
$ /usr/local/share/vulkan/bin/glslc shader.frag -o frag.spv
main.cc
...
#include <fstream>
...
static std::vector<char> readFile(const std::string &filename) {
  std::ifstream file(filename, std::ios::ate | std::ios::binary);
  if (!file.is_open()) {
    assert(false && "ファイルを開くに失敗。");
    return {};
  }

  size_t fileSize = (size_t)file.tellg();
  std::vector<char> buf(fileSize);
  file.seekg(0);
  file.read(buf.data(), fileSize);
  file.close();
  return buf;
}
...
  auto vertShader = readFile("vert.spv");
  if (vertShader.empty()) return -1;
  auto fragShader = readFile("frag.spv");
  if (fragShader.empty()) return -1;

  vk::ShaderModuleCreateInfo vertCreateInfo = {};
  vertCreateInfo.codeSize = vertShader.size() * sizeof(char);
  vertCreateInfo.pCode = reinterpret_cast<const uint32_t *>(vertShader.data());
  vk::ShaderModule vertShaderModule = device.createShaderModule(vertCreateInfo);

  vk::ShaderModuleCreateInfo fragCreateInfo = {};
  fragCreateInfo.codeSize = fragShader.size() * sizeof(char);
  fragCreateInfo.pCode = reinterpret_cast<const uint32_t *>(fragShader.data());
  vk::ShaderModule fragShaderModule = device.createShaderModule(fragCreateInfo);

  vk::PipelineShaderStageCreateInfo vertShaderStageInfo = {};
  vertShaderStageInfo.stage = vk::ShaderStageFlagBits::eVertex;
  vertShaderStageInfo.module = vertShaderModule;
  vertShaderStageInfo.pName = "main";

  vk::PipelineShaderStageCreateInfo fragShaderStageInfo = {};
  fragShaderStageInfo.stage = vk::ShaderStageFlagBits::eFragment;
  fragShaderStageInfo.module = fragShaderModule;
  fragShaderStageInfo.pName = "main";

  vk::PipelineShaderStageCreateInfo shaderStages[] = {
    vertShaderStageInfo,
    fragShaderStageInfo,
  };
...
  if (fragShaderModule) device.destroyShaderModule(fragShaderModule);
  if (vertShaderModule) device.destroyShaderModule(vertShaderModule);
...
Fixed Function
  std::vector<vk::DynamicState> dynStates = {
    vk::DynamicState::eViewport,
    vk::DynamicState::eScissor,
  };

  vk::PipelineVertexInputStateCreateInfo vertexInputInfo = {};

  vk::PipelineInputAssemblyStateCreateInfo inputAss = {};
  inputAss.topology = vk::PrimitiveTopology::eTriangleList;

  vk::Viewport viewport = {};
  viewport.x = 0.f;
  viewport.y = 0.f;
  viewport.width = static_cast<float>(swapChainExtent.width);
  viewport.height = static_cast<float>(swapChainExtent.height);
  viewport.minDepth = 0.f;
  viewport.maxDepth = 1.f;

  vk::Rect2D scissor = {};
  scissor.offset = vk::Offset2D{ 0, 0 };
  scissor.extent = swapChainExtent;

  vk::PipelineDynamicStateCreateInfo dynState = {};
  dynState.dynamicStateCount = static_cast<uint32_t>(dynStates.size());
  dynState.pDynamicStates = dynStates.data();

  vk::PipelineViewportStateCreateInfo viewportState = {};
  viewportState.viewportCount = 1;
  viewportState.pViewports = &viewport;
  viewportState.scissorCount = 1;
  viewportState.pScissors = &scissor;

  vk::PipelineRasterizationStateCreateInfo rasterizer = {};
  rasterizer.depthClampEnable = vk::False;
  rasterizer.rasterizerDiscardEnable = vk::False;
  rasterizer.polygonMode = vk::PolygonMode::eFill;
  rasterizer.cullMode = vk::CullModeFlagBits::eBack;
  rasterizer.frontFace = vk::FrontFace::eClockwise;
  rasterizer.depthBiasEnable = vk::False;
  rasterizer.lineWidth = 1.f;

  vk::PipelineMultisampleStateCreateInfo multisampling = {};
  multisampling.rasterizationSamples = vk::SampleCountFlagBits::e1;
  multisampling.sampleShadingEnable = vk::False;

  vk::PipelineColorBlendAttachmentState colorBlendAttachment = {};
  colorBlendAttachment.blendEnable = vk::True;
  colorBlendAttachment.srcColorBlendFactor = vk::BlendFactor::eSrcAlpha;
  colorBlendAttachment.dstColorBlendFactor = vk::BlendFactor::eOneMinusSrcAlpha;
  colorBlendAttachment.colorBlendOp = vk::BlendOp::eAdd;
  colorBlendAttachment.srcAlphaBlendFactor = vk::BlendFactor::eOne;
  colorBlendAttachment.dstAlphaBlendFactor = vk::BlendFactor::eZero;
  colorBlendAttachment.alphaBlendOp = vk::BlendOp::eAdd;
  colorBlendAttachment.colorWriteMask = vk::ColorComponentFlagBits::eR
                                      | vk::ColorComponentFlagBits::eG
                                      | vk::ColorComponentFlagBits::eB
                                      | vk::ColorComponentFlagBits::eA;

  vk::PipelineColorBlendStateCreateInfo colorBlending = {};
  colorBlending.logicOpEnable = vk::False;
  colorBlending.logicOp = vk::LogicOp::eCopy;
  colorBlending.attachmentCount = 1;
  colorBlending.pAttachments = &colorBlendAttachment;

  vk::PipelineLayoutCreateInfo pipelineLayoutInfo = {};
  pipelineLayoutInfo.setLayoutCount = 0;
  pipelineLayoutInfo.pushConstantRangeCount = 0;

  vk::PipelineLayout pipelineLayout = device.createPipelineLayout(pipelineLayoutInfo);
Pipeline Rendering
  vk::GraphicsPipelineCreateInfo pipelineInfo = {};
  pipelineInfo.stageCount = 2;
  pipelineInfo.pStages = shaderStages;
  pipelineInfo.pVertexInputState = &vertexInputInfo;
  pipelineInfo.pInputAssemblyState = &inputAss;
  pipelineInfo.pViewportState = &viewportState;
  pipelineInfo.pRasterizationState = &rasterizer;
  pipelineInfo.pMultisampleState = &multisampling;
  pipelineInfo.pColorBlendState = &colorBlending;
  pipelineInfo.pDynamicState = &dynState;
  pipelineInfo.layout = pipelineLayout;
  pipelineInfo.pNext = &pipelineRenderingCreateInfo;
  pipelineInfo.renderPass = nullptr;

  auto [result, pipeline] = device.createGraphicsPipeline(nullptr, pipelineInfo);
  if (result != vk::Result::eSuccess) {
    assert(false && "グラフィックパイプラインの設置にしっぱい。");
    return -1;
  }

  gfxPipeline = pipeline;
We have set the render pass to nullptr.
This is because we are using dynamic rendering instead of the old-style render pass.
Command Pool
  vk::CommandPoolCreateInfo poolInfo = {};
  poolInfo.flags = vk::CommandPoolCreateFlagBits::eResetCommandBuffer;
  poolInfo.queueFamilyIndex = queueIdx;

  vk::CommandPool cmdPool = device.createCommandPool(poolInfo);
Command Buffer
...
std::vector<vk::Image> swapChainImages;
vk::CommandBuffer cmdBuf;
vk::CommandBufferBeginInfo beginInfo;
std::vector<vk::ImageView> swapChainImageViews;
vk::Extent2D swapChainExtent;
vk::Pipeline gfxPipeline;
...
void transitionImgLayout(uint32_t imgIdx,
                         vk::ImageLayout oldLayout,
                         vk::ImageLayout newLayout,
                         vk::AccessFlags2 srcAccessMask,
                         vk::AccessFlags2 dstAccessMask,
                         vk::PipelineStageFlags2 srcStageMask,
                         vk::PipelineStageFlags2 dstStageMask) {
  vk::ImageSubresourceRange barrierSubres = {};
  barrierSubres.aspectMask = vk::ImageAspectFlagBits::eColor;
  barrierSubres.baseMipLevel = 0;
  barrierSubres.levelCount = 1;
  barrierSubres.baseArrayLayer = 0;
  barrierSubres.layerCount = 1;

  vk::ImageMemoryBarrier2 barrier = {};
  barrier.srcStageMask = srcStageMask;
  barrier.dstStageMask = dstStageMask;
  barrier.srcAccessMask = srcAccessMask;
  barrier.dstAccessMask = dstAccessMask;
  barrier.oldLayout = oldLayout;
  barrier.newLayout = newLayout;
  barrier.srcQueueFamilyIndex = VK_QUEUE_FAMILY_IGNORED;
  barrier.dstQueueFamilyIndex = VK_QUEUE_FAMILY_IGNORED;
  barrier.image = swapChainImages[imgIdx];
  barrier.subresourceRange = barrierSubres;

  vk::DependencyInfo depInfo = {};
  depInfo.dependencyFlags = {};
  depInfo.imageMemoryBarrierCount = 1;
  depInfo.pImageMemoryBarriers = &barrier;

  cmdBuf.pipelineBarrier2(depInfo);
}

void recordCmdBuf(uint32_t imgIdx) {
  cmdBuf.reset();
  cmdBuf.begin(beginInfo);


  transitionImgLayout(imgIdx,
                      vk::ImageLayout::eUndefined,
                      vk::ImageLayout::eColorAttachmentOptimal,
                      {},
                      vk::AccessFlagBits2::eColorAttachmentWrite,
                      vk::PipelineStageFlagBits2::eColorAttachmentOutput,
                      vk::PipelineStageFlagBits2::eColorAttachmentOutput);

  vk::ClearValue clearColor = vk::ClearColorValue(0.f, 0.f, 0.f, 1.f);
  vk::RenderingAttachmentInfo attachInfo = {};
  attachInfo.imageView = swapChainImageViews[imgIdx];
  attachInfo.imageLayout = vk::ImageLayout::eColorAttachmentOptimal;
  attachInfo.loadOp = vk::AttachmentLoadOp::eClear;
  attachInfo.storeOp = vk::AttachmentStoreOp::eStore;
  attachInfo.clearValue = clearColor;

  vk::RenderingInfo renderingInfo = {};
  renderingInfo.renderArea = vk::Rect2D{ {0, 0}, swapChainExtent };
  renderingInfo.layerCount = 1;
  renderingInfo.colorAttachmentCount = 1;
  renderingInfo.pColorAttachments = &attachInfo;

  cmdBuf.beginRendering(renderingInfo);
  cmdBuf.bindPipeline(vk::PipelineBindPoint::eGraphics, gfxPipeline);
  cmdBuf.setViewport(0, vk::Viewport(0.f, 0.f,
                                     static_cast<float>(swapChainExtent.width),
                                     static_cast<float>(swapChainExtent.height),
                                     0.f, 1.f));
  cmdBuf.setScissor(0, vk::Rect2D(vk::Offset2D(0, 0), swapChainExtent));
  cmdBuf.draw(3, 1, 0, 0);
  cmdBuf.endRendering();

  transitionImgLayout(imgIdx,
                      vk::ImageLayout::eColorAttachmentOptimal,
                      vk::ImageLayout::ePresentSrcKHR,
                      vk::AccessFlagBits2::eColorAttachmentWrite,
                      {},
                      vk::PipelineStageFlagBits2::eColorAttachmentOutput,
                      vk::PipelineStageFlagBits2::eBottomOfPipe);

  cmdBuf.end();
}
...
  vk::CommandBufferAllocateInfo allocInfo = {};
  allocInfo.commandPool = cmdPool;
  allocInfo.level = vk::CommandBufferLevel::ePrimary;
  allocInfo.commandBufferCount = 1;

  std::vector<vk::CommandBuffer> cmdBufs = device.allocateCommandBuffers(allocInfo);
  cmdBuf = cmdBufs.front();

  beginInfo.flags = vk::CommandBufferUsageFlagBits::eOneTimeSubmit;
...
Rendering and Presentation
  vk::Semaphore presentCompleteSemaphore = device.createSemaphore(vk::SemaphoreCreateInfo());
  vk::Semaphore renderFinishedSemaphore = device.createSemaphore(vk::SemaphoreCreateInfo());

  vk::FenceCreateInfo fenceInfo = {};
  fenceInfo.flags = vk::FenceCreateFlagBits::eSignaled;

  vk::Fence drawFence = device.createFence(fenceInfo);

  while (!glfwWindowShouldClose(window)) {
    if (glfwGetKey(window, GLFW_KEY_Q) == GLFW_PRESS) {
      glfwSetWindowShouldClose(window, true);
    }

    glfwPollEvents();

    auto fenceResult = device.waitForFences(drawFence, vk::True, UINT64_MAX);
    if (fenceResult != vk::Result::eSuccess) {
      assert(false && "フェンスまで待つに失敗。");
      break;
    }

    device.resetFences(drawFence);
    auto [acquireRes, imgIdx] = device.acquireNextImageKHR(swapChain, UINT64_MAX, presentCompleteSemaphore, nullptr);

    if (acquireRes == vk::Result::eErrorOutOfDateKHR || acquireRes == vk::Result::eSuboptimalKHR) continue;
    if (acquireRes != vk::Result::eSuccess) {
      assert(false && "次の画像の受け取りに失敗。");
      break;
    }

    recordCmdBuf(imgIdx);

    vk::PipelineStageFlags waitStage = vk::PipelineStageFlagBits::eColorAttachmentOutput;

    vk::SubmitInfo submitInfo = {};
    submitInfo.waitSemaphoreCount = 1;
    submitInfo.pWaitSemaphores = &presentCompleteSemaphore;
    submitInfo.pWaitDstStageMask = &waitStage;
    submitInfo.commandBufferCount = 1;
    submitInfo.pCommandBuffers = &cmdBuf;
    submitInfo.signalSemaphoreCount = 1;
    submitInfo.pSignalSemaphores = &renderFinishedSemaphore;

    gfxQueue.submit(submitInfo, drawFence);

    vk::SubpassDependency depend = {};
    depend.srcSubpass = vk::SubpassExternal;
    depend.dstSubpass = 0;
    depend.srcStageMask = vk::PipelineStageFlagBits::eColorAttachmentOutput;
    depend.dstStageMask = vk::PipelineStageFlagBits::eColorAttachmentOutput;
    depend.srcAccessMask = vk::AccessFlagBits::eNone;
    depend.dstAccessMask = vk::AccessFlagBits::eColorAttachmentWrite;

    vk::PresentInfoKHR presentInfo = {};
    presentInfo.waitSemaphoreCount = 1;
    presentInfo.pWaitSemaphores = &renderFinishedSemaphore;
    presentInfo.swapchainCount = 1;
    presentInfo.pSwapchains = &swapChain;
    presentInfo.pImageIndices = &imgIdx;

    vk::Result presentRes = gfxQueue.presentKHR(presentInfo);

    device.waitIdle();
  }
...
  if (device) device.waitIdle();
...
  if (presentCompleteSemaphore) device.destroySemaphore(presentCompleteSemaphore);
  if (renderFinishedSemaphore) device.destroySemaphore(renderFinishedSemaphore);
  if (drawFence) device.destroyFence(drawFence);
...
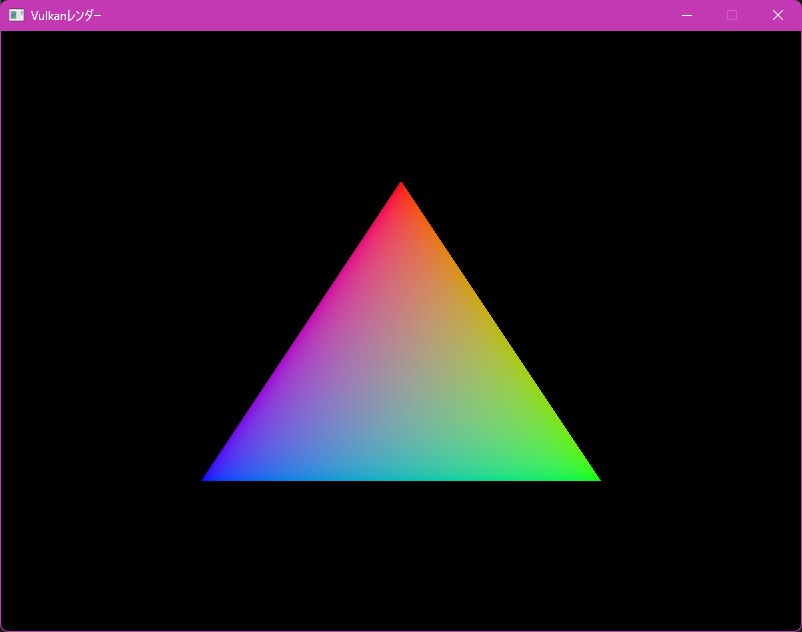
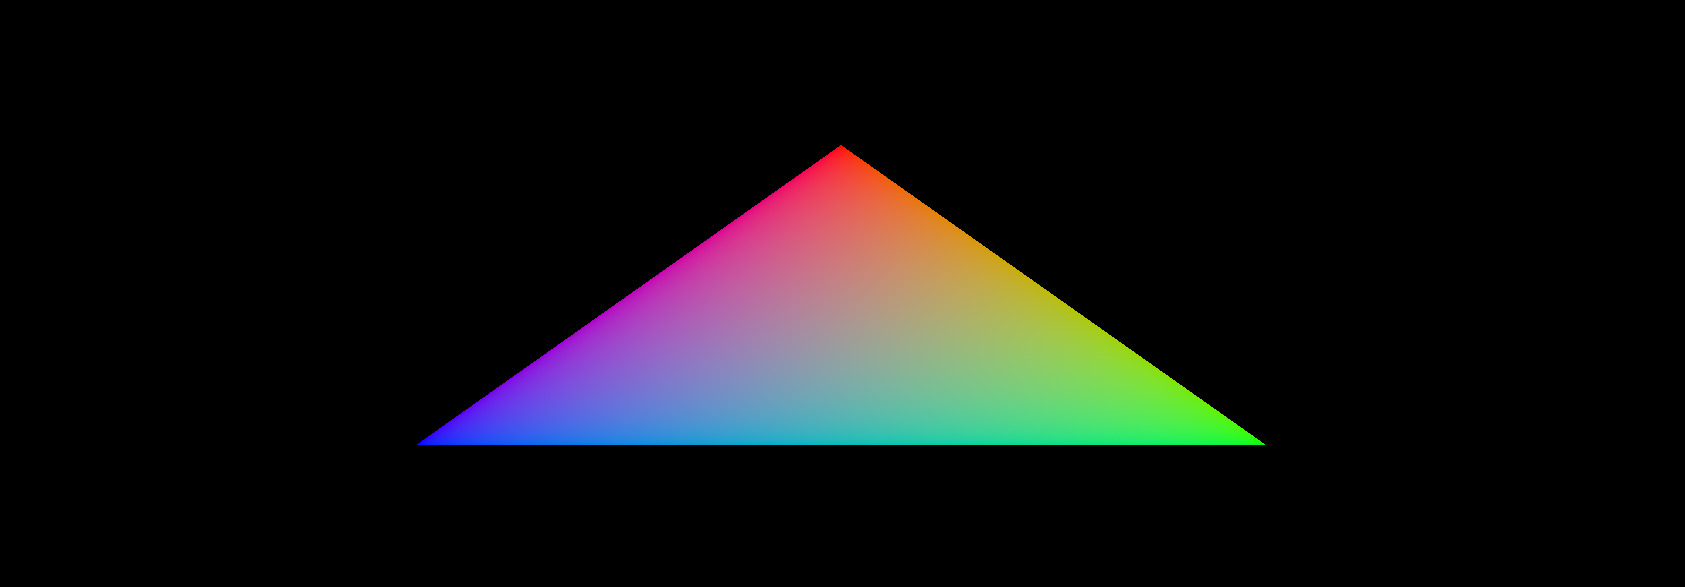
Finally, a triangle appears on the screen!
It only took 4 hours to make this.
A new record.
But this is not the end.
In fact, this is only the starting point.
Next time, we will set up frames in flight and swapchain recreation.
That's all