1. Introduction to GLSL Shader Programming
I've been building my own games with my own game engine for a while now.
This has let me explore many parts of game development beyond gameplay programming.
Of all of them, graphics programming is the one I enjoy the most.
That's why I'm writing a tutorial series on GLSL shader programming.
It comes right after the Linear Algebra for Graphics Programming series, which is the only thing you need to know before starting.
Vectors, the dot product, matrices and coordinate spaces will show up all the time here, and I'll link back to the linear algebra chapter whenever we use one of its ideas.
After this series comes the OpenGL series, and later the Slang and Vulkan series.
In this chapter we'll look at what a shader actually is, which shading languages exist, and then set up the small C program we'll use for the whole series: the GLSL tester.
1.1 What Are Shaders?
Shaders are programs that run on the GPU instead of the CPU.
They are essential to the rendering pipeline.
Without shaders, modern real-time rendering (e.g. 3D games) would not work the way we know it.
If you're a web developer, you can think of the graphics API as the browser engine, and of shaders as the CSS and JavaScript.
The big difference to a normal program is how often a shader runs.
A normal C function runs when you call it.
A shader runs once for every vertex or every pixel, thousands to millions of times per frame, and all of those runs happen in parallel on the GPU's many small cores.
Every run gets its own input (its own vertex, its own pixel position) and must produce its own output, without talking to the other runs.
The pipeline in one picture
When the C program asks the GPU to draw something, the data flows through a fixed chain of stages called the graphics pipeline.
Some stages are fixed hardware, and some are programmable: those are the shaders.
This is the pipeline of the GLSL tester we'll use in this series:
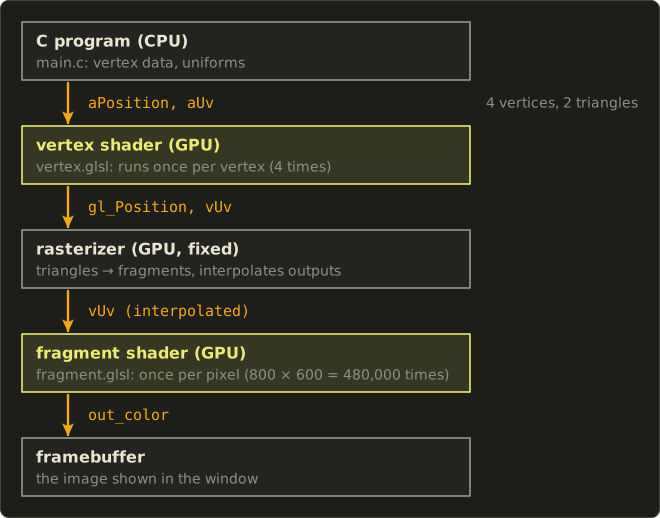
- The C program runs on the CPU. It sends the vertex data (4 corners of a rectangle covering the window) and a few values called uniforms (our colours) to the GPU.
- The vertex shader runs once per vertex. Its main job is to say where the vertex ends up on the screen.
- The rasterizer is fixed hardware. It finds out which pixels each triangle covers and blends (interpolates) the vertex shader's outputs for every pixel in between.
- The fragment shader runs once per pixel (more precisely, per fragment, a pixel candidate) and decides its colour.
- The result lands in the framebuffer, the image that is shown in the window.
The two yellow boxes are the programs we'll write.
In chapter 2 we'll meet the other, optional shader stages.
Shading languages
There are several shading languages, but the most common ones are GLSL (OpenGL Shading Language), HLSL (High-Level Shading Language) and MSL (Metal Shading Language).
GLSL has a C-like syntax, MSL has a C++-like syntax, and HLSL also has a C-like syntax, but with many Microsoft-specific conventions and keywords.
What you use depends on the graphics API and platform you're targeting.
If you're using Metal (only on macOS and iOS), you use MSL.
If you're using DirectX (only on Windows and Xbox), you use HLSL.
Interestingly, people using Unity or Unreal Engine write HLSL no matter which platform they target, and the engine automatically converts it to GLSL, SPIR-V or MSL for the non-Windows platforms.
PlayStation uses PSSL2 (PlayStation Shading Language) for its own AGC API.
If you're using OpenGL or Vulkan (Linux, BSD, Windows, Android, Haiku and many more), or NVN (Nintendo Switch), you use GLSL.
That's why we'll focus on GLSL here.
Vulkan doesn't actually read GLSL itself: it reads SPIR-V, a binary format that you compile from GLSL (or from HLSL or Slang) before the game runs.
Slang is a newer language that compiles to SPIR-V, HLSL, MSL and more from one source, which is why it gets its own series later.
Everything you learn here carries over directly, because the ideas (vectors, swizzles, per-pixel programs) are the same in every shading language.
Note: This series covers GLSL for OpenGL 4.5 Core (4.1 Core on macOS).
GLSL is used on many platforms, but the dialect differs a little between graphics APIs.
If you adapt the code for Vulkan, Android or WebGL, keep the differences in mind; chapter 2 shows them.
WebGPU, by the way, doesn't use GLSL at all: it has its own language, WGSL.
1.2 What We'll Build
Every chapter adds something you can see in the window.
Here is the whole series:
| Chapter | What you'll learn |
|---|---|
| 1. Introduction | What shaders are, setting up the GLSL tester |
| 2. GLSL Overview | Dialects, shader stages and the whole GLSL language: types, vectors, swizzles, matrices, functions |
| 3. Gradients | How the vertex and fragment shaders work together, mix, interpolation, animated colours |
| 4. Triangles and Lighting Part 1 | Drawing a triangle, light types, ambient and directional light with normals |
| 5. The Shader Playground | A full-screen playground with time, resolution and mouse uniforms and hot reload |
| 6. Shapes and Distance Functions | Drawing circles, boxes and lines with signed distance functions and anti-aliasing |
| 7. Transformations and Patterns | Moving, rotating and scaling coordinates, tiling, polar coordinates |
| 8. Randomness and Noise | Hash functions, value noise, gradient noise, fBm, Voronoi |
| 9. Lighting Part 2 | Specular highlights (Phong, Blinn-Phong) and point lights |
| 10. Lighting Part 3 | Spotlights, hemisphere and area lights, many lights, gamma correction |
| 11. Textures and Sampling | Creating a texture in C, sampling, filtering and wrap modes, image effects |
| 12. Normal Mapping | Detail without geometry, tangent space and the TBN matrix |
| 13. Vertex Shaders and 3D | A rotating cube with model, view and projection matrices, vertex animation |
| 14. Raymarching | A whole 3D scene drawn by the fragment shader alone |
| 15. Geometry, Tessellation and Compute | The remaining shader stages and when to use them |
How the chapters are organized
Each chapter follows the same pattern:
- A short explanation of the idea, with diagrams and the math in formulas.
- The code, step by step: the shader first, then the C changes when we need any, with a screenshot of every step taken from the real program.
- An explanation of every new GLSL feature and built-in function we used.
- How the technique is used in real games and engines.
- A summary, then challenges from ★ (pen and paper, or a one-line change) to ★★★ (think deeper or build something new). Each one tells you what the result should look like, so you can check yourself.
- When a chapter changes the project, a diff of all changes. The site shows it under the chapter, and you can download it and apply it inside the project folder with
git apply glslNN.diff(orpatch -p1 < glslNN.diff).
Chapters 1 and 2 don't change the project yet; they only edit the shader for a moment to try things out.
1.3 Getting Started
You can follow this series on any OS, but I'll copy a commercial work environment.
That means I assume you work on Windows with Visual Studio 2022 installed.
Download the starter project:
On Windows or macOS, download the ZIP file.
On BSD or Linux, download the TAR file.
On BSD and Linux, the unzip utility has a bug that corrupts non-English characters (the comments in the code are in Japanese).
That's why I recommend the tarball instead of the ZIP file there.
On Windows, I assume you use Visual Studio 2022 as the editor (the free Community edition works too).
On macOS, you could compile and run with the command-line tools, but I assume you use Xcode as the editor.
On Unix, I assume you use Neovim, but any editor will do.
Windows
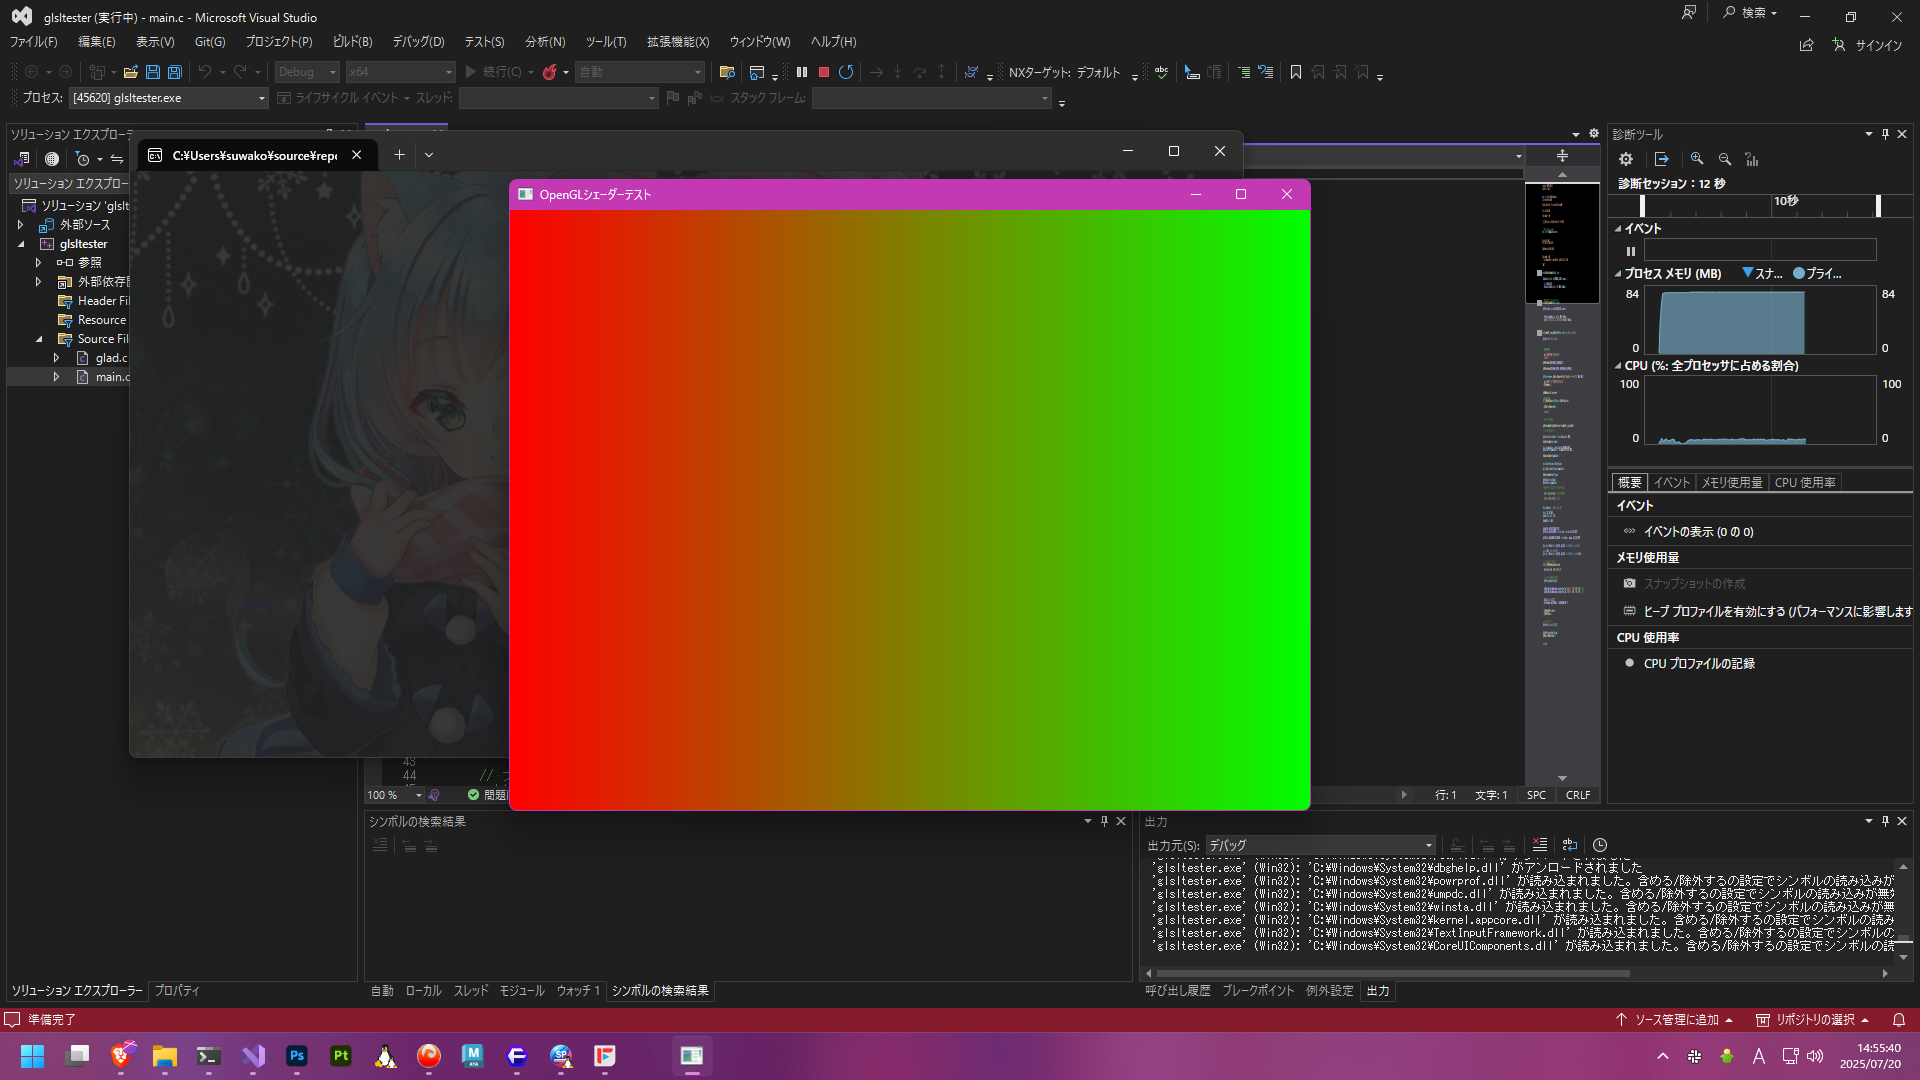
Extract the archive, open glsltester.sln and press F5.
You should see a window like this:
macOS
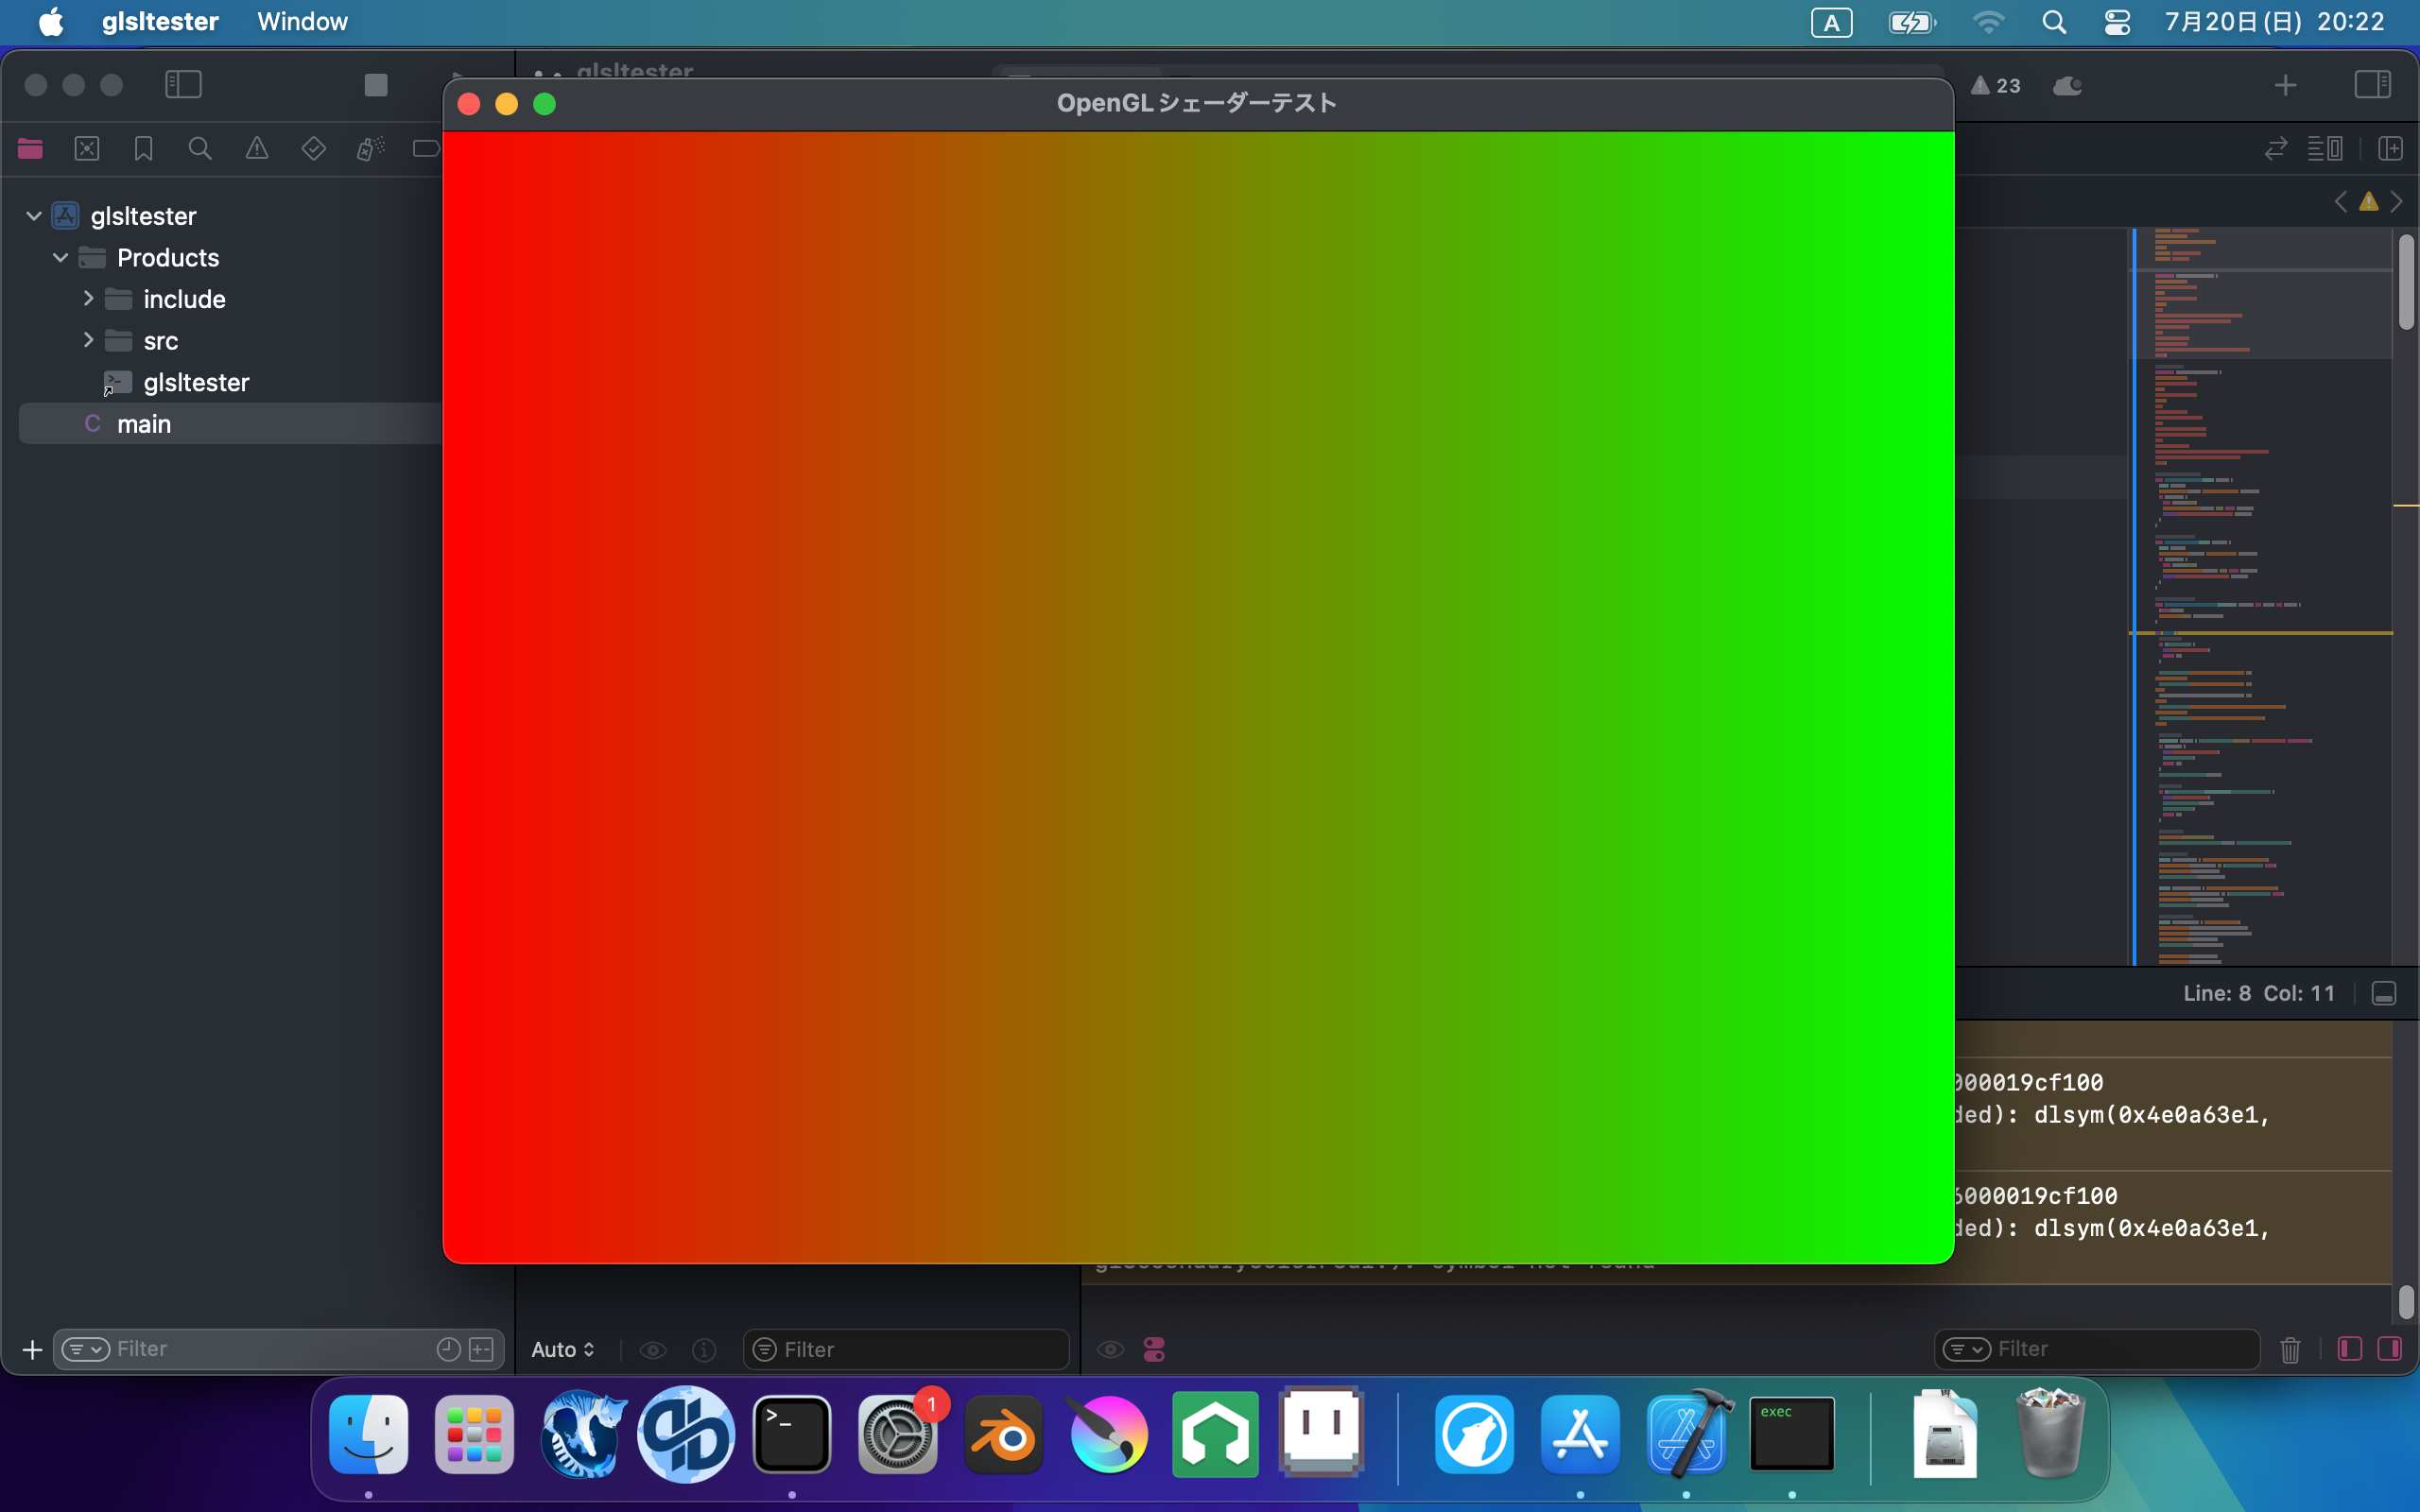
Extract the archive, open glsltester.xcodeproj and press CMD + R.
You should see a window like this:
Note: Apple never supported OpenGL newer than 4.1, and has marked OpenGL as deprecated since macOS 10.14.
That's whymain.casks for an OpenGL 4.1 context on a Mac, and why the Mac build loads its own shader files,shader/vertex.mac.glslandshader/fragment.mac.glsl, which start with#version 410 core.
This series uses GLSL 4.50, so whenever you see#version 450 corein my code, write#version 410 corein the.mac.glslfile instead.
Almost everything works the same; when something doesn't exist in 4.10 (for example compute shaders), I'll say so.
I set this up and tested it on a 2015 Intel MacBook Pro.
Apple Silicon Macs also provide OpenGL 4.1, but the libglfw.dylib in the project is an Intel-only build, so on an ARM Mac you'll need a GLFW built for ARM (for example from Homebrew) or build the project for Intel and run it with Rosetta 2.
I haven't tested that myself.
Unix
On Linux, FreeBSD, OpenBSD or NetBSD, install the OpenGL drivers and GLFW from your OS's package manager.
On FreeBSD:
pkg install glfwOn OpenBSD:
pkg_add glfwOn NetBSD:
pkgin install glfwOn Devuan or Debian:
apt install libglfw3-devFor other distributions, you'll have to figure it out yourself.
The build script build-unix.sh assumes your C compiler is called cc (Clang on the BSDs).
If it says cc wasn't found, edit build-unix.sh and change cc to gcc.
On NetBSD, pkgsrc installs into /usr/pkg, so also add -I/usr/pkg/include -L/usr/pkg/lib -Wl,-R/usr/pkg/lib to the compiler line.
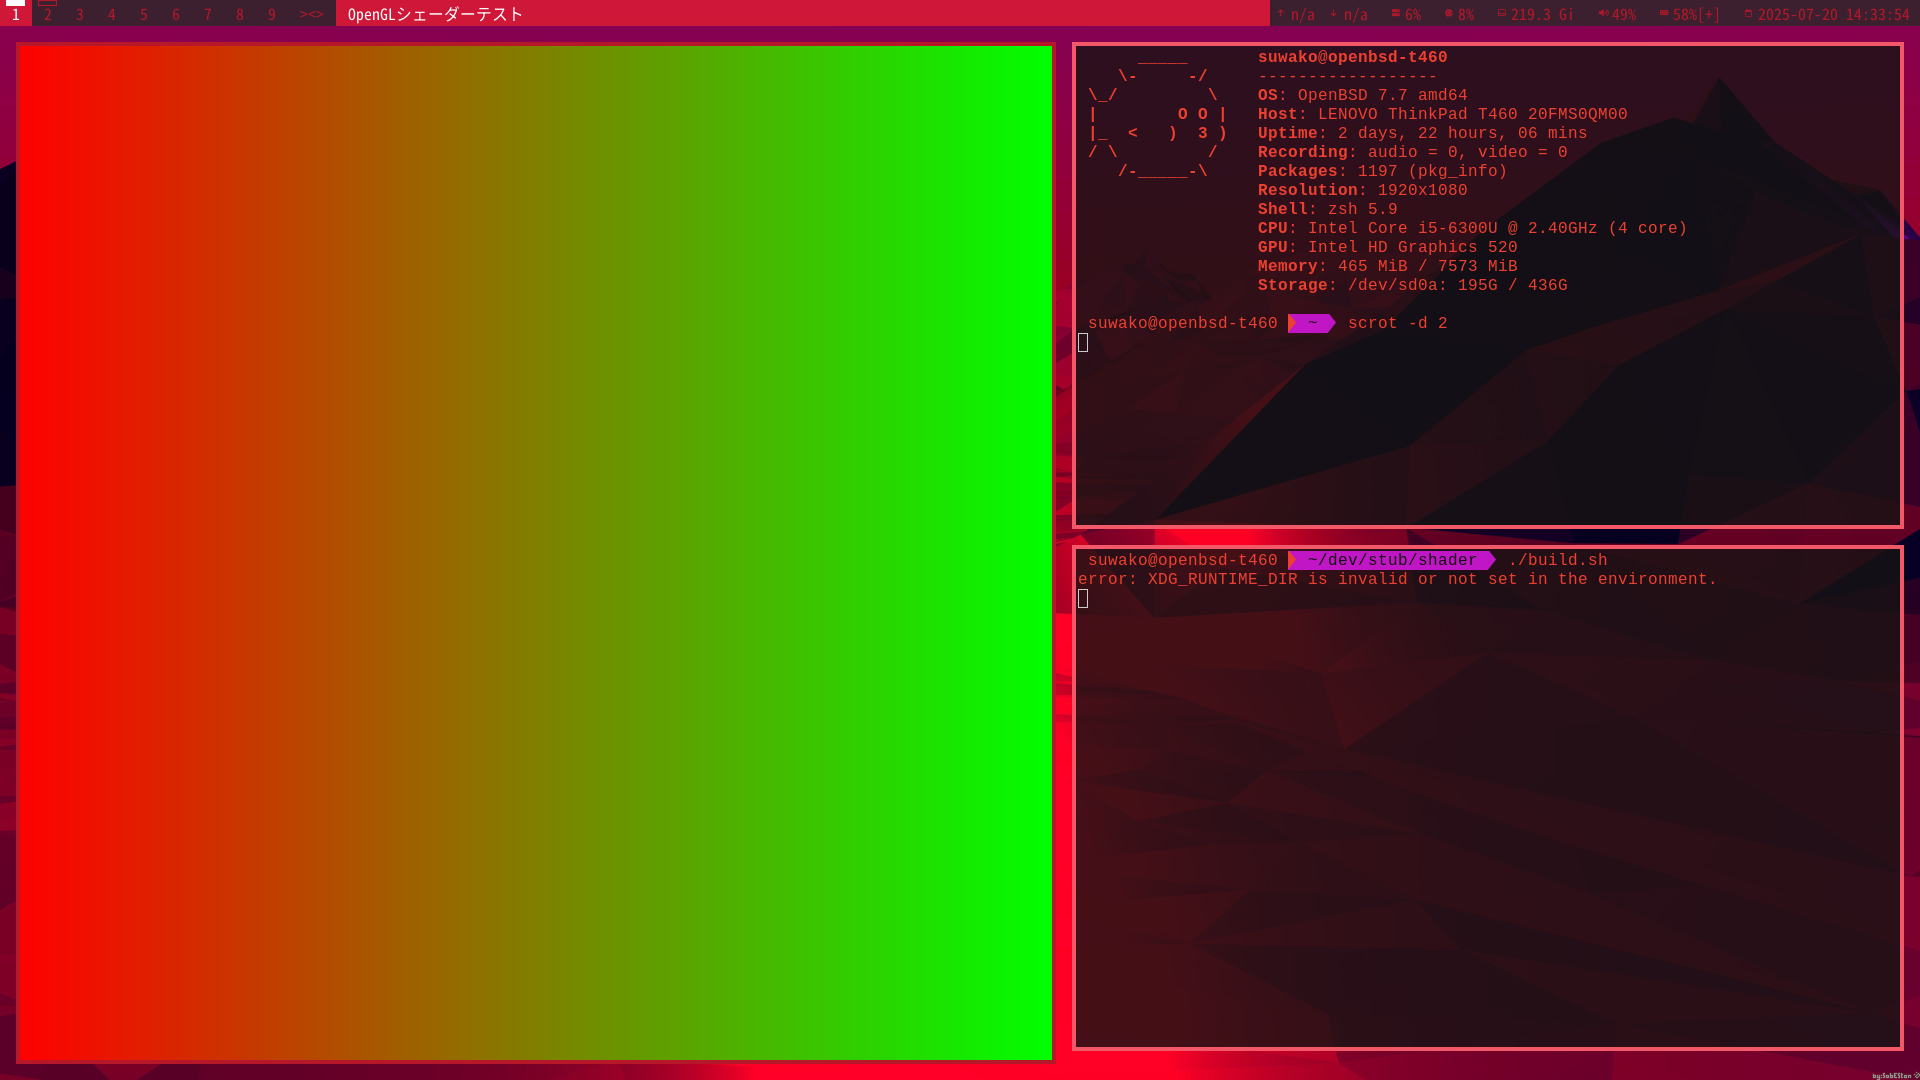
The script compiles the program and starts it right away:
tar zxfv glsltester.tar.gz
cd glsltester
chmod +x build-unix.sh
./build-unix.sh
You should see a window like this:
What you should see
The download already contains the finished code of the first chapters, so the colours in your window slowly change over time, and your window won't look exactly like my screenshots.
At one moment it looks like this:

On a Mac you'll see a gradient of two colours instead of three, because fragment.mac.glsl still contains the simpler two-colour version.
In chapter 3 we'll go through exactly how this picture and its animation are made.
1.4 A First Look at the Project
These are the files that matter:
glsltester/
  main.c                  the C program (window, OpenGL, uniforms)
  include/vector.h        tiny Vector2/3/4 types for C
  shader/vertex.glsl      vertex shader (Windows, Unix)
  shader/fragment.glsl    fragment shader (Windows, Unix)
  shader/vertex.mac.glsl    the same for macOS (GLSL 4.10)
  shader/fragment.mac.glsl
  build-unix.sh           build script for Unix
  glsltester.sln          Visual Studio project
  glsltester.xcodeproj    Xcode project
You don't need to worry about the whole code for now.
The most important parts are the shader files and these three lines in main.c:
    glUniform3f(glGetUniformLocation(shaderProgram, "uColorA"), colorA.r, colorA.g, colorA.b); // red
    glUniform3f(glGetUniformLocation(shaderProgram, "uColorB"), colorB.r, colorB.g, colorB.b); // green
    glUniform3f(glGetUniformLocation(shaderProgram, "uColorC"), colorC.r, colorC.g, colorC.b); // blue
This is how the C program hands values to the shaders.
glGetUniformLocation looks up a uniform variable by its name ("uColorA") in the compiled shader program and returns a number, its location.
glUniform3f then writes three floats to that location.
In the fragment shader, the same name appears as uniform vec3 uColorA;, a variable with three components that the shader can read but not change.
Two details are worth knowing right away:
- Colours on the GPU are floats from 0.0 to 1.0, not integers from 0 to 255. Red is (1.0, 0.0, 0.0), white is (1.0, 1.0, 1.0), 50% grey is (0.5, 0.5, 0.5).
- If the shader doesn't have (or doesn't use) a uniform with that name,
glGetUniformLocationreturns −1, andglUniform3fwith location −1 silently does nothing. That's why the Mac version works even thoughfragment.mac.glslhas nouColorC.
The values colorA, colorB and colorC are recalculated every frame from the time, which makes the colours move.
The comments red, green and blue are left over from when these were fixed colours.
For now, think of these lines as three colour knobs that the C program turns.
Now open shader/fragment.glsl (on a Mac, shader/fragment.mac.glsl):
#version 450 core

in vec2 vUv;
out vec4 out_color;

uniform vec3 uColorA;
uniform vec3 uColorB;
uniform vec3 uColorC;

void main() {
  vec3 temp = mix(uColorA, uColorB, vUv.x);
  vec3 blendedColor = mix(temp, uColorC, vUv.y * 0.95);
  out_color = vec4(blendedColor, 1.0);
}
This little program runs once for every pixel of the window, 800 × 600 = 480,000 times per frame.
vUv is the pixel's position on the rectangle, from (0, 0) in the bottom-left corner to (1, 1) in the top-right corner, and out_color is the colour the pixel gets.
We'll take every line apart in chapters 2 and 3.
1.5 Your First Change
Let's change the shader once, just to see that it works.
Replace the main function in fragment.glsl with this:
#version 450 core

in vec2 vUv;
out vec4 out_color;

void main() {
  out_color = vec4(1.0, 0.5, 0.0, 1.0);  // red, green, blue, alpha
}
The four numbers are red, green, blue and alpha (opacity).
Full red plus half green is orange, so every pixel becomes orange:

You don't need to recompile the C code for this, because the program reads the shader files every time it starts.
On Windows, just press F5 again (Visual Studio starts the program in the project folder, where shader/ is).
On macOS, press CMD + R again; Xcode copies the changed .mac.glsl files next to the program before starting it.
On Unix, just start ./glsltester again.
The uniforms uColorA, uColorB and uColorC are gone from this shader, but the C program still sets them.
As we saw above, that's no problem: their locations are −1 and the calls do nothing.
When the shader has an error
Now delete the semicolon at the end of the out_color line and start the program again.
The window stays black, and the console prints something like this:
シェーダーのコンパイルに失敗しました:
0:8(1): error: syntax error, unexpected '}', expecting ',' or ';'

プログラムのリンクに失敗しました:
error: linking with uncompiled/unspecialized shader
The first message (from checkShaderCompile in main.c) says "shader compilation failed", and the second one, "program link failed", follows from it.
0:8(1) means source 0, line 8, column 1.
Line 8 is the } after the broken line, because the compiler only notices the missing ; when it sees the next token.
The exact wording depends on your GPU driver (this one is from Mesa on Linux; NVIDIA, AMD, Intel and Apple each word it differently), but there is always a line number.
Get used to reading this log: you'll see it a lot.
Put the semicolon back (or the original shader) before you continue.
1.6 How This Is Used in Real Games
- Shaders are assets. Engines keep shaders as text files next to models and textures, exactly like our
shader/folder. With OpenGL they're compiled by the driver when the game starts or a level loads. - Compiling ahead of time. Vulkan and consoles compile shaders to binary (SPIR-V or the console's GPU code) at build time. The "compiling shaders" screen in many PC games is the driver turning that into code for your exact GPU, and saving it in a shader cache.
- Uniforms are material parameters. The colour pickers and sliders of a material in Unity or Unreal are uniforms, set from the CPU exactly like our
glUniform3flines. - Hot reload. Engines watch the shader files and reload them while the game runs, so artists see a change immediately. We'll build that into our tester in chapter 5.
- Generated shaders. Node-based material editors (Unreal's material editor, Unity's Shader Graph, Blender's shader nodes) generate shader code from the graph you draw. Knowing the language helps you understand what they produce and why something is slow.
1.7 Summary
- A shader is a program that runs on the GPU, once per vertex (vertex shader) or once per pixel (fragment shader), in parallel.
- The C program sends vertex data and uniforms; the vertex shader positions the vertices; the rasterizer interpolates their outputs; the fragment shader picks each pixel's colour.
- GLSL is used by OpenGL, Vulkan (through SPIR-V) and NVN; HLSL by DirectX, MSL by Metal, WGSL by WebGPU.
- This series uses GLSL 4.50 for OpenGL 4.5 Core; on a Mac, use
#version 410 corein the.mac.glslfiles. glGetUniformLocation+glUniform3fsend avec3uniform from C. Colours are floats from 0.0 to 1.0. An unknown or unused uniform has location −1, and setting it does nothing.- Shader changes don't need a C rebuild: restart the program. Compile errors are printed with a line number and the window stays black.
1.8 Challenges
- ★ Write the
vec4for these colours with alpha 1.0: yellow, cyan, magenta, white, black and 25% grey. Check two of them by putting them intoout_coloras in section 1.5. - ★ The window is 800 × 600 pixels and runs at 60 frames per second. How many times per second does the fragment shader run? Why would a CPU have a hard time doing the same work?
- ★★ In the original
fragment.glsl, swapuColorAanduColorBin the firstmix. The picture should look mirrored left to right: the colour that was on the left side is now on the right. - ★★ In the original
fragment.glsl, swapvUv.xandvUv.y. The gradient that went from left to right now goes from bottom to top, and the third colour now fills the right side instead of the top. - ★★ Stop the animation: in
main.c, replacecolorA.r, colorA.g, colorA.bwith1.0f, 0.0f, 0.0f, the B arguments with0.0f, 1.0f, 0.0fand the C arguments with0.0f, 0.0f, 1.0f, then rebuild. You should get a still picture: red at the bottom left, green at the bottom right and an almost pure blue along the top. - ★★ Break the shader on purpose in two different ways: misspell
out_colorasout_colour, and writevec3instead ofvec4in its declaration. Read the log each time. Which line does it point to, and does the message make sense? - ★★★ Change the window size in
glfwCreateWindowand in theglViewportcall right below it to 1024 × 512. Does the gradient stretch, or does it repeat? Explain why, using whatvUvis. What happens if you change onlyglfwCreateWindowbut forgetglViewport?
コメント(0)
まだコメントはありません。
ログインするとコメント出来ます。